


_______________________________________________________________________________________
9
Enable/Disable Onboard Mixer
Under the normal LCD manual display mode, press parameter knob 2 to enable/disable the Mixer.
Enable/Disable Onboard Metronome
Under the normal LCD manual display mode, press parameter knob 3 to enable/disable the
metronome. If metronome enabled, rotate parameter knob 3 to adjust the tempo speed or rotate
the parameter knob 4 to change the beat. Please note that the metronome tone will only go to True
Bypass Output when Mixer is enabled.
Enable/Disable EXT LOOP
During the sound patch setting, you can enable/disable EXT LOOP to make an additional external
guitar effect pedal connected or not connected in series with analog sound modules chain.
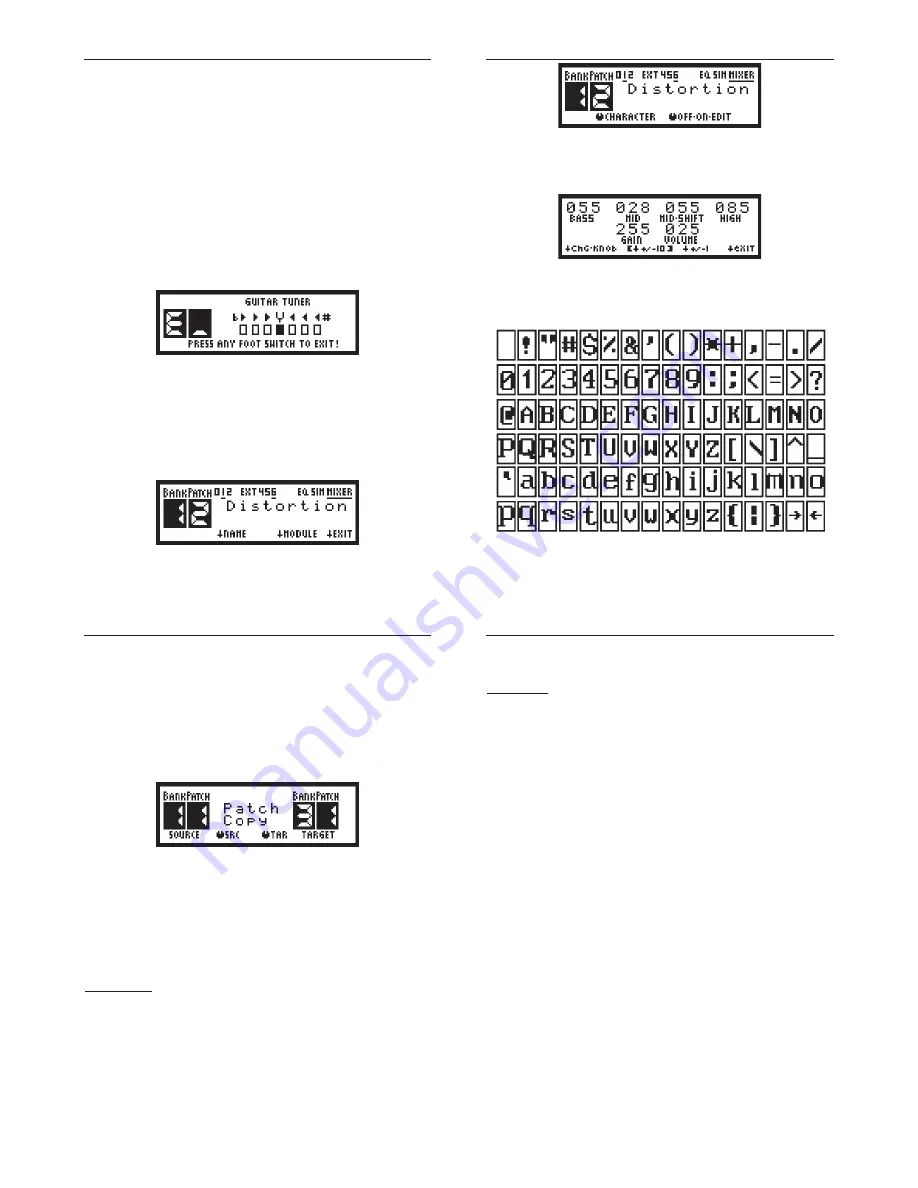
Tuning Your Guitar using Built-in Tuner
Step foot-switch 1 & 2 simultaneously to enter guitar tuner mode.
Play a single open note on the string being tuned, then a corresponding note name closest to the
pitch of the plucked string appears on LCD. During the tuning, the small rectangular icon will move
to left or right to indicate the played string pitch that is too high or too low. The string is in tune when
the small rectangular icon moves to center. Step any foot switch to exit when guitar tuning done.
Create, Edit and Save Your Own Sound Settings
1. Select your preferred Bank and Patch by stepping corresponding foot switch.
2. Press “SETUP” knob to enter sound patch edit mode.
_______________________________________________________________________________________
10
3. Press “MODULE” knob to select your preferred analog sound module, the corresponding
analog sound module name will be shown on LCD.
4. Rotate “OFF-ON-EDIT” knob to enable/disable the installed analog sound module or edit the
analog sound module settings.
5. Inside the sound module setting manual display, rotate the corresponding knob to adjust sound.
6. Press “+/- 10” or “+/- 1” knob to switch between Ten Increment/Decrement and One
Increment/Decrement.
7. Press “Chg.knob” to switch to other group of sound parameter control knobs.
8. Press “exit” knob to save your sound module settings and exit.
9. Repeat 3 to 8 for other analog sound module setting.
Characters Map
_______________________________________________________________________________________
11
10. Go to next step if you want to assign or edit patch name, otherwise press “EXIT” knob to save
all settings and exit.
11. Press “NAME” knob to switch to patch name edit mode.
12. Rotate “CHARACTER” knob to change the character, and then press this knob to confirm
current character and go for next character input.
13. Press “EXIT” to quit the edit mode, and all analog sound module settings and patch name will
be saved.
Patch Copy
With this useful function, you can move your predefined patch to wherever you want.
1. Make sure there is no patch engaged, then press “SETUP” knob to enter “Patch Copy” mode.
2. Rotate “SRC” knob to select source Bank/Patch.
3. Rotate “TAR” knob to select target Bank/Patch.
4. Press “Run” knob to copy source Bank/Patch settings into target Bank/Patch.
5. Press “EXIT” knob to exit “Patch Copy” mode.
Onboard and Plug-in Analog Sound Modules
There are two kinds of analog sound module: onboard module and plug-in module.
Onboard Modules
(1) 7-Band Global Equalizer
100Hz to 6.4KHz: adjust to boost or cut the corresponding frequencies.
VOLUME: set the output level.
(2) Speaker Simulator
The Speaker Simulator is very useful for standalone guitar sound recording or mixed sound
recording (using built-in mixer to mix both backing music and guitar sound) without the use of
microphone to pickup the sound from speaker cabinet or guitar power amplifier. It is also a cool
feature that the user can plug AGP-1 output directly to PA system for practice or onstage show.
_______________________________________________________________________________________
12
(3) Mixer
Mix the external audio, metronome tone and guitar signal together. Four control knobs are reserved
for the control of metronome volume, guitar balance, external signal level and master volume.
Plug-in Modules
(1) Compressor/NoiseGate
The Compressor/Noisegate divides the input signal into three portions.
|
------1------
|
noisegate
|
------2------
|
rotation
|
------3------
|
When the signal is smaller than noisegate (in portion 1), it will be cut and removed.
When signal is in between noisegate and rotation (in portion 2), it will be amplified with appropriate
gain to maintain smooth volume.
When signal is larger than rotation (in portion 3), it will be suppressed to maintain steady volume.
The use of Compressor/Noisegate module may be a bit complicated when compared with other
modules. Please follow below steps to get your preferred tone.
(a) Turn off all other modules. Only Compressor/Noisegate is ON.
(b) In the beginning, set Gain to 0, Noisegate to 255, Compression to 0, Rotation to 0.
(c) Use your finger to punch the guitar high E string (high frequency E) slightly and keep decreasing
(set to one decrement) Noisegate value. When you just hear string "clicking" noise, then stop
decreasing Noisegate value. This Noisegate value is your preferred triggering level of guitar input
signal.
(d) Set Compression value to 255. Strum guitar strings and increase Rotation value till you hear the
guitar sound volume that is getting louder rapidly. This Rotation value is the upper limit of signal
input. Any signal over this rotations point will be suppressed to maintain a steady guitar volume
output.
(e) For most of case, setting gain value to 0 is good enough. You are better not to set the value
over 5. Any values bigger than 5 are used for some small sensitive guitar pickup or other kind of
small signal input.
(f) Now you can set the Compression value to any value in between 0 to 255. Bigger value will have
longer guitar signal sustain. Bigger value will also have noise louder when guitar signal is getting
weak.
(g) You can repeat (c) to (f) to refine your settings.
(2) Overdrive
DRIVE: set signal gain.
TONE: set your preferred tone color, middle value 128 will filter both higher & lower frequencies
evenly. When the value is more close to 255, Tone control works more like a high-pass filter. When
the value is more close to 0, Tone control works more like a low-pass filter.
VOLUME: set output volume.


