19
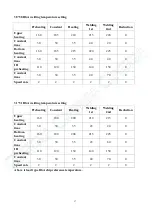
31*31 BGA welding temperature setting
Above is lead-free type BGA reference temperature
When remove the BGA chip, the temperature reduction is set at 0.
八、
Handling Precautions
1 . After opening the power, firstly you should check whether the upper and bottom
hot air nozzles
have cold wind.If not, starting the power is strictly prohibited.or the heaters will be burnt.The
bottom infrared heating areas are all controlled by switch, and you can choose the bottom heating
areas depend on the PCB
board size.
2 . You should set different temperature curves when repair different BGA,each temperature
should not higher than 300
℃;
Lead-free rework setting can refer to welding temperature curve of
BGA tin bead.
3. When demount BGA,the cooling fan and vacuum should be setted to automatic
transmission,the buzzer will warn automatically when temperature curve runs to the
end.Meanwhile, remove the BGA from PCB board with vacuum pen, and then remove the PCB
board from the positioning frame.
4 .When welding the BGA chip,set the cooling fan to manual grade
、
close vacuum.After the
temperature curve runs to the end, the buzzer will alarm automatically,the cooling fan begins to
cooling the BGA chip and bottom heating zone,meanwhile,the warm heating head will blow a
cold wind.Then elevate the upper heater,make the gap has 3 -5mm space between the bottom of
nozzle and the upper surface of BGA chip and keep cooling for 30-40 seconds,or move away the
main heater after the starting light is off,finally take away the PCB board from the support.
5. Before installation of BGA chip, it is necessary to check that if the PCB pad and BGA tin bead
are all in good condition.After welding, it have to check the exterior appearance by piece, if it is
Preheating
Constant
Heating
Welding
1st
Welding
2nd
Reduction
Upper
heating
165
190
220
240
245
235
Constant
time
30
30
35
40
20
15
Bottom
heating
165
190
220
240
245
235
Constant
time
30
30
35
40
20
15
IR
preheating
110
120
130
140
150
160
Constant
time
30
30
35
40
40
70
Speed rate
2
2
2
2
2
2


