Dimplex DWF-13 Series Service Manual Download Page 12

12 

            www.dimplex.com

the unit and your work surface, (i.e. cloth, cardboard, thick 

plastic) to avoid scratching your work surface.
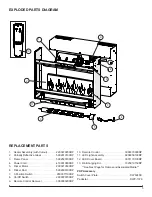
4.  Remove the ten screws around the outside flange of 

the end panel. (Figure 6)

5.  Remove the eight screws on the end panel. (Figure 7)
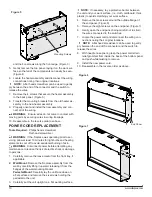
6.  Gently open the end panel, being careful not to strain 

the wires connected to the switches

7.  Remove the partially reflective glass by sliding it out of 

the unit.

8.  Remove the media and partially reflective glass support 

bracket, by removing the two center screws from the 

top of the bracket and the two screws from the closed 

end of the unit. (Figure 9)

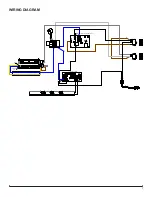
9.  Locate the flicker motor and flicker rod.
10. Locate and disconnect the three motor assembly wires 

going to the terminal block. (Figure 8)

11.  Remove the two motor mounting screws.
12. Separate the motor from the flicker connector and 

remove.

13. Slide the flicker rod out of the snap-in bushing and 

remove.

14. Reassemble in the reverse order as above.

Figure 9

Media Support 

Bracket

Summary of Contents for DWF-13 Series

Page 1: ...orth America Limited Dimplex North America Limited 1367 Industrial Road Cambridge ON Canada N1R 7G8 1 888 346 7539 www dimplex com REV PCN DATE 00 16 AUG 13 IMPORTANT SAFETY INFORMATION Always read th...

Page 2: ...llowed will expose the user to the risk of fire serious injury or death OPERATION 3 MAINTENANCE 4 EXPLODED PARTS DIAGRAM 5 REPLACEMENT PARTS 5 FRAMES AND MEDIA REPLACEMENT PARTS 6 WIRING DIAGRAM 7 3 P...

Page 3: ...position is for manual operation In this position the built in remote control is bypassed The II position is for operating the unit with the provided remote control When in II position the unit is op...

Page 4: ...these can be removed by dusting lightly with a clean dry cloth To remove fingerprints or other marks the Partially Reflective Glass can be cleaned with a damp cloth The Partially Reflective Glass sho...

Page 5: ...0800RP 5 Flicker Motor 2000210500RP 6 Flicker Rod 5902600100RP 7 3 Position Switch 2800071100RP 8 On Off Switch 2800070700RP 9 Remote Control Receiver 3000380200RP 10 Remote Control 3000370900RP 11 LE...

Page 6: ...1 Trim 6908820138RP 2 Walnut Tray 1124800138RP 3 River Rock Media 1400080100RP DWF 1327B 1 Trim 690885010FRP 2 Black Media Tray 1025770159RP DWF 5328B 1 Trim 690888010FRP 2 Silver Media Tray 102577020...

Page 7: ...7 WIRING DIAGRAM F L1 N F F T T F T T F P P P F P L N L IN L OUT N BOTTOM TYP TOP TYP REMOTE CONTROL RECEIVER BOARD LED DRIVER BOARD...

Page 8: ...and Figure 3 push the switch out through the opening 8 Properly orient and insert the new switch and connect all of the wiring 9 Reassemble in the reverse order as above HEATER ON OFF SWITCH REPLACEM...

Page 9: ...n WARNING Disconnect power before attempting any maintenance to reduce the risk of electric shock or damage to persons 1 Carefully remove the loose media from the front tray if applicable 2 Wall Mount...

Page 10: ...o reduce the risk of electric shock or damage to persons 1 Carefully remove the loose media from the front tray if applicable 2 Wall Mount Remove the fireplace assembly from the wall by carefully lift...

Page 11: ...mbly from the wall by carefully lifting it upward releasing it from the flanges of the wall mounting bracket Pedestal Mount Carefully lay the unit face down on a flat surface and remove the six screws...

Page 12: ...iding it out of the unit 8 Remove the media and partially reflective glass support bracket by removing the two center screws from the top of the bracket and the two screws from the closed end of the u...

Page 13: ...the touch Appearance Fireplace does not turn on Manu ally Improper operation Refer to Operation Section No incoming voltage from the electrical wall socket Check Fuse Breaker Panel Loose wiring Check...

Page 14: ...accumulated during manufacturing or operation Defective Heater Assembly Replace Heater Assembly Heater fan turns on but heater lacks heat Loose wiring Trace wiring in unit Defective heater assembly R...

Reviews: