Operation
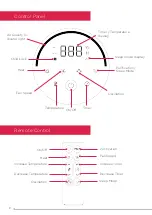
When the power is connected, flick the power switch at the back of the unit to turn
the device on. You can select different modes by pressing the keys/buttons on the
control panel and/or remote control.
1. After the power switch is turned on, press the
ON/OFF
button to start the de-
vice and begin using the functions. When this button is first pressed, the unit will
automatically begin to work in the low fan speed setting. To turn off the device,
simply press the
ON/OFF
button again, and this will bring the unit back to stand-
by state. This unit has an automatic memory function, so after the first use of the
device, when you click the
ON/OFF
button to switch on the fan, it will remember
the state it was in when switched off.
2. Press the
HEAT
button to allow the device to start producing warm air. There
are three heat settings, being low, medium and high. Press this button to rotate
between the heat settings to find your desired level. The display screen will show
'H1' for low heat, 'H2' for medium heat and 'H3' for high heat. In this state, the in-
dicator light will display red colouration.
3. Press the
FAN SPEED
button to allow the device to start producing cool air.
There are five fan speeds within this unit. Press this button to rotate between the
speeds. The display will show 'C1' for the first setting, 'C2' for the second setting,
'C3' for the third setting, 'C4' for the fourth setting and 'C5' for the fifth setting.
'C1' is the slowest fan speed, ranging up to 'C5' being the fastest. In this state, the
indicator light will display blue colouration.
4. Press the
OSCILLATION
button to enable the fan to swing 90° left to right whilst
working in
HEAT
or
FAN SPEED
modes. Press this button again to turn this func-
tion off. Press and hold this button for three seconds to turn on/off the
CHILD
LOCK
function. In this function, buttons will be invalid until the child lock is
turned off again.
5. Press the
TIMER
button to set a timer for the running time of your desired
FAN
SPEED
or
HEAT
setting. This button is used to set the timer and also can be used
to check the remaining time left when already set. You are able to set a timer
between 1-12 hours. To cancel the timer before the allocated time has ended, hold
this button for five seconds. Once the timer is complete, the device will automati-
cally go into standby mode.
6. Press the
TEMPERATURE
button to set your desired temperature when in any of
the
HEAT
settings. This button can be used to set desired temperature and also
check the currently set temperature when already using this function. The tem-
perature can be set between 15°C and 35°C, with the nine options being 15°C,
20°C, 22°C, 24°C, 26°C, 28°C, 30°C and 35°C. Press this button to rotate between
the temperature settings. To cancel this setting, press the button for five seconds,
and the temperature will turn off. The device will show the ambient temperature
on the display when no temperature setting is chosen. When the ambient tem-
perature is higher than the set temperature, the heat setting will suspend itself
until the ambient temperature is lower than the set by 2°C. It will then be turned
on again.
10


