background image

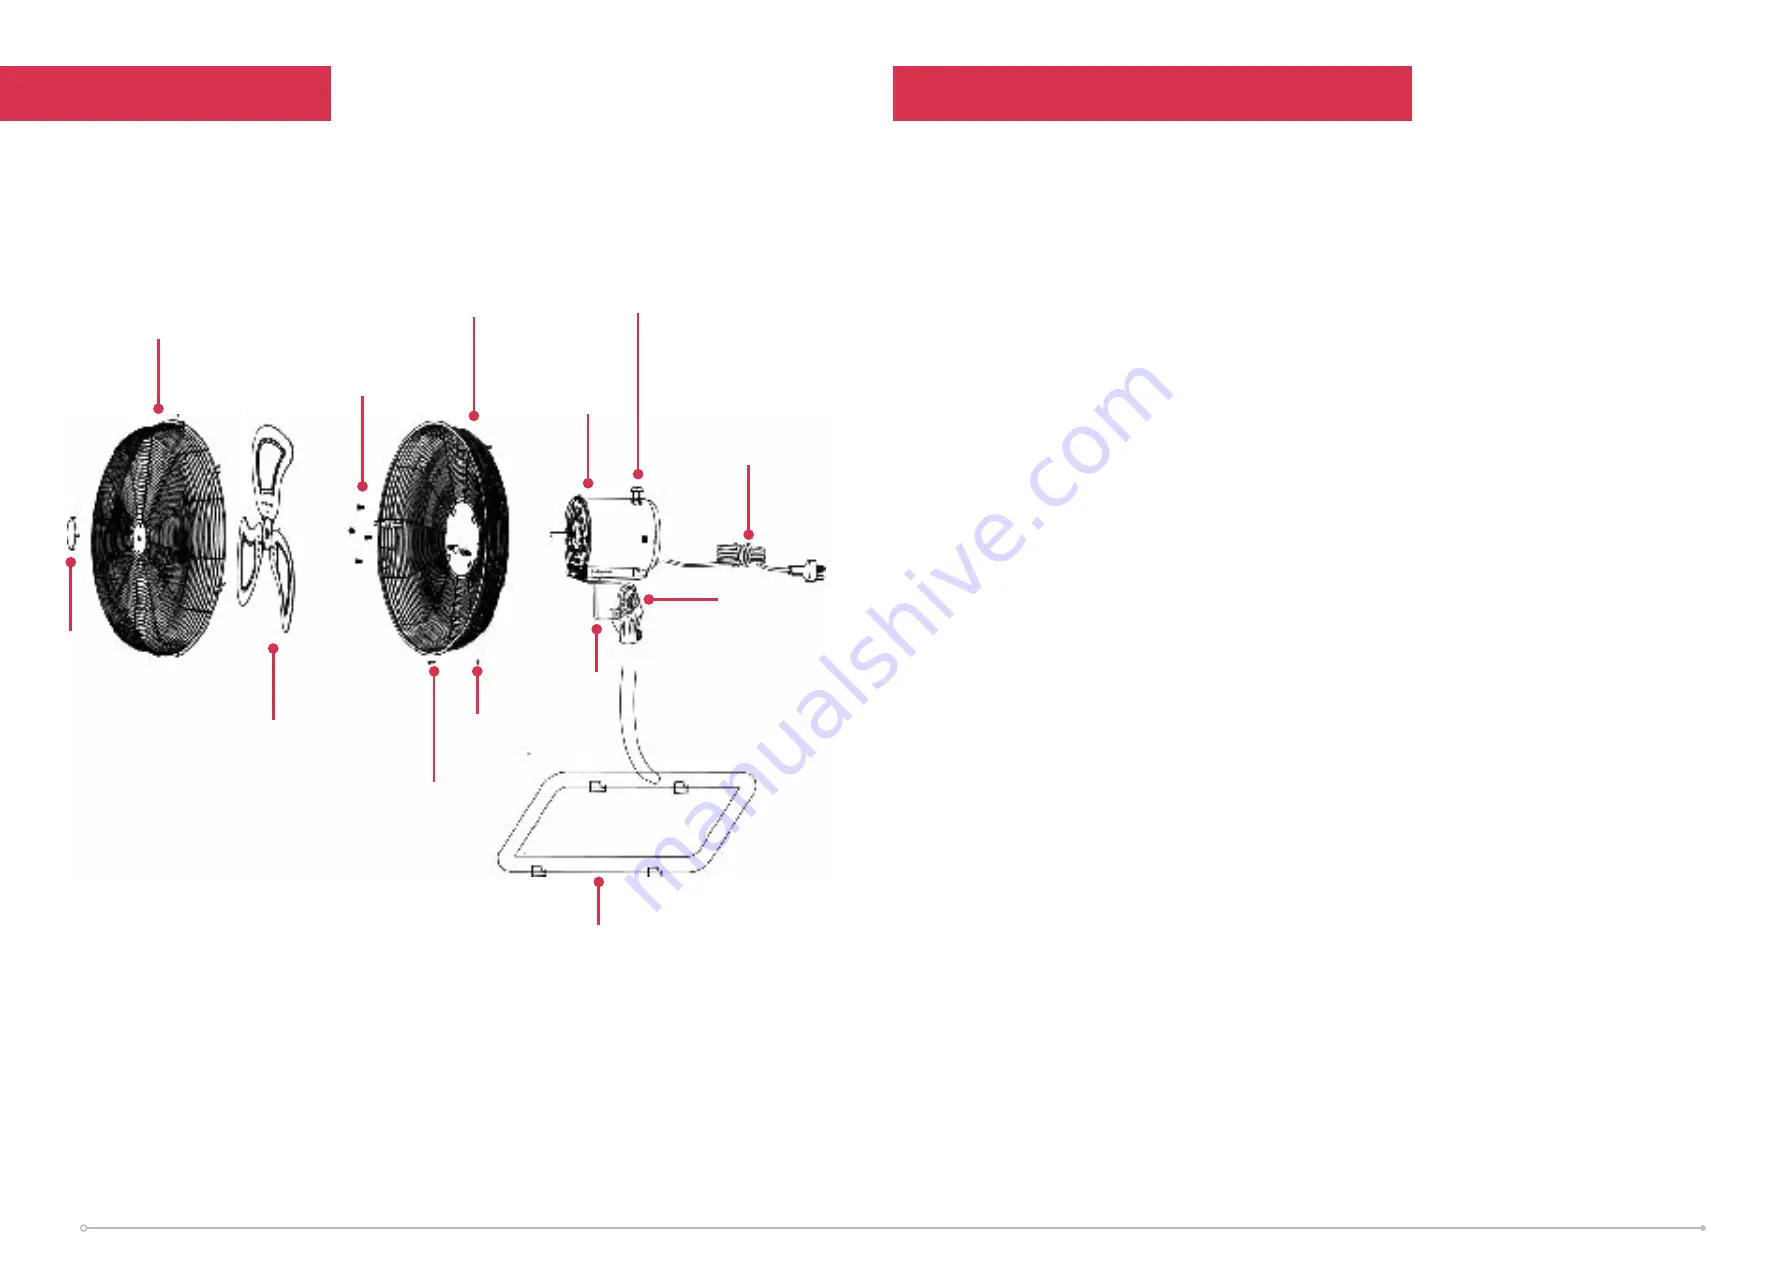
Parts

Assembly

This fan has been partially assembled to reduce wastage of packaging material, 
paper cartons and weight. To assemble the fan grilles, blades and base, please follow 
the instructions below:

1.  Remove the protective sleeve (if any) from the motor shaft (8).
2.  Remove the four rear guard retaining screws (6) from the motor housing (8).
3.  Using a Phillips head screwdriver (not supplied), attach the rear grille (7) to the 

motor housing (8) using the four screws (6), you just removed.   


Ensure the handle is at the top. 

4.  Place the fan blade (3) over the motor shaft (8) so that the blade retaining screw 

on the fan blade shaft sits behind the blade. Tighten the screw securely against 
the flat part of the motor shaft (8).

5.  Remove the front grille rim screw (4) and nut (5) from the front grille (2)  and 

open the clips around the outside edge of the front grille (2), turning them 
outwards.

6.  Hang the front grille (2) by its hook over the top of the rear grille (7), making sure 

the holes for the front grille rim screw (4) and nut (5) are aligned. Bring the front 
grille (2) down to meet the rear grille (7) and push the clips inwards until the 
front grille (2) is fastened to the rear grille (7). Finally fit the front grille rim screw 
(4) and nut (5) through the holes in the bottom edge of the guard and tighten 
with a small Phillips head screwdriver (not supplied).

7.  Place the stand base (13) on the floor in front of you with the long part of the 

stand tube (13) at the front so that the end of the tube stand points to the back.

8.  Take the fan head assembly (with the front towards you) and push the opening of 

the fan neck firmly onto the top of the stand base (13) as far as it will go.

9.  Tighten the lock nut (12) to secure the parts together.

CAUTION:

 If you install the fan head assembly the wrong way onto the stand tube, 

the fan could turn over when tilting the fan head.

1. Logo ring

2. Front grille

3. Blade

4. Front grille 

screw

5. Front 

grille nut

6. Motor housing 

screws

7. Rear grille

8. Motor 

9. Oscillation 

knob

10. Power 

cord

12. Lock nut

11. Neck

13. Stand

7

6

Summary of Contents for DCFF40CH

Page 1: ...For domestic household use only INSTRUCTION MANUAL 40cm HV Floor Fan Model DCFF40CH DCFF40MBK ...

Page 2: ...ing strap or pulling lead To avoid a fire or electrocution hazard NEVER put the cord near heat registers radiator stoves or heaters DO NOT cover cord with carpeting throw rugs runners or similar coverings DO NOT route cord under furniture or appliances Take care to position the cord away from traffic areas and where it will not be a tripping hazard DO NOT use the unit near windows or where water c...

Page 3: ... there is a risk of water falling on the unit Where there is a risk of interference by foreign objects This product is not made for DIY repair Model no DCFF40CH DCFF40MBK Colour Chrome Matte Black Power supply 220 240V 50 60Hz Rated power 70W Speed settings 3 Modes Timer Air volume 76m3 min Adjustable height Tilt adjustable head Y Horizontal oscillation Y Noise level 60dB A Weight net 3 6kg Dimens...

Page 4: ...er the top of the rear grille 7 making sure the holes for the front grille rim screw 4 and nut 5 are aligned Bring the front grille 2 down to meet the rear grille 7 and push the clips inwards until the front grille 2 is fastened to the rear grille 7 Finally fit the front grille rim screw 4 and nut 5 through the holes in the bottom edge of the guard and tighten with a small Phillips head screwdrive...

Page 5: ...available If electrical appliances are disposed of in landfills or dumps hazardous substances can leak into the ground water polluting the food chain and damaging health and well being Warranty Please refer to the warranty card in the box for warranty information For any troubleshooting advice please contact the relative Customer Care Centre below Glen Dimplex Australia Pty Ltd Glen Dimplex New Ze...

Page 6: ...plied by Glen Dimplex Australia 8 Lakeview Drive Scoresby Victoria 3179 Glen Dimplex Australia All rights reserved Material contained in this publication may not be reproduced in whole or in part without prior permission in writing of Glen Dimplex Australia DCFF40CH DCFF40MKB REV1 10 ...

Reviews: