14
www.dimplex.com
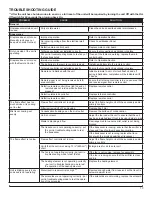
PROBLEM
CAUSE
SOLUTION
Appearance Continued
Flame effect will not start
- unit being operated with
refill bottle
Improper operation
Mist will begin emitting out of the unit after 45 sec-
onds of operation
Low water level indicator and lights continu-
ously blink twice **
Turn the unit off with the On/Off switch, refill the refill
container and turn the unit back on
Ensure that water bottle is level and positioned so
that the water can easily flow to the water reservoir
Manually fill the reservoir to the maximum line and if
issues persists replace the level sensor assembly
Water in unit is too cold
Allow water to warm to room temperature.
Cord is located over emitter on transducer
Relocate cord so that mist is free to rise off of trans-
ducer.
Transducer is not installed correctly
Ensure that the connection has clicked into place
If using distilled or reverse osmosis water, unit
will not produce a consistent mist
Add 1/8 tsp of table salt to water reservoir to intro-
duce electrolytes, only repeat when mist is not being
produced correctly
The transducer is not operating correctly - put
the unit in troubleshooting mode to test
the transducer
If the transducer is running, ensure that the emitter is
clean and free of calcium deposits or scaling
If the transducer is not running, replace the trans-
ducer with the provided additional transducer
The fan is not operating correctly - put unit in
troubleshooting mode to test the fan
If the fan is not running, replace fan assembly
If the fan is running, ensure that the air filter is clean
and dry
The heating element is not operating correctly
Replace the heating element
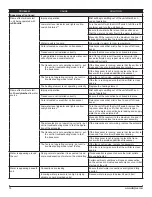
Flame effect will not start -
unit
hard plumbed
to water
source
Improper operation
Mist will begin emitting out of the unit after 45 sec-
onds of operation
Transducer is not installed correctly
Ensure that the connection has clicked into place
Cord is located over emitter on transducer
Relocate cord so that mist is free to rise off of trans-
ducer.
Low water level indicator and lights continu-
ously blink twice **
Turn the unit off with the On/Off switch, remove the
top cover assembly, verify that ball valve is open,
none of the water connections are leaking and supply
water has not been turned off
Manually fill the reservoir to the maximum line and if
issues persists replace the level sensor assembly
The solenoids are not operating correctly - put
unit in troubleshooting mode to test the opera-
tion of the solenoids
If the solenoids are not working, replace the solenoid
The transducer is not operating correctly - put
the unit in troubleshooting mode to test
the transducer
If the transducer is running, ensure that the emitter is
clean and free of calcium deposits or scaling
If the transducer is not running, replace the trans-
ducer with the provided additional transducer
The fan is not operating correctly - put unit in
troubleshooting mode to test the fan
If the fan is not running, replace fan assembly
If the fan is running, ensure that the air filter is clean
and dry
Water is appearing around
the unit
During normal operation it is expected to see
some condensation of water on the media tray.
If condensation is present ensure that mist outlets
are unobstructed
Certain ambient conditions will cause condensation
on the unit and in most cases will only occur on initial
start up of the unit
Water is appearing beneath
unit
Connections are leaking
Ensure that all water connections are tight and fully
inserted
Incoming water pressure is too high (only ap-
plicable on hard plumbed units)
Reduce water pressure to below 58 psi (8 bar)

