background image

Aquatic Fitness System 

2003


Owner’s Manual


9.  Close all jets, by turning jet faces counter clockwise.   


10.  Put on your protective goggles in order to protect eyes from air, water, antifreeze or debris exiting 

the jets or drains. 


11.  Insert the hose of a high-pressure air blower into the filter element fitting.  Some models may have 2 

filters.  Begin with the left-hand filter fitting, which will help evacuate water from the circulation pump 
system.  Then proceed to the right-hand filter fitting.  When using air blower on single-filter systems 
or the right-hand fitting on dual filter systems, rotate each of the jet faces clockwise to open and 
counter-clockwise to close again.  Do this to each jet face, one jet at a time.  Be careful, as water will 
be coming out of each jet fitting as you perform this maneuver.  Perform this operation, until no 
more water is coming from the jets. 


12.  Remove jet faces and insert the hose of a high-pressure air blower into each jet fitting.  Continue this 

process, until no more water comes out of any jet fitting or drain fitting and you no longer hear 
water gurgling within the plumbing.  Place all jet faces in a plastic bag and set aside until you are ready 
to use your system again. 


13.  Remove both bleeder valves from the top of the filter canister area. Place hose of a high-pressure air 

blower into the rear-most bleeder fitting first. Confirm that water mist is blowing from one or both 
of the circulation system; return jets in the footwell of the system.  You may also get some water 
mist blowing from the filter canister. Repeat this process with the front-most bleeder fitting. Confirm 
that water mist is blowing from the drain fittings of the jet pumps. 


14.  Place the hose of a commercial grade, wet-vacuum over each jet fitting, bleeder valve fitting, and drain 

fitting to draw out as much remaining standing water as possible.  


15.  Remove drain hose bib assembly from the outside bottom of the system.  


16.  Use the wet-vacuum to remove standing water from the pumps and any other fittings within the 

equipment compartment. 


17.  Once you are sure that all water is evacuated from the plumbing and equipment of the system, put 

the system back down in its normal position and repeat Step 10 and Step 11 


18.  Read all Directions and Safety Precautions on the Swimming Pool or Recreational Vehicle antifreeze 

bottle before opening and using.  Ensure that it is non-toxic and safe for this use.  Beware of and 
follow all safety precautions. 


19.  Using a long funnel, begin pouring non-toxic swimming pool or recreational vehicle water system 

antifreeze into the filter canister fittings, bleeder valve fittings and jet fittings of your system.  
Continue adding antifreeze until it comes out of the drain fittings or from the opening you are 
pouring it into.  You must complete this task for every jet fitting in the system.  Some of the 
antifreeze will seep into the system from the drain or jet fittings, which is okay, the goal is to have 
anti-freeze collect in the areas of the plumbing that would normally trap water.  Use the funnel to 
also place antifreeze into the pump housing(s). 


When pouring antifreeze into the rear-most bleeder valve fitting, you may see antifreeze 
pouring from one or both of the circulation system return fittings. 


29


Summary of Contents for AQUATIC FITNESS SYSTEM 2003

Page 1: ......

Page 2: ...Aquatic Fitness System 2003 Owner s Manual ii...

Page 3: ...10 Using The Top Side Control 10 Temperature Set Buttons 11 Jets 1 Button 11 Jets 2 and Jets 3 Buttons 12 Light Button 12 LED Display Window 12 Programming the Filtration Cycle 13 Filtration 13 Filter...

Page 4: ...it Dual Temp Pool Side Only and AquaPro 25 LIGHT BULB REPLACEMENT 26 SURFACE CARE SHELL 27 Dimension One EnviroTect Skirts and Vinyl Covers 27 Care for the Wood Spa Cabinet 27 SPECIAL COLD WEATHER INS...

Page 5: ...y paralysis or death can occur if user jumps of dives into the Aquatic Fitness System The Aquatic Fitness System is not designed for jumping of diving Extreme caution must be exercised to prevent anyo...

Page 6: ...al use will exceed 10 minutes or anytime young children are present in the Aquatic Fitness System To Reduce the Risk of Injury Prolonged immersion in an Aquatic Fitness System may be injurious to your...

Page 7: ...use Aquatic Fitness System To Reduce the Risk of Injury Wet surfaces can be slippery To avoid injury exercise care when entering or exiting the Aquatic Fitness System To Reduce the Risk of Injury Mai...

Page 8: ...the normal body temperature of 98 6 F or 37 C The symptoms of hyperthermia include dizziness drowsiness lethargy and fainting The effects of hyperthermia include Failure to perceive heat Failure to re...

Page 9: ...tem cover closed when the Aquatic Fitness System is not in use This is also the key to economical Aquatic Fitness System operation Don ts DON T allow horseplay or unsupervised use of your Aquatic Fitn...

Page 10: ...e to all who use your Aquatic Fitness System This sign must be permanently placed in a location that is visible to the Aquatic Fitness System user Replacement signs may be obtained from Dimension One...

Page 11: ...HydroSport Aquatic Fitness Gear The HydroSport Swim System is included with the Aquatic Fitness System This Swim System includes the Swim Tether six high volume Swim Jets and a Swim Kick Bar You may...

Page 12: ...e Swim Tether at the other end Built in OptiMounts Multiple OptiMount locations are installed to provide easy installation of the HydroSport Aquatic Fitness Gear components Multiple Training Stations...

Page 13: ...heater equipped with a high limit temperature safety shut off switch The high limit switch automatically shuts the heater off when the temperature reaches 118o F If the high limit safety switch trips...

Page 14: ...ystem should be filled until the water level is approximately 2 inches 5 centimeters above the bottom of the tile line Do not attempt to use your Aquatic Fitness System until your dealer has completed...

Page 15: ...n the UP and DOWN Arrow Buttons will light up while the heater is on and flash when there is a call for heat and the heater has not yet been activated Jets 1 Button JETS 1 Button Press the button once...

Page 16: ...ff if any of the pumps are operated at high speed If you are running a separate 50 amp service for heat and a separate 50 amp service for the pumps you can continue to heat your water while operating...

Page 17: ...e the WARMER and COOLER buttons to scroll up or down between the filtering modes The filter cycles are as follows Standard Mode F1 F2 F3 Economy Mode F4 F5 F6 Lockout Mode L1 L2 Standard Mode and Econ...

Page 18: ...you don t make another change within three 3 more seconds Set the display to F2 to receive two 2 hours of filtration three times a day To select filter cycle F2 press and hold the Warmer and Cooler B...

Page 19: ...er change within three 3 more seconds Set the display to F5 to receive two 2 hours of filtration and heat three times a day To select filter cycle F5 press and hold the Warmer and Cooler Buttons for t...

Page 20: ...control is heating when the system is put into the lockout mode the heater will immediately turn off and the pump will cycle water for thirty seconds then turn off This will assist in cooling the heat...

Page 21: ...systems Water level referencing weir skimmer Proportional FastFlo Heater A variety of interchangeable jets Exclusive custom hand set ceramic tile adds a distinctive touch Built in automatic freeze pro...

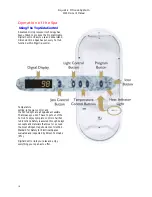
Page 22: ...ontrol Temperature setting jet power control and the hot tub light are all spa side accessible That means you don t have to get out of the hot tub to enjoy complete control of all hot tub functions Sa...

Page 23: ...ly activated during a heating cycle in which case a third press will return the pump to the Low Speed The Jets Indicator Light next to the Jets Button will be lit while the pump is running A Jet Pump...

Page 24: ...ght Button is used to turn the Dynamic L E D Light ON or OFF and manage the custom lighting sequences Up and Down Buttons Up and Down Buttons Pushing the UP Button increases the temperature and pushin...

Page 25: ...WN buttons to change to the correct MINUTES When the MINUTES are correct press the LIGHT Button to toggle the AM PM Filter Cycle Start Time Program the Filter Cycle Start Time by pressing the PROGRAM...

Page 26: ...ter temperature simply use the UP or DOWN Buttons to select between Fahrenheit F and Celsius C The factory default setting is Fahrenheit Exit the Programming Sequence by pressing the PROGRAM Button a...

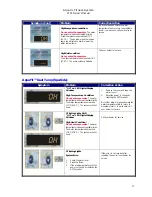
Page 27: ...igh limit condition The water temperature has reached 118 F 47 8 C The entire system is disabled Contact your local Authorized Dimension One Spas Dealer or authorized service center DO NOT ENTER THE W...

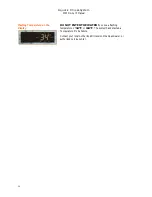
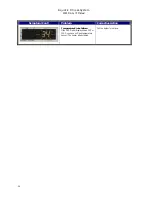
Page 28: ...shing Temperature on the Display DO NOT ENTER THE WATER if you see a flashing temperature of 34 F or 134 F The system has detected a Temperature Probe Failure Contact your local Authorized Dimension O...

Page 29: ...y extended Hold the centerpiece of the assembly and turn it counter clockwise until the flats of the basket are aligned with the securing tabs Then pull the basket assembly straight up to remove Next...

Page 30: ...the light housing cover without lowering the water level below the light housing cover Do not attempt to remove the light housing cover without the special tool If you are not able to locate it contac...

Page 31: ...yl Covers The Dimension One EnviroTect skirts are unaffected by most corrosive substances and will not absorb moisture To maintain the original finish clean with soap and water No sealing or painting...

Page 32: ...as it freezes and may result in damaged plumbing lines or fittings Dimension One Spas does not recommend that you drain your system for the winter Freeze damage is specifically not covered by Your Wa...

Page 33: ...from the filter canister Repeat this process with the front most bleeder fitting Confirm that water mist is blowing from the drain fittings of the jet pumps 14 Place the hose of a commercial grade wet...

Page 34: ...n tarp the system at this point for maximum protection Spring Time Startup In the spring or when you are ready to start the system back up follow these instructions Make sure o rings for pumps are in...

Page 35: ...d up high enough Maximum thermostat setting is approximately 104 F 40 C 3 Burned out Aquatic Fitness System light Bulbs are not covered 4 Aquatic Fitness System water chemistry is the responsibility o...

Page 36: ...tronic control system that governs all of the electrically operated components of your Aquatic Fitness System utilizes an advanced microprocessor and solid state electronic switches to activate all us...

Page 37: ...ice s that sends a signal to the electronic control system that there is adequate water flow to turn the heater on Primary Pump Produces water flow through the heater filter sanitation system and the...

Page 38: ...jet pumps are single speed pumps that operate on high speed The second and third pump buttons control the booster pumps Temperature Sensor Measures the temperature of the water inside the Aquatic Fit...

Page 39: ...uts down unexpectedly while in use 2 Motor over heated and automatic protective device has shut down pump s 2 If pump s will not restart when JETS pad is pushed call for service Make sure that the equ...

Page 40: ...k for proper water level ensure pump is primed and or check for clogged filter Pressure switch may need to be adjusted Call the dealer for service Pressure switch problem Pressure switch is closed whi...

Page 41: ...erature Condition Do not enter spa water The water temperature is above acceptable limits The water temperature has reached 110 F 43 3 C The system will shut down 1 Remove the cover and allow the wate...

Page 42: ...003 Owner s Manual Symptom Cont Problem Corrective Action Temperature Probe Failure If the LED Digital Display shows 34 F or 134 F you have an Open temperature sensor The heater is deactivated Call th...

Page 43: ......

Page 44: ......
Reviews: