background image

3

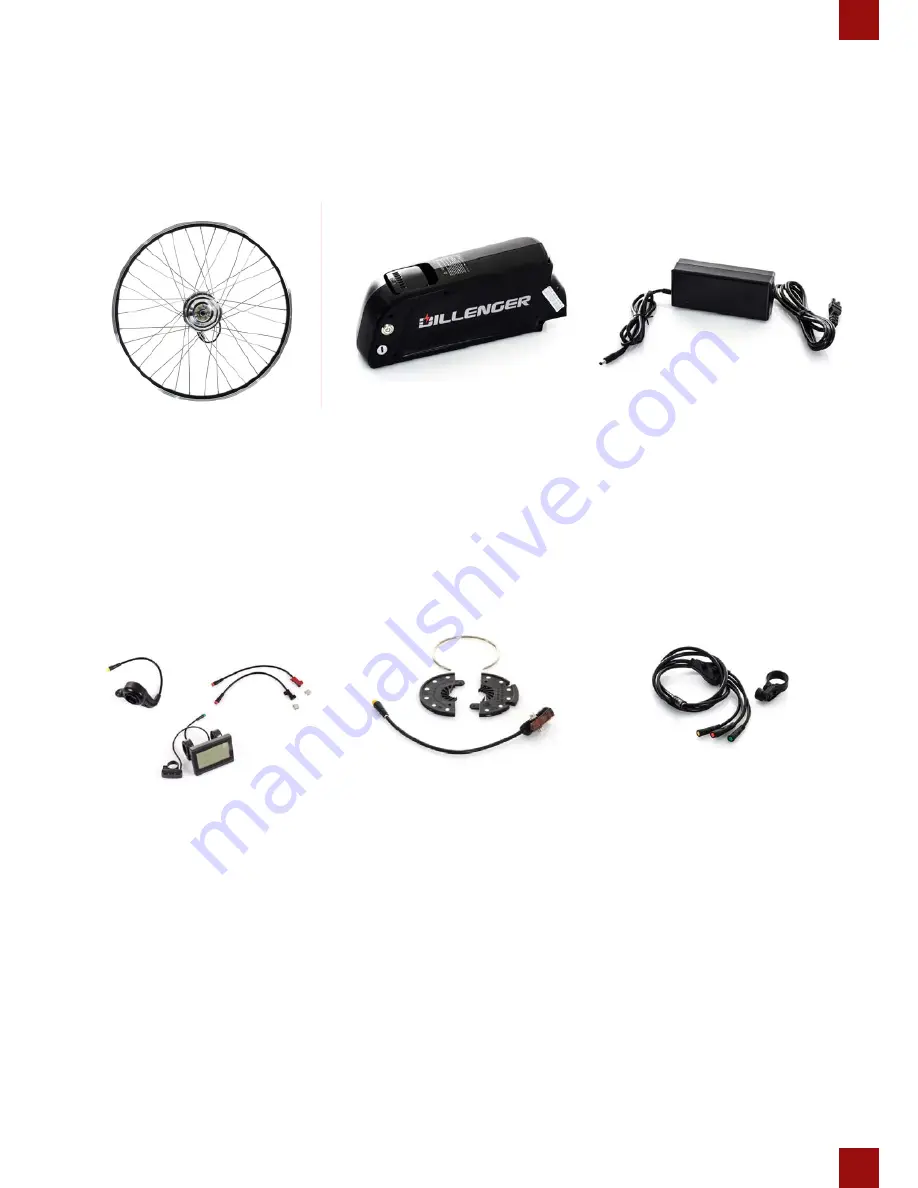
ITEM CHECK LIST

Each conversion kit is tested for quality control before shipping to a customer. Before converting 
your bike, it’s a good idea to lay each of the components out to visiualise how they will come 
together on your bicycle. 


Before you begin your conversion, it can be helpful to lay everything out first and make sure 

all the parts are there. 


Something missing? Double check the box, even under the flaps. Those small parts can be 
sneaky. If you still can’t find it let us know and we’ll assist you ASAP. 


Note: The motor wheel depicted in the following pictures is of a slightly different model. This will 
not effect the assembly instructions given. (The only difference is the colour of the hub and some 

minor features)

Motor wheel

Handle Bar Controls 

Battery, Cradle and Keys

RPAS

Charger

Cables 

Summary of Contents for Street Legal Electric Bike Kit

Page 1: ...CONVERSION KIT Please read through carefully before beginning your conversion User Manual Dillenger Street Legal Electric Bike Kit Samsung Power English ...

Page 2: ... pick an area away from cars other cyclists obstacles or other hazards to become familiar with the controls features and performance of your new electric bike We highly recommend the purchase of the Dillenger hub motor conversion kit It will make your installation and ongoing maintenance much easier This can be purchased online Thank you for purchasing your new Dillenger conversion kit We know you...

Page 3: ...ything out first and make sure all the parts are there Something missing Double check the box even under the flaps Those small parts can be sneaky If you still can t find it let us know and we ll assist you ASAP Note The motor wheel depicted in the following pictures is of a slightly different model This will not effect the assembly instructions given The only difference is the colour of the hub a...

Page 4: ... 8 Handlebar Controls 9 Display 9 Display Continued 10 Thumb Throttle 11 E Brake Sensors 12 Removable Pedal Assist Sensor RPAS 13 RPAS Continued 14 Wiring Install 14 Tidy Up 15 Battery Operation 16 Charging 17 Maintenance and Care 18 Trouble Shooting 19 Trouble Shooting Continued 20 Specifications 23 Contact us 24 ...

Page 5: ...licate this when installing onto the forks Then move on to the battery cradle and handlebar controls 3 Ride Once the battery is fully charged lock it into its cradle turn it on and you re now ready to go 5 Prepare you bike Make sure you have measured your dropout slots approx 10mm and the clearance between your dropouts approx 100mm for front forks Remove your current wheel remove the tyre tube ri...

Page 6: ...f you have not done so already For disk brake users it s much easier to fit the motor wheel with the caliper removed For disk brake users The disk brake rotor installs onto the side of the motor hub just like a regular hub You will need to use the existing bolts that are already installed into the side of the hub Simply loosen them install your disk rotor and then tighten the bolts as shown Max 5N...

Page 7: ...uld be pushed all the way down into the dropouts to make sure it s a nice and tight fit One torque washer should be fitted against the hub on the side of the forks on each side and then one flat washer on the outside With these in place you can then tighten the axle nuts using a spanner or adjustable wrench Make sure you have the right size as to protect the nuts from being stripped Tighten to app...

Page 8: ...crews and tighten as shown Be careful not to over tighten your bolts screws as drink bottle mounts and threads are only nutserts If installed correctly the battery and cradle should feel very secure and not bounce over bumps If drink bottle mounts aren t an option there are plenty of battery attachment options other than the method above such as 1 Install the battery on a rear rack contact Dilleng...

Page 9: ... shown in the adjacent images The display attaches to your handlebars using a dual clamp bracket This will arrive in two pieces and will be screwed together using the provided fasteners Not all handlebars are the same diameter so there s a couple different sized rubber bushes provided Once you have the bracket connected to the display screen you can mount it to your handlebars using the provided b...

Page 10: ...fasteners as they are secured by plastic Once you have the display mounted you can fit the satellite keypad thumb controls This is a small module with three buttons to control the display Up Down and MODE on off You can download the manual for this separately ...

Page 11: ...ke sure the cable is not fouling the brake lever otherwise readjust Before sliding the grip handle onto the handlebars make sure you insert the small plastic bush you can see this in the third photo on this page This prevents the grip from rubbing against the throttle At this point your handlebar installation is completed and you should have everything in a comfortable position For users in states...

Page 12: ...n purposes The sensors magnets can also be installed underneath the brake levers so they are hidden making for a sleeker look The magnetic square and the sensor should be installed so that when the brake lever is realeased they contact each other When you pull on the lever to brake the sensor will register the proximity change and activate the e brake cut off This means that when you use your brak...

Page 13: ... facing the sensor The RPAS is directional so when you pedal backwards the motor won t engage that would be dangerous and annoying 3 With the two halves of the disk mated together you can mount the silver circlip onto the disk without jamming your fingers in the process ideal but not always possible 4 When fitting the hall effect cadence sensor the adhesive section is only there to hold it in plac...

Page 14: ...y buttons which we already fitted with the display up and down buttons Wiring Install The wiring now has to be connected up so that everyhting has power and can function correctly All the wires are colour coded so it is simply a matter of connecting the same coloured wire ends together 1 The first wire to connect is the main wire connecting from the rear wheel to the controller This wire has 9 pin...

Page 15: ...ng from the base of the battery RPAS and anything else leading up to the handlebars Wiring Install Continued 3 Now connect the Wiring Loom to the controller These wires are colour coded with a black end plug 4 The yellow plug from the wiring loom goes to the throttle 5 The two red plugs from the wiring loom go to the E Brake sensors 6 Lastly the green plug from the wiring loom joins with the wire ...

Page 16: ...ow use the key to lock the battery in place The key is only used for the locking function it doesn t turn the battery on or off in fact when riding it s best you remove the key and store it safely to avoid hitting it with you knee or worse loosing it Take one of the keys off the key chain before you re finished and store it in a safe place The keys are coded so if you loose both you will have to s...

Page 17: ... 4 The charger indicator lights should glow red whilst charging 5 Once the charger indicator lights change to 1 red and 1 green the battery is fully charged There is no way to over charge the battery When it is full the charger will stop charging the battery automatically Charging time can vary from 1 to 5 hours if fully empty The battery should be charged once every month as a minimum to maintain...

Page 18: ...red over and above a normal bicycle One of the main things you may come across is that your spokes need to be tightened more often than a non electric wheel Our wheels use 12G and 13G stainless steel spokes which handle the load and torque of these motors very well but are more susceptible to coming loose A spoke tightening tool such as the one including in the Dillenger hub motor conversion toolk...

Page 19: ... just a little bit loose sometimes this can reverberate and make a harsh high pitch rattling sound Nothing is broken or wrong you just have to identify the loose part Rim has a buckle or spokes coming loose all the time We would recommend a competent wheel builder to fix any major spoke tension issues however there are some really good youtube tutorials on how to adjust spoke tension Spokes has sn...

Page 20: ...ring extension kit which can be purchased online This is usually recommended for rear rack versions of this kit Disk brake bolts won t tighten You may require some longer bolts but be careful they are not too long and foul against the internals of the motor Handlebar too crowded If for instance you have integrated shifters you might find that with the throttle and shifter on the right side you hav...

Page 21: ...ck that the battery is locked to the cradle and not loose A momentary discontinuity in power will turn the kit off My battery cuts out intermittently If the battery is low on power or you are going up a very steep hill with a load on the motor you will likely experience a voltage cut off if you have overloaded the controller or dropped the voltage below the low voltage cut off which is more preval...

Page 22: ... LCD indicator light running low Some customers find that the LED LCD charge indicator can lead them astray in terms of how far the bike will go on low power You don t risk damaging the system by riding all the way to the controller low voltage cutoff Keep riding on pedal assist even after the last battery indicator bar starts blinking 4 Hills riding style other factors a The ranges quoted are fro...

Page 23: ...peed 32km h 20mph restricted to 25km h in display settings for AU and UK Max Rider Weight 120kg Max Range 100km 62miles Weight Total Weight No Battery 4 5kg Battery Weight 3 2kg Total Weight 7 7kg Components Throttle Thumb Peddle Assist RPAS Cut Off Switches E Brake Sensors Battery Computer On Board BMS Other Features USB charging battery cradle included Charger Type SANS 36V 2A Smart charger Batt...

Page 24: ...24 CONTACT US Dillenger Head Office 3 13 Olympic Circuit Southport QLD 4215 AUSTRALIA Tel 617 5532 9235 dillenger zendesk com www dillengerelectricbikes com Dillenger 2016 ...

Reviews: