background image


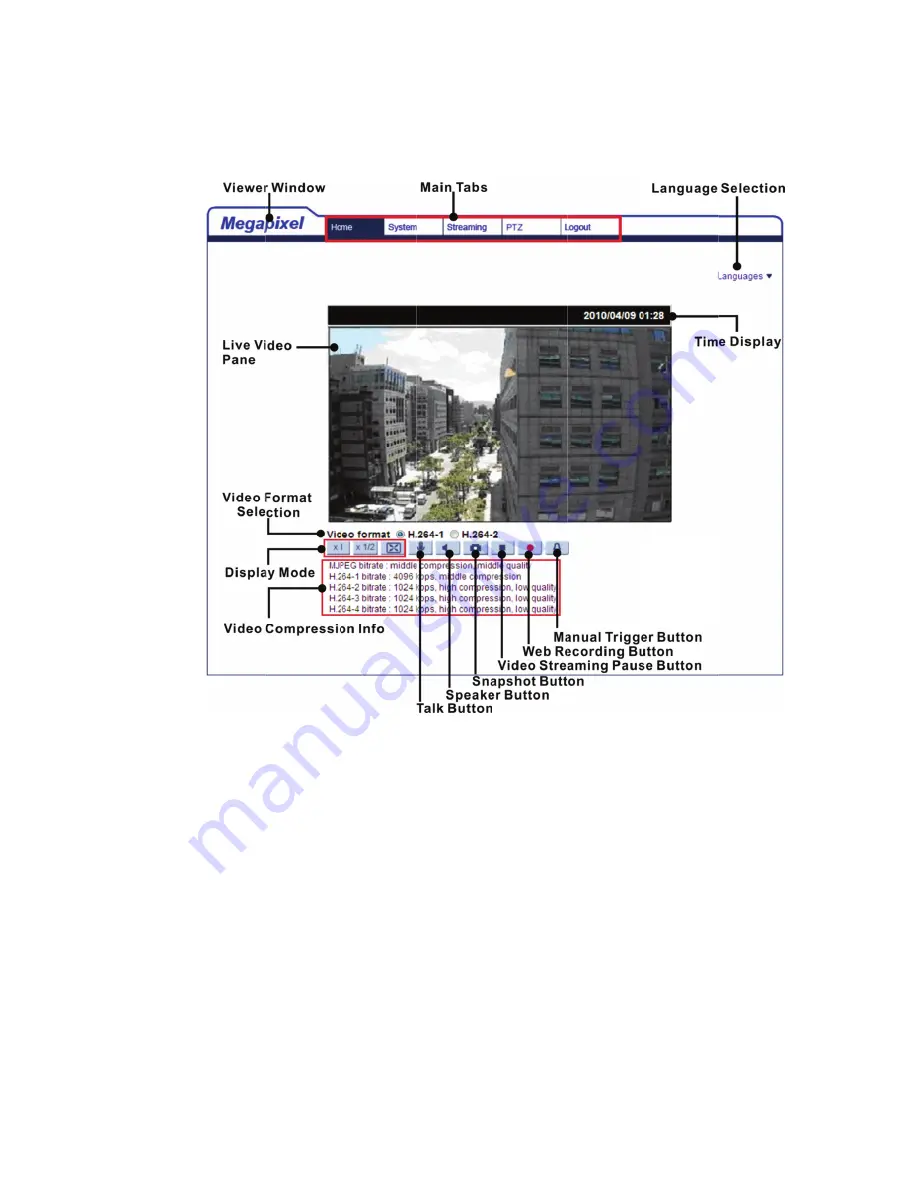
Once the
will be sh
connecte


e Viewer is
hown as th

ed analog 

s successf

he figure b

camera wi


fully install

elow. User

ith this use

led, the Ho

rs now can

er-friendly b

ome page 

n setup the

browser-ba

of the Vid

e configura

ased interf

13

deo Server
ation of the

face. 

3

All manuals and user guides at all-guides.com

Summary of Contents for DN-16100-1

Page 1: ...Video Server User s Manual DN 16100 1 Ver1 0 All manuals and user guides at all guides com a l l g u i d e s c o m ...

Page 2: ...arranty of this product will be voided in the situation above 2 Do not service this Video Server yourself Opening or removing covers may expose you to dangerous voltage 3 Do not use accessories and attachments which are not recommended by the manufacturer 4 Do not use the Video Server near water or install this device and the power supply in the dry place All manuals and user guides at all guides ...

Page 3: ...ect Camera 8 3 2 Connect Power 8 3 3 Connect Ethernet Cable 8 3 4 Connect Alarm I O 8 3 4 Video Server Installation 9 3 4 1 Installation Tools 9 3 4 2 Installation Steps 9 4 System Requirement 10 5 Access Video Server 11 6 Configuration Files Export Import 13 7 Tech Support Information 15 7 1 Delete the Existing Viewer 15 7 2 Setup Internet Security 16 All manuals and user guides at all guides com...

Page 4: ...from the internet users can promote the analog cameras to become an IP based surveillance system that reduces wiring cost and maximizes the convenience of distant surveillance application 1 1 Features Dual Streams D1 D1 60fps Quad Stream Support H 264 Baseline Main Profile High Profile and MJPEG Codec support Alarm Input Output BNC Input Output Line In Line Out RS 485 Support DC 12V Power Output T...

Page 5: ...s ensions of ontents package co der ead crew s the Video s ontains the DC Ja Length M4 Plast Length Server are e following ck Cable h 300mm tic Anchors h 35mm e shown b items liste s bun d elow ed below Quick Gu CD ndled softw documenta 5 uide ware and ation 5 All manuals and user guides at all guides com ...

Page 6: ... In NC Output NC Input s each conne n the front p r For DC Audio Audio For an For an ector on the panel are i C12V powe Out In nalog video nalog video e Video Se llustrated a Def er output output input erver is giv and introdu finition ven as follo uced as be ows elow All manuals and user guides at all guides com a l l g u i d e s c o m ...

Page 7: ... Out Alarm Out mmended ay not be a ontact the g the reliab lustrated a finition microSD c d snapshots the Video S k and PoE c V 48V AC button with restore the to record w able to sup manufact ility and th and introdu ard into th s Do not r Server is pow connections 24V power h a proper system RS 4 Alarm with the m port long t turer of th e life expe uced as be Remark he card slo remove the wered o...

Page 8: ...ion for Ethernet cable connection NOTE If PoE is used make sure the PSE switch is in used in the network 3 3 Connect Ethernet Cable To have best transmission quality cable length shall not exceed 100 meters Connect one end of an Ethernet cable to the RJ 45 connector of the Video Server and the other end of the cable to the network switch or PC NOTE In some cases Ethernet crossover cable might be n...

Page 9: ...s STEP 1 Use a power drill to drill two holes on the ceiling or wall for the two M4 Plastic Anchors STEP 2 Use a hammer to install two M4 Plastic Anchors into the holes STEP 3 Install the Video Server to the ceiling Tighten the two M4 Pan Head Self tapping Screws into Plastic Anchors All manuals and user guides at all guides com ...

Page 10: ...r 1 Intel Pentium IV 3 GHz or higher Intel CoreTM 2 Duo 2 GHz or higher 2 1 GB RAM or more 3 AGP graphics card 64 MB RAM DirectDraw Operating System Windows VISTA Windows XP Window 7 Web Browser Microsoft Internet Explorer 6 0 or later Firefox Chrome Safari Network Card 10Base T 10 Mbps or 100Base TX 100 Mbps operation Viewer ActiveX control plug in for Microsoft IE All manuals and user guides at ...

Page 11: ...he Video Server may not be in the same LAN as the IP address of the PC If so the IP address of the Video Server needs to be changed Right click on the Video Server and click Network Setup Meanwhile record the MAC address of the camera for future identification Step 5 The Network Setup page will come out Select DHCP and click Apply down the page The Video Server will be assigned with a new IP addre...

Page 12: ...ot allow Viewer installation please check the Internet security settings or ActiveX controls and plug ins settings refer to section Setup Internet Security to continue the process The Information Bar just below the URL bar may come out and ask for permission to install the ActiveX Control for displaying video in browser Right click on the Information Bar and select Install ActiveX Control to allow...

Page 13: ...log s successf he figure b camera wi fully install elow User ith this use led the Ho rs now can er friendly b ome page n setup the browser ba of the Vid e configura ased interf 13 deo Server ation of the face 3 r e All manuals and user guides at all guides com ...

Page 14: ...to the camera It is especially convenient to make multiple cameras having the same configuration Export Users can save the system settings by exporting the configuration file bin to a specified location for future use Click on the Export button and the popup File Download window will come out Click on Save and specify a desired location for saving the configuration file Upload To upload a configur...

Page 15: ...d or Remove Programs In the Currently installed programs list select Viewer and click on the button Remove to uninstall the existing Viewer Deleting Temporary Internet Files To improve browser performance it is suggested to clean up all the files in the Temporary Internet Files The procedure is as follows Step 1 Click on the Tools tab on the menu bar and select Internet Options Step 2 Click on the...

Page 16: ...s set ALL items as listed below to Enable or Prompt Please note that the items vary by IE version ActiveX controls and plug ins settings 1 Binary and script behaviors 2 Download signed ActiveX controls 3 Download unsigned ActiveX controls 4 Allow previously unused ActiveX controls to run without prompt 5 Allow Scriptlets 6 Automatic prompting for ActiveX controls 7 Initialize and script ActiveX co...

Reviews: