background image

7

Getting Started

Before connecting the Vocalist

®

 Live 4 to your amplifier, make sure that the power to your ampli-

fier is off and that the Vocalist Live 4 is plugged into the wall and powered on. There is no power 

switch on the Vocalist Live 4. To turn the Vocalist Live 4 on or off, connect or disconnect the 

included PS093B power supply from the Power Input jack. 

Connect the Microphone, Guitar, and P.A. or Mixer

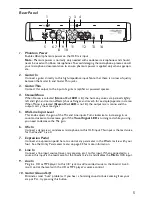
Make sure the 

Mic/Line Input Level

 knob (located on the back panel) is turned all the 

down (counter-clockwise). 

Plug a microphone into the Vocalist Live 4 

Mic In

 jack. 

If you need phantom power, press the 

Phantom Power

 switch on the Vocalist Live 4 back 

panel. The 

Phantom Power LED

 will illuminate.  


Note:

 Phantom power is normally only needed with condenser microphones, and should 

never be used with ribbon microphones. To avoid damaging the microphone, please consult 

your microphone documentation to ensure phantom power is applied only when appropri-

ate. 

Plug your guitar into the Vocalist Live 4 

Guitar In 

jack. 

Make sure your guitar amplifier is turned off and the volume level is turned all the way 

down. 

Make sure your P.A. or mixer is turned off and the volume levels are turned all the way 

down. 

Connect the Vocalist Live 4 

Guitar Thru

 to your amplifier’s input or the P.A. system.  

Plug the Vocalist Live 4 

Left 

and 

Right Line Outputs 

into your P.A. system or mixer. Or, if 

you are only using a single channel or mono amplification system, connect the Vocalist Live 

Left

/

Mono Out 

to the P.A. system or mixer, and press the 

Stereo/Mono

 button so the 

Stereo Out LED

 is not lit.  

Set the Vocalist

®

 Live 4 Controls

Select preset  (

3RD ABOVE

) with the 

Up/Down 

footswitches. 

Turn the 

VOCAL LEVEL

HARMONY LEVEL

,


and 

GUITAR LEVEL

 knobs to their 

2 o’clock positions. 

Press the 

musIQ

TM

 button so that it is lit. 

Press the 

HARMONY FOOTSWITCH

 so that the 

HARMONY LED

 just above it is 

lit. 

Adjust Levels and Tune Your Guitar 

Observe the 

Guitar Signal LED 

while playing your guitar.  Adjust the output level of your 

guitar until the 

Guitar Signal LED

 lights green or amber most of the time. (For more 

information about setting levels, see page 3.) 

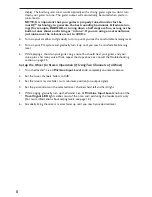
Sing into the mic while gradually turning up the Vocalist Live 4 

Mic/Line Input Level 

knob 

until the 

Vocal Signal LED

 lights amber most of the time.  (For more information about 

setting levels, see page 3.) 

Press and hold the 

EFFECTS/TUNER FOOTSWITCH

 until the display reads 

TUNER

.  

Tune each string until a star (

*

) without arrows (

>>

 or 

<<

) appears in the center of the 

display for each string, indicating it’s in tune. The note being played appears in the 

Key 

.

2.

3.

4.

5.

6.

7.

8.

.

2.

3.

4.

.

2.

3.

Summary of Contents for VOCALIST LIVE 4

Page 1: ...Owner s Manual Vocal Harmony and Effects Processor...

Page 2: ...O NOT INSTALL NEAR ANY HEAT SOURCES SUCH AS RADIATORS HEAT REGISTERS STOVES OR OTHER APPARATUS INCLUDING AMPLIFIERS THAT PRODUCE HEAT ONLY USE ATTACHMENTS ACCESSORIES SPECIFIED BY THE MANUFACTURER UNP...

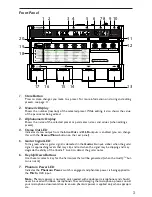
Page 3: ...Down Footswitches 4 Harmony LED 4 Harmony Footswitch 4 Effects LED 4 Effects Tuner Footswitch 4 Effects Matrix 4 Edit Up Down Buttons 4 Parameter Knobs 4 Rear Panel 5 Phantom Power 5 Guitar In 5 Guit...

Page 4: ...l Knobs 12 Effects Matrix 12 musIQTM Button 12 Key Display Key Up Down Buttons and Major Minor Button 12 Effects Footswitch 12 Harmony Footswitch 12 Guitar Tuner 12 Mono and Stereo 13 Regarding Extern...

Page 5: ......

Page 6: ...ke additions to or improvements upon this product without incurring any obligation to install the same on products previously manufactured 6 The consumer forfeits the benefits of this warranty if the...

Page 7: ...tch shifting and humanization processing Built in guitar tuner Built in microphone preamp Stereo XLR balanced and 1 4 unbalanced line outputs 50 factory presets and 50 user editable presets Expression...

Page 8: ...cerns the individual notes and key signatures that are played to automatically generate appropriate vocal harmonies that comple ment the lead vocal With musIQ you can focus on your live singing and pl...

Page 9: ...detected in the Guitar In input amber when the guitar signal is approaching levels that may clip and red when the signal may be clipping and may degrade the ability of theVocalist Live 4 to detect th...

Page 10: ...nies You can configure the Harmony Footswitch to be a toggle press and release to turn harmonies on or off or momentary harmonies are active when you hold it down See the Utility Parameters menu on pa...

Page 11: ...Input Level This knob adjusts the gain of the Mic and Line inputs Turn clockwise to increase gain or counter clockwise to decrease gain If the Vocal Signal LED is turning red while you sing you need t...

Page 12: ...s if necessary Left Mono Out and Right Out XLR Outputs Connect these XLR balanced outputs to a powered speaker or mixer If a mono mix is desired use only the Left Mono XLR jack and be sure the Stereo...

Page 13: ...down Connect theVocalist Live 4 GuitarThru to your amplifier s input or the P A system Plug theVocalist Live 4 Left and Right Line Outputs into your P A system or mixer Or if you are only using a sin...

Page 14: ...u reach a comfortable listening level While playing a chord on your guitar sing a note You should hear your guitar and your voice plus a harmony voice If not repeat the steps above or consult the Trou...

Page 15: ...reo Out LED is not lit Note that the XLR outputs could also be used for stereo output Express on Pedal Mixer P A system 1 0 5 1 2 3 5 1 2 3 4 1 0 5 1 2 3 5 5 6 Stereo Mono or Guitar and Microphone In...

Page 16: ...not lit Expres ion Pedal Mixer P A system 1 2 3 4 1 1 0 1 2 3 5 0 6 1 0 1 2 3 5 Powered monitor Guitar and Mixer or Preamp In P A Out Stereo This setup includes a preamp or mixer between the microphon...

Page 17: ...ppear in the Alphanumeric display when you turn its Parameter knob Repeat this step for each parameter you want to change Repeat steps 2 and 3 for each effect you want to edit To store your changes to...

Page 18: ...he Effects footswitch is illuminated the effects are on When the LED is turned off the effects are turned off Note that when theVocalist Live 4 ships from the factory the Effects footswitch is config...

Page 19: ...he Vocal Signal LED is amber during loud vocal sections and only briefly turns red on the very loudest vocal sections TheVocalist Live 4 will normally prevent the vo cal harmonies from clipping even w...

Page 20: ...your vocals more warmth Selects a preamp with heavy distortion and low susceptibility to feedback Gain PRE GAIN Adjusts the preamp s gain Range 0 99 De esser DE ESSER Increasing this value applies mo...

Page 21: ...to feedback due to the higher gain used Threshold cmp thresh This parameter determines the input level of the knee A value of 0 corresponds to 0 dB and a value of 99 corresponds to 40 dB Range 0 99 A...

Page 22: ...Chromatic Scale 1 b2 2 b3 3 4 b5 5 b6 6 b7 7 16 pc lydian Lydian Mode 1 2 3 b5 5 6 7 3 pc major Major Scale 1 2 3 4 5 6 7 17 pc mixolyd Mixolodian Mode 1 2 3 4 5 6 b7 4 pc min nat Natural Minor Scale...

Page 23: ...s high then all of your pitch variations will be removed resulting in a very flat robotic sounding voice Range 1 99 Amount Pc amount The amount parameter scales the amount of pitch correction applied...

Page 24: ...opera PER rock PER elvis PER bob PER SHEEP PER GRANNY 1 2 3 4 5 6 7 8 9 10 11 12 13 14 15 16 17 18 Effect is off Metallic ringing Stepped pitch Fixed pitch Bigger person Smaller person Very large pers...

Page 25: ...on either a Lead Effect persona or pitch correction requires the use of a harmo ny voice If all harmony voices are being used in the current preset the least important harmony voice is automatically s...

Page 26: ...uce some unexpected harmonies Each key variation KEY VAR selects a scale that sounds correct with your song The difference between the 3 Major or 3 Minor scales is fairly subtle and may not be obvious...

Page 27: ...nies Range 0 99 Tone rvb tone Adjusts the tone of the reverb Range 1 5 Pre Delay rvb predel Determines the amount of pre delay Range 0 9 Decay Adjust rvb decadj Increases or decreases the rate at whic...

Page 28: ...ffects refer to Chorus and Flange effects that are programmed in the Guitar Mix row Mod Effects can be bypassed by setting the GMod Type to Gmod OFF Reverb Level gtrrvb lvl Determines the amount of re...

Page 29: ...GTRSENS HI 1 2 Low guitar sensitivity used for most guitars High guitar sensitivity used for older guitars with weak output levels Expression Pedal Controls 1 EP NONE Expression pedal is disabled 13 E...

Page 30: ...ctory defaults FXFS ALL HARMFS TOG GTRSENS LO Set the Stereo Mono state to Stereo To perform a Factory Reset procedure If you are editing a preset press the Up or Down footswitch to exit edit mode Pre...

Page 31: ...hile singing The guitar signal is too quiet Turn up the volume on your guitar Make sure the guitar cable is properly connected to the guitar and theVocalist Live 4 The guitar signal is too loud Turn d...

Page 32: ...o chorus effect on the guitar 10 LITE WORLD Utilizes three part harmony 3rd above 5th above with a unison vocal to help thicken your voice Also uses a stereo chorus effect on the guitar Chromatic pitc...

Page 33: ...trates a guitar tremolo effect with reverb Play around with the speed and feedback parameters to customize your sound The harmony has unison octave down and octave up voices 26 GTR FLANGE Demonstrates...

Page 34: ...ffect to the lead vocal 43 TUBEFLANGE Uses the tube pre amp with flange lead effect to create a surreal lead vocal effect 44 CHIPMUNK Has a large female gender shift combined with an octave up pitch s...

Page 35: ...ax input level gain at min 18 5dBu Impedance 12k Ohms unbalanced Aux Input Connector 3 5mm unbalanced stereo TRS connector Impedance 33k Ohms unbalanced Converters 24 bit Analog to Digital Converter D...

Page 36: ...and offer a minimum resistance of 10kOhms Signal Processing Freescale DSP56367 DSP with custom firmware All signal processing takes place at 44 1KHz sample rates native Power US and Canada 120VAC 60...

Page 37: ...31...

Page 38: ......

Reviews: