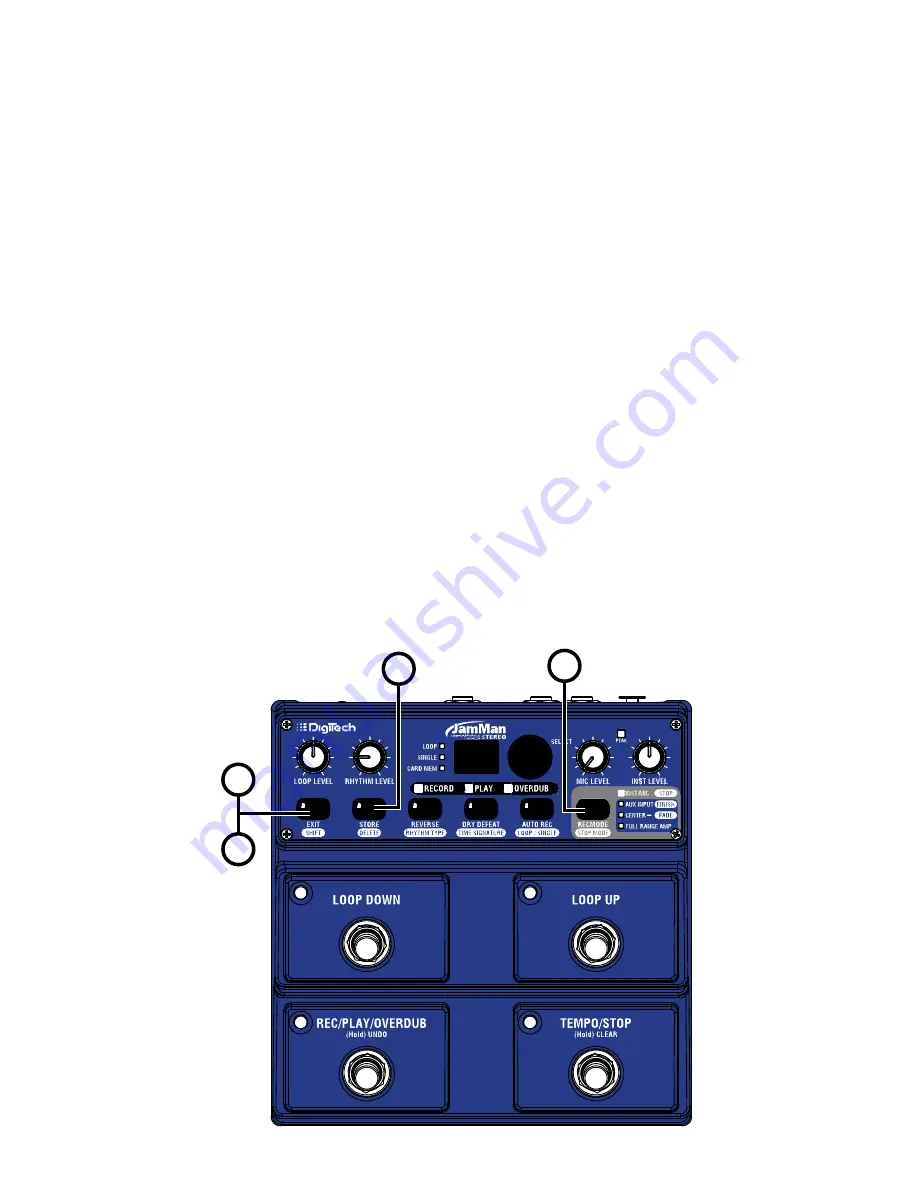
background image

36

Stop Modes

1

3

2

4

99

Loop Phrases can be stopped in three ways after the 

teMPo/stoP

 footswitch 

is pressed:  

 stoP

• 

: Stops the phrase immediately when Stop is pressed.

 fINIsH

• 

: Finishes playing to the end of the phrase and stops after Stop is pressed. 

 faDe: 

• 

Fades the phrase volume to 0 and then stops after Stop is pressed. 

To change Stop Modes, follow these steps:


  Press the 

1. 

sHIft

 button.  It will now be lit.

  Press the 

2. 

stoP MoDe 

button to select the LED which is labeled with 

the Stop Mode you want to use..  The three Stop Modes are labeled 
to the right of the 

RecoRD MoDe 

LEDs.  

  Press the 

3. 

eXIt 

button.

  Press the 

4. 

stoRe

 button twice to store the changes, if desired.

NOTE:  Stop modes must be stored with each phrase individually.

Summary of Contents for JAMMAN - MANUAL 2

Page 1: ...Owner s Manual Professional Audio Equipment...

Page 2: ...OLLOWING KEEP THESE INSTRUCTIONS HEED ALL WARNINGS FOLLOW ALL INSTRUCTIONS The apparatus shall not be exposed to dripping or splashing liquid and no object filled with liquid such as vases shall be pl...

Page 3: ...s and the Product Specifications noted on the Declaration of Conformity Operation is subject to the following two conditions this device may not cause harmful interference and this device must accept...

Page 4: ...rden of the consumer 5 DigiTech reserves the right to make changes in design or make additions to or improvements upon this product without incurring any obligation to install the same on products pre...

Page 5: ...verdubs 30 Undo Redo and Clear 32 Undo an Overdub 32 Redo an Overdub 32 Clear Overdubs Unstored Phrases 32 Recording a Loop Aux Input 34 Stop Modes 36 Using Auto Quantizing Looping 37 Storing Copying...

Page 6: ...l Loop Phrases 50 Erase All Loops Internal Memory 52 Using Optional SD SDHC Memory Cards 54 Formatting SD Cards 55 Unformatted Cards 55 Erase All Loops Memory Card 56 Factory Restore 58 Optional FS3X...

Page 7: ...ou quickly create custom JamLists to take to your gig Features Store over 35 minutes of stereo CD Quality loops in 99 internal memories Optional SDHC card can store over 16 hours of CD quality audio i...

Page 8: ...Start with your amplifier and the JamMan turned off or the mixer 1 faders at their minimum position Turn the 2 LOOP LEVEL RHYTHM LEVEL Mic level and inst level knobs all the way down on the JamMan St...

Page 9: ...n footswitches until the Loop LED and the Single LED are off Turn the SELECT knob until these LEDs are off 99 3 Select the Record Mode Press the REC MODE button repeatedly until the INST MIC LED light...

Page 10: ...rding Level Set the Inst level and Loop Level knobs to 12 o clock Set the rhythm level knob to the 9 o clock position 99 Set the INST LEVEL knob to 12 o clock Set the LOOP LEVEL to 12 o clock and the...

Page 11: ...er left footswitch to start recording While recording the Rec Play Overdub footswitch and Record LEDs will light red 99 Press the REC PLAY OVERDUB lower left footswitch While recording the RECORD and...

Page 12: ...The Rec Play Overdub footswitch and Play LEDs light green Adjust the loop level and rhythm level knobs as needed During playback the PLAY and REC PLAY OVERDUB LEDs light solid green Press the REC PLAY...

Page 13: ...he TEMPO STOP lower right footswitch to stop playback then press the Store button twice to store the loop 99 First press the TEMPO STOP lower right footswitch to stop playback Then press the STORE but...

Page 14: ...hythm Level 2 Controls the level of the Rhythm guide track 3 Loop Single Card Mem LEDs Loop LED This green LED indicates the current phrase memory is set to playback continuously as a loop when play i...

Page 15: ...internal memory or optional SD memory is being accessed loading a loop Time Stretching or store copy procedure Card Mem This red LED is lit when you are selecting loop memories on the optional SD SDH...

Page 16: ...ty gain signal through the JamMan Stereo when connected to your amplifier For all other uses set the Input Level controls so the green and yellow LEDs light regularly but rarely lights the red LED If...

Page 17: ...n equalization curve so that when it is played through a guitar amp it will more closely retain its original frequency response see page 34 Record Mode Stop Mode Button 10 Press this button to select...

Page 18: ...location that has no phrase recorded in it Loop Up Footswitch 13 This footswitch selects the next higher loop memory Press and hold this footswitch to scroll quickly through internal and optional SD c...

Page 19: ...being set in an empty phrase memory see page 48 Store Delete Button 18 Press to store copy changes made to a memory location This button will light when a change has been made indicating the change mu...

Page 20: ...Connect the Left Mono output to the input of a guitar amplifier mixer channel another pedal s input or amp effects return Connect the Right output to the input of a second guitar amplifier when a sec...

Page 21: ...Plug your portable MP3 CD player in here When the Aux Input Minus Center option is selected any stereo source is summed to mono when recorded see page 34 Rhythm Output Jack 6 Use this jack to isolate...

Page 22: ...USB jack provides a connection to a Windows or Mac computer for transferring loop files to and from the JamMan Stereo via the downloadable JamManagerTM loop librarian application Power Jack 10 Connect...

Page 23: ...19 Making Connections Instrument Mono Instrument Stereo...

Page 24: ...5 10 0 5 10 20 30 5 Mute L R 5 10 0 5 10 20 30 5 Mute L R 6 10 0 5 10 20 30 5 Mute L R 10 0 5 10 20 30 5 Aux 1 0 2 4 6 8 10 Aux 2 0 2 4 6 8 10 Aux 1 0 2 4 6 8 10 Aux 2 0 2 4 6 8 10 Aux 1 0 2 4 6 8 10...

Page 25: ...10 20 30 5 Mute L R 5 10 0 5 10 20 30 5 Mute L R 6 10 0 5 10 20 30 5 Mute L R 10 0 5 10 20 30 5 Aux 1 0 2 4 6 8 10 Aux 2 0 2 4 6 8 10 Aux 1 0 2 4 6 8 10 Aux 2 0 2 4 6 8 10 Aux 1 0 2 4 6 8 10 Aux 2 0...

Page 26: ...ction The Display will show the memory location number as these buttons are pressed When Loop 99 is reached pressing the Loop Up footswitch will return to the first memory location 1 will be shown in...

Page 27: ...23 Selecting a Loop Loop Select knob Loop Down footswitch Loop Up footswitch 99...

Page 28: ...et tempo see page 42 Optional Set the Time Signature to something other than 4 4 if desired 3 see page 40 Press the 4 Rec Play Overdub footswitch and begin playing or singing to start recording If a t...

Page 29: ...Recording a Loop Inst Mic Input 25 3 1 2 4 5 6 99...

Page 30: ...switch LEDs flash red to show that the JamMan is armed The JamMan monitors the input level and starts the recording when it detects an audio signal If you ve tapped in a tempo while Auto Record is ena...

Page 31: ...27 Auto Record Mode 99 Auto Record button...

Page 32: ...optional memory card Press the 2 AUTO REC button so it is lit Press the 3 Rec Play Overdub footswitch to arm record The Rec Play Overdub footswitch and RECORD status LEDs will be quickly flashing red...

Page 33: ...29 Recording a Loop Using Auto Record 3 5 6 1 2 4 99 O CO...

Page 34: ...again to begin overdub recording This footswitch and the OVERDUB status LEDs will now light solid yellow and any audio introduced on the selected input will be added to the audio the playback When yo...

Page 35: ...Recording Overdubs 31 2 3 4 1 99...

Page 36: ...do takes place Redo an Overdub Press and hold the REC play overdub footswitch to redo the last undone overdub the REC PLAY OVERDUB and OVERDUB status LEDs flash yellow and the display briefly shows rd...

Page 37: ...33 Undo Redo and Clear Press and hold to undo or redo an overdub Press and hold to clear overdubs and unstored phrases 99...

Page 38: ...UT CENTER and FULL RANGE AMP lit Audio will be summed to mono and remove center channel material and apply a compensating equalization as in the two previous modes Optional Set the Time Signature to s...

Page 39: ...Recording a Loop Aux Input 35 6 5 3 2 99 1 2 4 7...

Page 40: ...e phrase volume to 0 and then stops after Stop is pressed To change Stop Modes follow these steps Press the 1 Shift button It will now be lit Press the 2 Stop Mode button to select the LED which is la...

Page 41: ...ayed Getting an accurately timed and seamless loop takes practice but offers the flexibility experienced loopers need Auto Quantized looping makes getting accurately timed loop points easy Begin by fi...

Page 42: ...op with its changes the LOOP or SINGLE LEDs are off or press EXIT to abort Press the 4 STORE button again The changes are now saved and the STORE button turns off Copy a Loop to a Different Memory Loc...

Page 43: ...39 Storing Copying Phrases 4 2 3 1 99 5 3 1 4 2 99 Store Changes to a Loop Copy a Loop to a Different Memory Location...

Page 44: ...ultTime Signature of four beats per measure Use the 4 Select knob to change the Time Signature You can select from two to 15 beats per measure This means if you want to record in 5 4 time select 5 To...

Page 45: ...41 Time Signature 4 1 5 2 3 99...

Page 46: ...e 2 Tempo Stop footswitch at least 2 times 4 or more times is recommended The Tempo Stop footswitch LED will begin flashing at the tempo that has been tapped in The first downbeat of the measure flash...

Page 47: ...43 Setting a LoopTempo for Recording 3 1 2 4 99...

Page 48: ...mpo rate will slow down playback To return to the original tempo press and hold the 3 Tempo Stop footswitch for two seconds and the phrase will return to the original stored tempo Time Stretch a Loop...

Page 49: ...45 Time Stretching a Loop 1 2 3 99 1 2 99 3 Time Stretch a Loop that is Stopped Time Stretch a Loop that is Playing...

Page 50: ...e 1 LOOP LED is lit using the Loop Up Loop Down footswitches or Select knob If the CARD MEM LED is lit you have selected a memory location on the optional memory card Enable the 2 Shift button and the...

Page 51: ...47 Loop Single Phrases 1 99 3 2 4...

Page 52: ...switch to start playback Turn up the 3 Rhythm Level knob to hear the guide track Enable the 4 Shift button and then the Rhythm Type button The Display will now show r5 indicating the default Rhythm Ty...

Page 53: ...looped audio It also prevents the rhythm guide track from being heard by the audience through an amp or PA system connected to the left and right outputs The Rhythm Output does not pass any of the inp...

Page 54: ...ss the EXIT button at this point to abort the Delete procedure Press the 3 DELETE button again The DISPLAY reads E Erase Loop The button will continue to flash To abort this procedure at any time pres...

Page 55: ...51 Deleting Individual Loop Phrases 1 99 2 3 4...

Page 56: ...for four seconds until Ei Erase Internal Memory Loops appears in the Display and release EL will show briefly first but keep holding the button until Ei appears The Delete button will begin flashing P...

Page 57: ...53 Erase All Loops Internal Memory 2 1 3 4 5 99...

Page 58: ...to 32GB for over 16 hours of total loop memory The first time a memory card is inserted into the JamMan Stereo it is recommended that you format the card using the JamMan Stereo s format procedure see...

Page 59: ...will show Bu indicating the card is being formatted Unformatted Cards If a memory card is inserted into the JamMan Stereo that does not have a valid format the JamMan Stereo will not recognize it and...

Page 60: ...s until EC Erase Memory Card Loops appears in the Display and release EL will show briefly first but keep holding the button until EC appears The Delete button will begin flashing Press the 5 Delete b...

Page 61: ...57 Erase All Loops Memory Card 3 2 4 5 6 1 99...

Page 62: ...ore procedure with caution It is recommended you back up your internal loops to your computer with the JamManagerTM software and USB connection Press and hold the 1 STORE button while powering up the...

Page 63: ...witch is used for immediately undoing and redoing the last recorded overdub Down Switch This footswitch is used to play the recorded phrase in reverse Up Switch This footswitch can be used to set the...

Page 64: ...JamMan Stereo and your computer For more information visit www digitech com System Requirements Windows Vista 32 64 bit 7 32 64 bit XP Home Professional 32 bit Intel or AMD XP Processor 1GB of memory...

Page 65: ...99 loops total Inputs Outputs Microphone Input Connector Type Female XLR Pin 2 Hot no phantom power Input Impedance 1 k Balanced Maximum Gain 41 dB 150 source EIN 125 dBu A weighted max gain 150 sour...

Page 66: ...Line Inputs to Outputs Dynamic Range 105 dB A weighted at unity gain Frequency Response 0 3 dB 20 20 kHz Voltage Rails 14 V General Power 9 Watts Current Draw 1 A Adaptor PS0913B Included Output 9VAC...

Page 67: ...63...

Page 68: ...gitech com JamMan Stereo Owner s Manual 18 0707 B Printed in the USA DigiTech and JamMan Stereo are registered trademarks of HARMAN All other product name and trademarks are the property of their resp...

Reviews: