background image

DIGITAL YACHT


WL60 Quick Start  Guide


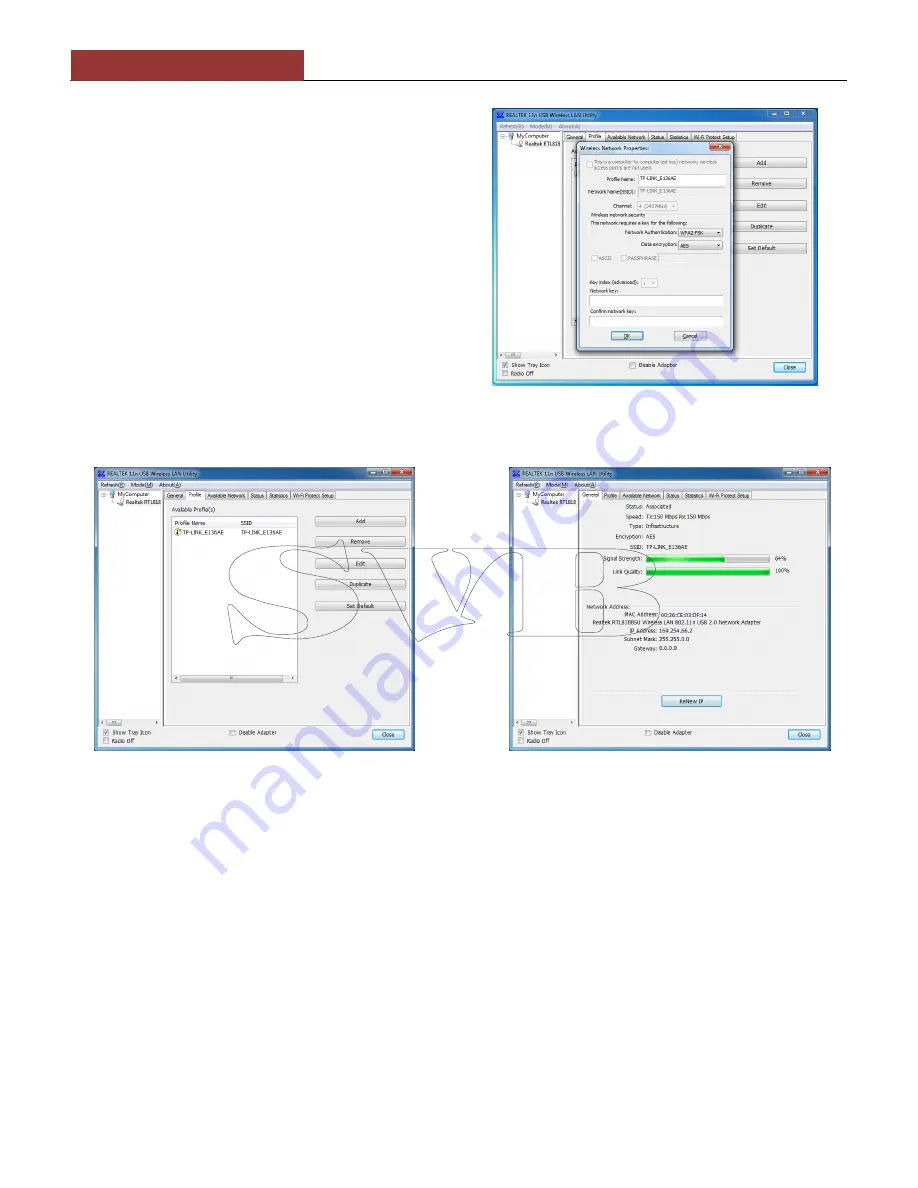
Click on the “Available Network” tab and the window 
shown in Figure 19 will appear which lists all of the 
available wireless networks that the WL60 can detect. 
Select the wireless network that you wish to connect to 
and click the “Add to Profile” button.  
 
You will now be prompted to enter the Network Key 
(also known as Password, WEP key or Passphrase) for 
the network that you have selected. Consult the 
network operator to get the necessary password and 
enter this in the two boxes at the bottom of the window 
shown in Figure 20

. Click “OK”. 

 
Assuming that the password was correct, the WL60 
should connect to the network and you will see the 
window shown in Figure 21. 
 
If you click on the “General” tab you should see the 
window shown in Figure 22 which gives the wireless 
connection status. 
.  


5. Installing and Operating the WL60 on a Mac 

Insert the WL60 Drivers/Software CD-Rom in to your Apple Mac and using Finder open the folder called MacOS10.4, 
MacOS10.5, MacOS10.6 or MacOS10.7 depending upon the version of Mac OS X you have. 

Included in each of these folders is an Installer.pkg package that you can double click on to install.  

For OSX 10.8 (Mountain Lion) use the Installer in  the MacOS10.7 folder which is a 64bit driver and has been 
successfully tested with Mountain Lion. 

When you run the Installer.pkg file, the first screen that you see will be the one shown in Fig 23. Click 

“Continue” for 

this screen and the next couple of screens that are displayed. You will be asked to enter your Administrator password 
and then the installation will start and you will see a progress bar as shown in Fig 24. 

Figure 21


Figure 22


Figure 20


Summary of Contents for WL60

Page 1: ...QUICK START WL60 VR1 00 Installation Quick Start Guide WL60 Wireless Adaptor Antenna...

Page 2: ...e wireless hotspot antenna that you wish to connect to There are two methods of mounting the WL60 using the kit of parts included in the box Sucker Cup Mount Pole Mount Neither of these two mounting m...

Page 3: ...ement or when you need to use a pole to get more height it is possible to mount the WL60 using the U bolts nuts and washers supplied The diagram below shows the three steps to mounting the WL60 on a s...

Page 4: ...he WL60 in to a spare USB port on the laptop Windows will detect the new hardware and display the message shown in Figure 1 It will then automatically search the on line Windows Update server for the...

Page 5: ...If you have any other important programs or documents opened save any work and close them then click Finish and the computer will restart Once the computer has fully rebooted plug in the WL60 the new...

Page 6: ...pots will be displayed Your laptops internal wireless adaptor is usually named Wireless Network Connection and the WL60 will automatically be named Wireless Network Connection 2 or possibly another nu...

Page 7: ...you should see the window shown in Figure 22 which gives the wireless connection status 5 Installing and Operating the WL60 on a Mac Insert the WL60 Drivers Software CD Rom in to your Apple Mac and us...

Page 8: ...ee USB port on the Mac and two things will happen A new Icon will appear in the Dock as shown in Fig 26 Also a new application will open and a window similar to the one in Fig 27 will be displayed thi...

Page 9: ...0 should now connect to the selected wireless network and display the General Status tab shown in Fig 30 The network details plus the password are stored as a profile which is remembered in case you r...

Reviews: