background image

LICENSE REGISTRATION

The Blackjack Servers come with complimentary four (4) recording licenses. 

OPTION 1:


If your server has internet access —

1.

  Go to 

DW Menu Button

 > 

System Administrator

 > 

Licenses

2.

 Select ‘

Automatic Activation via Internet

’ from the drop-down options. 

3.

 Input your sixteen character license key.

4.

 Press ‘

Activate License

’. The system will notify you if the activation was successful. 

5.

 If your licenses have been registered successfully, they will appear under the Active 

Licenses table. 

OPTION 2:


If you do NOT have internet access —

1.

  Go to 

DW Menu Button

 > 

System Administrator

 > 

Licenses

2.

 Select ‘

Manual Activation

’ from the drop-down options. 

3.

 Copy your hardware ID. This information will be filled out automatically by your server.

4.

 E-mail your Hardware ID and your License Key to 

[email protected]

. Please allow 

up to 48 hours for Digital Watchdog to reply. 

5.

 Once provided with an Activation Key, Enter this information without altering it in the 

Activation Key space and press ‘

Activate Licenses

’.

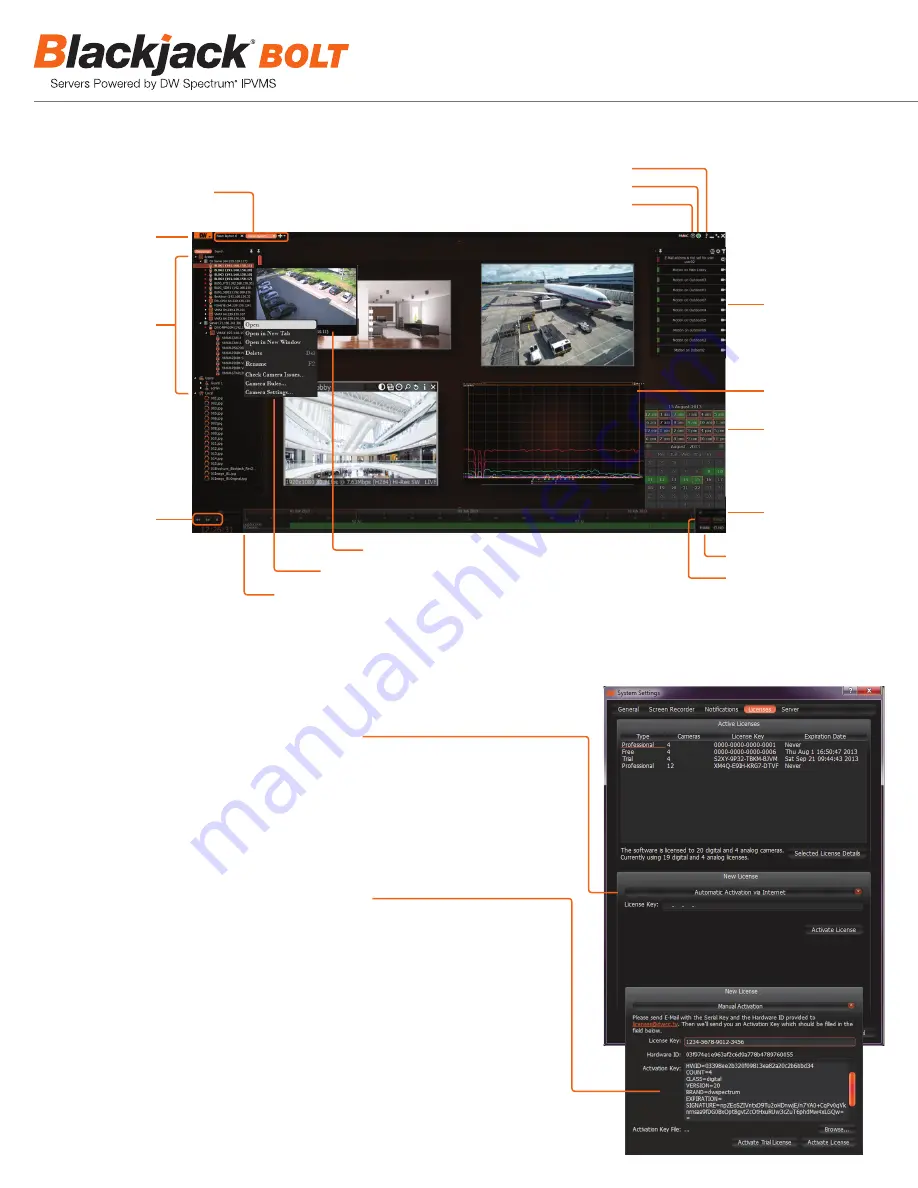
USER INTERFACE OVERVIEW

Screen Recording Controls

Login to Server

Help Menu

Server / Camera  

Display Tree

Playback Controls

Main Menu Button

Layout Management

Time Navigation Bar Zoom

Camera Options

Camera Popup Preview

Popup Notifications

Calendar Search

Audio Controls

Thumbnail Toggle Button
Live / Playback

Server Health
Monitoring

6

Summary of Contents for Blackjack BOLT DW-BJBOLT12T-LX

Page 1: ...uide Tel 1 866 446 3595 813 888 9555 Technical Support Hours 9 00AM 8 00PM EST Monday thru Friday digital watchdog com Attention This document is intended to serve as a quick reference for initial set up See the DW Spectrum full manual for more information on features and functionality Default Login Information for DW Spectrum IPVMS Username admin Password admin WHAT S IN THE BOX BOLT Server 1 Set...

Page 2: ...oard and PS 2 Mouse Port B3 DVI D Port B4 HDMI Port B5 USB 2 0 Ports B6 Mic In Pink B7 Line Out Green B8 Line In Blue B9 Ethernet Port to the Camera Network B10 Ethernet Port to the Local Network B11 USB 3 0 Ports B12 D Sub Port F1 HDD LED F2 Power Button Power LED F3 USB 2 0 Port F4 Microphone Jack F5 Headphone Jack F6 Reset Button WARNING For an optimal system configuration it is recommended tha...

Page 3: ...rn on the server automatically STEP 2 Set Date and Time 1 Update Date and Time by clicking on the time on the upper right hand corner then click Time Date settings 2 If the server will be connected to the Internet leave Set the Time to Automatically from the Internet and update the Location to the correct Time Zone Enter the nearest major city to select the correct Time Zone If it shows multiple c...

Page 4: ...tab 4 From the drop down menu select connection type Method as Manual 5 Click Add next to Addresses 6 Enter IP Address then press Tab on the keyboard to move to Netmask 7 Ignore any populated values and enter the valid Netmask value then press Tab on the keyboard to move to the Gateway 8 Enter the Gateway address if required then press Enter on the keyboard Gateway is not required on the camera ne...

Page 5: ... Manually Adding Cameras on page 7 NOTE If you have not already configured the IP cameras please follow the camera s QSG and configure the cameras first Host 127 0 0 1 Login admin Password admin STEP 3 Configure Network CONT Local Network 11 Select Wired with picture of network port and repeat 2 to 8 of STEP 3 Configure Network 12 Click on the DNS Servers field box and enter DNS server address 13 ...

Page 6: ...m Administrator Licenses 2 Select Manual Activation from the drop down options 3 Copy your hardware ID This information will be filled out automatically by your server 4 E mail your Hardware ID and your License Key to licenses dwcc tv Please allow up to 48 hours for Digital Watchdog to reply 5 Once provided with an Activation Key Enter this information without altering it in the Activation Key spa...

Page 7: ... to add all selected cameras 6 Enter log in information 3 4 Click on the Scan button USER ACCOUNTS ADMIN CAMERA SETTINGS PTZ CONTROLS VIDEO ARCHIVES EXPORT VIDEO VIEW LIVE VIDEO Administrator Advanced Viewer Live Viewer RECORDING SCHEDULE Select cameras and go to Camera Settings Enable Cameras to Record Select All Click Drag Pre Post Recording 3 is recommended Recording Type Motion Menu Recording ...

Page 8: ...s the server 6 If you are connecting to a camera that is integrated with DW Spectrum via the ONVIF protocol see list make sure ONVIF is enabled 7 Make sure your user has permissions to view that specific camera I can t get playback video from my camera 1 Do you have network connection between client and server in case server and client are not on the same machine 2 Make sure your user has playback...

Reviews: