Digital Projection iVision50 series User Manual Download Page 37

english

37

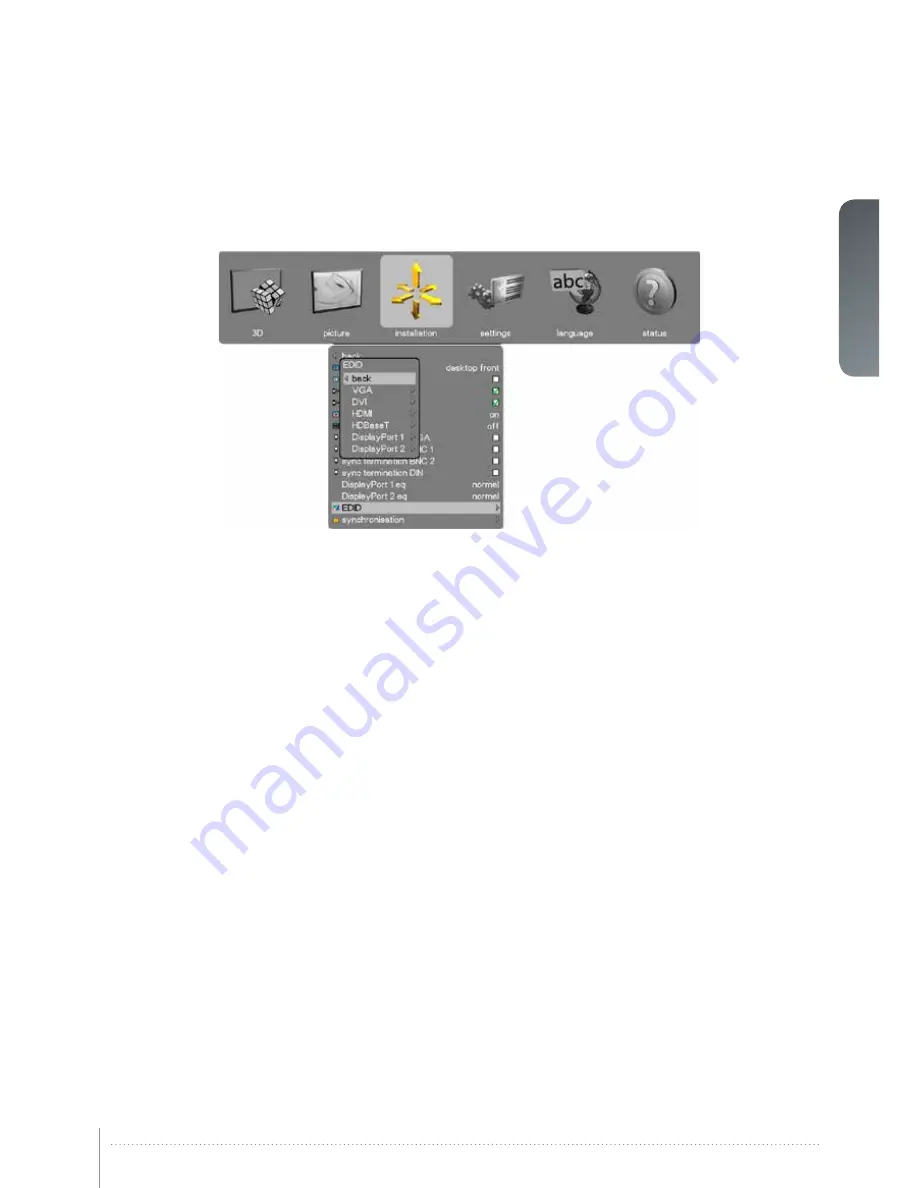
5.7.1  Installation > EDID sub menu

VGA

Define the detailed timing descriptor in the EDID data for VGA connector. 

Select between auto, WUXGA, 1080@60Hz, SX+, SXGA, 1366x768, 720@60Hz, 

720@50Hz,  XGA, SVGA, VGA.

DVI

Define the detailed timing descriptor in the EDID data for DVI connector. 

Select between auto, WQXGA@60Hz, WUXGA@120Hz, WUXGA@60Hz,1080 

@120Hz, 1080@60Hz, SX+, SXGA, 1366x768, 720@60Hz, 720@50Hz, XGA, 

SVGA, VGA. Here are the auto-settings for various resolutions:

•  1080: 1920x1080@120 Hz. Dual link

•  WUXGA: 1920x1200@120 Hz. Dual link

•  WQXGA: 2560x1600@60 Hz. Dual link

HDMI

:


Define the detailed timing descriptor in the EDID data for HDMI connector. Select 

between auto, WQXGA@60Hz, WUXGA@120Hz, WUXGA@60Hz,1080@120Hz, 

1080 @60Hz, SX+, SXGA, 1366x768, 720@60Hz, 720@50Hz, XGA, SVGA, 

VGA. All settings, except auto, uses DVI as type. Here are the auto-settings for 

various resolutions: 

•  1080: 1920x1080@60 Hz 

•  WUXGA: 1920x1080@60 Hz 

•  WQXGA: 1920x1080@60 Hz

HDBaseT:


Define the detailed timing descriptor in the EDID data for HDBaseT connector. 

Select between 

auto, WQXGA@60Hz, WUXGA@120Hz, WUXGA@60Hz,1080 

@120Hz, 1080@60Hz, SX+, SXGA, 1366x768, 720@60Hz, 720@50Hz, XGA, 

SVGA, VGA. All settings, except auto, uses HDMI as type. Here are the auto-

settings for various resolutions: 

•  1080: 1920x1080@60 Hz 

•  WUXGA: 1920x1080@60 Hz 

•  WQXGA: 1920x1080@60 Hz

DisplayPort 1:


Define the detailed timing descriptor in the EDID data for DisplayPort 1 connector. 

Select between 

auto, WQXGA@120Hz, WQXGA@60Hz, WUXGA@120Hz, 

WUXGA@60Hz,1080@120Hz, 1080@60Hz, SX+, SXGA, 1366x768, 720@60Hz, 

720@50Hz, XGA, SVGA, VGA. Here are the auto-settings for various resolutions: 

•  1080: 1920x1080@60 Hz 

•  WUXGA: 1920x1080@60 Hz 

•  WQXGA: 1920x1080@60 Hz

DisplayPort 2:


Define the detailed timing descriptor in the EDID data for DisplayPort 2 connector. 

Select between 

auto, WQXGA@120Hz, WQXGA@60Hz, WUXGA@120Hz, 

WUXGA@60Hz,1080@120Hz, 1080@60Hz, SX+, SXGA, 1366x768, 720@60Hz, 

720@50Hz, XGA, SVGA, VGA. Here are the auto-settings for various resolutions: 

•  1080: 1920x1080@60 Hz 

•  WUXGA: 1920x1080@60 Hz 

•  WQXGA: 1920x1080@60 Hz

Summary of Contents for iVision50 series

Page 1: ...an introduction to the projector iVision50 series User Manual...

Page 2: ...english 2...

Page 3: ...e product 2 4 3 Turkey RoHS compliance 2 5 Service 3 What s in the box 13 4 Installation 15 4 1 System considerations 4 2 Ventilation 4 2 1 Ventilation accessories 4 3 Ceiling and rig mounting 4 4 Loc...

Page 4: ...ub menu 5 8 3 Settings Factory Reset sub menu 5 8 4 Settings Service sub menu 5 9 Languages menu 5 10 Status menu 5 10 1 Status Source Information sub menu 5 10 2 Status Source Information Advanced su...

Page 5: ...ge 53 7 1 Calibration data 7 1 1 Updating ColorMax calibration data 7 1 2 ColorMax modes 7 2 Setting a white point or color temperature 7 2 1 Defining the system color gamut 7 3 Gamma 8 Technical spec...

Page 6: ...6 iVision50 series User Manual Introduction english...

Page 7: ...the best performance out of the projector as well as the system training is highly advised in addition to studying this user guide Various courses are available At the Academy skilled trainers will te...

Page 8: ...8 iVision50 series User Manual Introduction english...

Page 9: ...lead to overheating resulting in malfunctioning Always allow ample airflow through the projector Never block any of the air vents Never cover the unit in any way while running Allow for sufficient di...

Page 10: ...he effects of mercury and permanent damage can occur at sufficiently high levels of exposure Acute exposure to high concentrations of mercury vapour can cause conditions such as lung and airway irrita...

Page 11: ...more than the specified values of lead Pb mercury Hg or cadmium Cd these chemical symbols will appear below the crossed out wheeled bin symbol By participating in separate collection of batteries you...

Page 12: ...12 iVision50 series User Manual Safety and compliance english...

Page 13: ...Air inlet filter also sold separately B Side cover Air inlet C Ceiling mount cover Air outlet also sold separately D Exhaust air duct Flexible hose 2m with clamp inncluded Acoustic silencer kit for ce...

Page 14: ...14 iVision50 series User Manual What s in the box english...

Page 15: ...employed as well as intermediate system components like signal converters and line buffers Make sure that IG properties like pixel resolution and frame refresh match those of the projector Choice of...

Page 16: ...ure 4 1 Positioning the projector When the projector is ceiling mounted using an air duct kit assessory the minimum distance between projector and roof is 15cm 4 2 1 Ventilation accessories A set of o...

Page 17: ...lly by using a so called Kensington lock The Kensington lock hole where the lock itself is attached can be found on the back of the projector Use an approved locking cable to secure the projector to a...

Page 18: ...with the projector Figure 4 4 The protection lid A protection lid is mounted on the projector lens interface to protect the interior of the projector from dust and damage The protection lid must alway...

Page 19: ...e the existing lens and put the 2 lens projection caps back on the removed lens 4 Replace with another lens or if no lens is to be installed remount the projector protec tion lid Note that the lens po...

Page 20: ...range Figure 4 7 Horizontal both directions and vertical up lens shift Lens shift is motorized and the lens can be shifted either by using the keypad the wireless remote control or through the wired c...

Page 21: ...ized First adjust zoom to achieve the desired image size if the lens has a zoom function Then adjust focus to achieve a sharp image If the image is not sharp all over the sur face please check the sur...

Page 22: ...Multiple signals can be connected in parallel to allow for a selection of sources to be viewed in sequence Attach the interfaces of choice and make sure all connectors are fully inserted and retained...

Page 23: ...1 00 1 1 0 10m Long Throw Zoom EN54 2 68 4 18 1 5 25 m Super W ide Zoom EN55 2 5 2 72 0 8 5 0m Standard Zoom EN51 1 71 2 37 1 1 5 10m Wide Zoom EN56 2 5 3 05 1 3 7m Projection distance Image width Scr...

Page 24: ...24 iVision50 series User Manualal Introduction english iVision50 series User Manual Installation...

Page 25: ...nt Figure 5 11 Projector rear Figure 5 12 Projector top Remote Control Receiver Interchangeable Projection Lens Projection Lens Release Button Mains Power Connector Hot Air Exhaust Signal and Control...

Page 26: ...Introduction english Figure 5 13 Mounting features Figure 5 14 Projector left and right hand side iVision50 series User Manual Overview Lamp Door Air Inlet Ceiling Rig Mounting Features Accessory Mou...

Page 27: ...ens when not in Menu and after SHIFT OK pressed Navigate when in Menu system SHIFT OK Shift lens when not in menu system Shift option when in menu system AUTO Automatic set up STATUS COLOR On active B...

Page 28: ...ms the selection Directional navigation tools BACK Returns to previous alternative MENU Activates the projector menu SOURCE Toggles between available sources forward backwards arrows SOURCE POWER INFO...

Page 29: ...i DSUB Analog RGBHV video 3G SDI BNC 75 Digital Video the DVI connection is digital only although it uses the DVI I physical connector for convenience 5 3 2 Control connectors CONNECTOR NAME CONNECTOR...

Page 30: ...hroughout the user guide Please familiarize yourself with the menus and the rich functionality provided 5 4 1 Top menu 3D 3D and dual head setup picture Basic and advanced picture controls installatio...

Page 31: ...ollowing alternatives for setup off side by side 60Hz only frame sequential and dual head 60Hz only dual head setup Allows the user to define 2 current sources The alternatives are SDI 1 SDI 2 DVI HDM...

Page 32: ...ossibilities right eye Choice of source for the right eye Alternatives are SDI1 SDI2 DVI HDMI VGA HDBaseT DisplayPort1 DisplayPort 2 For possible setup combinations see Figure 4 18 Dual head setup pos...

Page 33: ...ep S shape Dynamic Increase S shape DICOM 180 Lux Curve shape depending on type of color wheel used lamp power Adjustment of lamp power between 280 350W profile reset Resets any entered profiles eithe...

Page 34: ...ication of red green blue cyan magenta and yellow color coordinates x y and gain temperature Sets the system color temperature white point on the Kelvin scale from 3200K to 9300K in steps of 100K All...

Page 35: ...and parts of the image may not be displayed on screen Push the AUTO button to find a correct setting or manually adjust the frequency until the vertical bands disappear Frequency adjusts the pixel clo...

Page 36: ...n the center of the image 16 10 fills the imaging device with a white image but marks out the 16 10 area in the center of the image 1 85 1 fills the imaging device with a white image but marks out the...

Page 37: ...Hz WQXGA 1920x1080 60 Hz HDBaseT Define the detailed timing descriptor in the EDID data for HDBaseT connector Select between auto WQXGA 60Hz WUXGA 120Hz WUXGA 60Hz 1080 120Hz 1080 60Hz SX SXGA 1366x76...

Page 38: ...l Options for 3D source sync none SYNC 1 SYNC 2 SYNC 3 3D display sync Selects the 3D display LR sync signal Options for 3D source sync source SYNC 1 SYNC 2 SYNC 3 SYNC 1 Selects usage of SYNC1 connec...

Page 39: ...PMS time out If the projector is powered down in DPMS power save it will automatically power back on if a valid source is acquired DPMS timeout Set the period of time before the projector automaticall...

Page 40: ...of PIN code If PIN is entered incorrectly 3 times it will ask for a PUK code If the PUK is entered incorrectly it will require a special unlock code provide by a service partner to unlock the project...

Page 41: ...rted and is enabled by default but can be disabled under change LAN settings LAN IP address Info field stating the current LAN IP address LAN subnet mask Info field stating the current LAN subnet mask...

Page 42: ...cation settings to factory default ColorMax TM Restores ColorMax TM settings to factory default other Restores other settings of your choice to factory default 5 8 4 Settings Service sub menu service...

Page 43: ...Languages menu Select the desired menu language Supported languages English French German Spanish Norwegian Swedish Russian Korean Japanese Chinese Traditional Chinese Simplified Portuguese Italian D...

Page 44: ...manufactured y Year of manufacturing manufactured w Week of manufacturing software version Software version installed in the projector This is very important for service requests colorwheel Type of c...

Page 45: ...for more settings depending on source used See 4 10 2 Status Source Information Advanced sub menu source Info on which source is in use brightness Info on brightness settings contrast Info on contrast...

Page 46: ...ontal and vertical sync frequency for the projector total image size Info on current horizontal and vertical image size active image size Info on current active image size scan Projector serial number...

Page 47: ...e sync Indicates where the source L R sync is connected Frequency Shows the current frequency of the signal Duty cycle Shows the duty cycle of the signal Status Indicates the sync status Phase Indicat...

Page 48: ...48 User Manual Introduction english iVision50 series User Manual Overview...

Page 49: ...ers down after a specified period of time after a source has been removed The time out setting can be specified in the DPMS TIMEOUT function in the same menu using the arrow keys 6 2 Image alignment T...

Page 50: ...re version Runtime and remaining time for lamp Total number of operating hours All network information Currently active source Further source information is available by selecting STATUS SOURCE INFORM...

Page 51: ...ous features of the projector OSD messages will appear on the screen Which messages will be appearing can be partially controlled by the user The OSD can run in these modes On All messages warnings an...

Page 52: ...ne in the front and one at the rear These receivers can be individually disabled if necessary Go to menu entry INSTALLATION IR FRONT IR REAR to disable the receivers 6 10 Software upgrades In order to...

Page 53: ...ntColor 1 is entered in this menu The BrilliantColor should all be set to 0 000 for the VizSim RGBRGB color wheel All values can also be up dated using the communications protocol over RS 232 or LAN B...

Page 54: ...Max can operate in 3 modes Color temperature white point correction only Red Green Blue White correction In this mode optimal color coordinates for Cyan Magenta and Yellow will be computed automatical...

Page 55: ...lay is called the system color gamut The white triangle in the figure is an example of a system color gamut By default the projector has the widest pos sible system gamut The system color gamut cannot...

Page 56: ...ilm 2 8 Video 1 Video 2 Computer 1 Computer 2 Dynamic and DICOM 180 The different gamma curves are displayed below The names of the curves are descriptive for their recommended use Using any of the co...

Page 57: ...english 57 Figure 7 4 Film 2 8 gamma Figure 7 5 Video 1 gamma Figure 7 6 Video 2 gamma...

Page 58: ...58 iVision50 series User Manual Optimising the image english Figure 7 7 Computer 1 gamma Figure 7 8 Computer 2 gamma Figure 7 9 Dynamic gamma...

Page 59: ...english 59 Figure 7 10 DICOM 180 Lux example HB color wheel other shapes with other alternatives Several DICOM settings 10 60 180 250 400 Lux The higher Lux number ambient light the steeper the curve...

Page 60: ...60 iVision50 series User Manual Optimising the image english...

Page 61: ...english 61 8 Technical specifications Please see www digitalprojection com for more technical information...

Page 62: ...62 iVision50 series User Manual Technical specifications english...

Page 63: ...ew the lamp door screw 2 Open the lamp door 3 Unscrew the three screws that hold the lamp in place 4 Pull the lamp out using the handle Replace with a new lamp in reverse order 1 Insert a new lamp Obs...

Page 64: ...64 iVision50 series User Manual Lamp change english...

Page 65: ......

Page 66: ...tion Ltd Greenside Way Middleton Manchester M24 1XX P 44 0 161 947 3300 F 44 0 161 684 7674 China Corporate Headquarters DP China Rm C1202 Cai Fu Jia Yuan No 19 Xiao Ying Street Chaoyang District Beij...

Reviews: