Digital Alert Systems DASDEC-III DAS3-EL Quick Start Manual Download Page 1

Digital Alert Systems, Inc. 

100 Housel Ave | Lyndonville NY 14098 

p: 585-765-2254 | f: 585-765-9330 

www.digitalalertsystems.com 
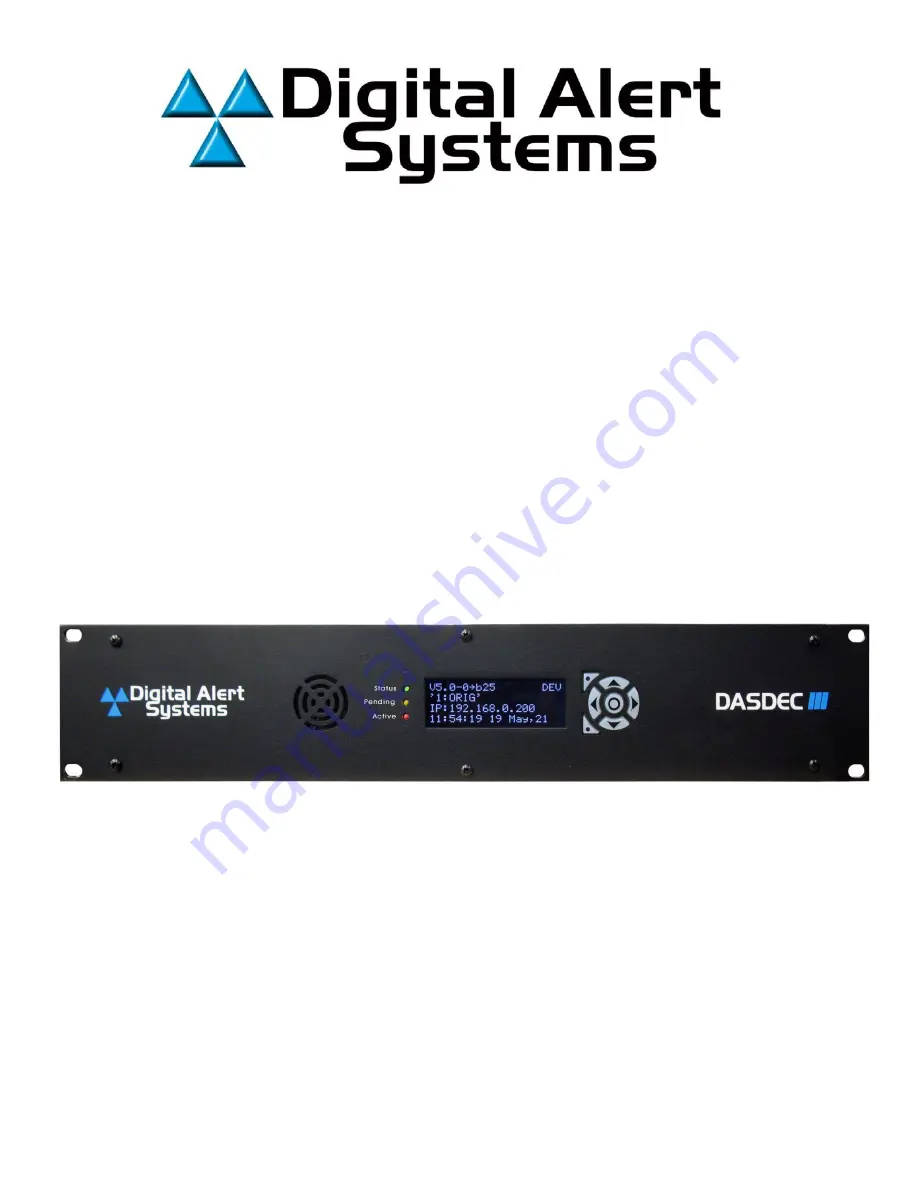


DASDEC-

III


Digital/Analog Emergency Alert System 

Encoder/Decoder


Quick Start Guide


Models DAS3-EX & DAS3-EL 

Version: 5.0 

August 2022 

Rev: R10122022


Summary of Contents for DASDEC-III DAS3-EL

Page 1: ...ousel Ave Lyndonville NY 14098 p 585 765 2254 f 585 765 9330 www digitalalertsystems com DASDEC III Digital Analog Emergency Alert System Encoder Decoder Quick Start Guide Models DAS3 EX DAS3 EL Version 5 0 August 2022 Rev R10122022 ...

Page 2: ... Display Lights 6 Step 3 Audio Wiring 8 Step 4 Assigning Radio Tuners 10 Step 5 Setting the Time 11 Step 6 FIPS EAS Code Setup 12 Step 7 Alert Decoding Filtering Forwarding 13 Step 8 Alert Encoding and Originating 16 Step 9 Setting Audio Levels and Required Tests 17 Step 10 GPIO Configuration 19 Step 11 Email Setup 20 ...

Page 3: ...le and rack mounting screws Items NOT included Wiring for audio and RF connections Note ADAPTERS MAY BE REQUIRED to connect the audio sources For more information see the section Program Audio and Monitor 4 Wiring Analog AES Digital page 9 Getting Started What you ll need to have or know A PC laptop or tablet and an RJ45 networking cable A valid unused IP address Speak with your network administra...

Page 4: ...con on the right hand side of your PC s taskbar and click Open Network and Internet Settings Note These steps are targeted at PCs running Windows 10 3 Click the Edit button under IP settings which will open a dialog box to edit the IP address for the PC 4 In the dialog box at the top select the manual option instead of dynamic DHCP if not already selected Type in the 192 168 0 X in the IP address ...

Page 5: ...ur network or it will cause a conflict If possible confirm with your system administrator what IP address would be the best for the DASDEC III to be set to 9 The DASDEC III can now be connected to your network Once the device is connected to your switch router launch a browser on a PC residing on the same network on which you just placed the DASDEC III Access the login page by typing the newly pro...

Page 6: ...utomatically switches back to page one after a few seconds of inactivity Page One Line one shows the total number of active alerts Line two shows a crawl of one of those active alerts along with whether the alert was decoded D originated O CAP C or forwarded F Line three shows the time when the currently crawling alert will end Page Two Line one displays audio sources 1 through 4 pressing the down...

Page 7: ...address Line two is the subnet mask Line three is the default gateway IP address Page Four Line one shows the current software version Line two is the device name of the DASDEC III Status LEDs The system s three Light Emitting Diodes LEDs are used to display as variety of system status conditions ...

Page 8: ...ional sound card with its 3 5mm jack You can also use the three radio tuners radio 1 2 and 3 with the 4th option being the Audio 4 input The line in jack option uses a monoaural connection meaning that one 1 8 mini plug will need to be wired to provide the audio of two sources provided from your external radios Below is an image displaying what that would look like broken down The tip is left inpu...

Page 9: ...fessionally terminated cables in a variety of lengths and formats One excellent source is Studio Hub https studiohub com adapters There are a number of sources for professionally terminated cables in a variety of lengths and formats One excellent There are a number of sources for professionally terminated cables in a variety of lengths and formats One excellent source is Studio Hub https studiohub...

Page 10: ...ield with a higher or lower level Underlined in red until the status shown is Ok and colored green It s best to have the levels as low as possible while still maintaining an OK status Shown in red For external radio setup navigate to Setup Audio Audio inputs tab and under the Primary L1 R1 source adjust the levels to an Ok or green status The best setting would be the lowest possible level that st...

Page 11: ...button shown in red Digital clocks will drift over time and must be monitored to maintain accuracy Using an NTP server is recommended as it accounts for time drift and automatically updates the internal clock Public NTP servers are listed at http tf nist gov tf cgi servers cgi Type the server domain name or IP address into the field shown in purple followed by checking the box shown in red This wi...

Page 12: ...Location Group Lists you can click the Add New FIPS Group shown in blue to add a new group followed by clicking the Edit button shown in red to customize the group FIPS groups created in this section can be used to filter decoded alerts Start by naming the group this will aid in distinguishing one FIPS group from another shown in blue followed by selecting the state and FIPS codes that need to be ...

Page 13: ... Alert Nodes tab We recommend keeping your setup as simple as possible Note The default configuration is set to forward any decoded alert Typically this is not ideal so some customization will be required To edit a node click the check box to enable the node shown in black followed by clicking the Edit button shown in green This will allow you to make changes to the fields within the node When you...

Page 14: ...rea The common filters used in nodes are FIPS and EAS code groups covered in step 6 Note For RMT s always include both the state and county FIPs codes At the top of the page is a Test Node feature that allows testing how a specific EAS alert will filter through the nodes and which node it will match without triggering an alert Below is an image showing an RMT being tested and reflecting the node i...

Page 15: ...button which will then air that alert Auto forward mode allows alerts to be forwarded without user intervention Aired automatically To edit the forwarding mode navigate to Setup Station Global Options Under the Alert forwarding section is a check box labeled Enable Auto Forward Mode When checked auto forward mode is set When unchecked the device is in manual mode Indicated below are examples of au...

Page 16: ...an applicable substitute alert in a given week See FCC Part 11 rules for details Navigate to Setup Station and under the Origination section select your ORG code which will typically be EAS Broadcast Cable System shown in blue Under the Required Weekly Test section add your FIPS group containing the counties that apply to your broadcast area shown in red The process for initiating automating the o...

Page 17: ... the audio output level is satisfactory check the Alert Audio Passthrough box shown in green Weekly Tests The DASDEC III has two main options for originating an RWT Required Weekly Test Option one is to use the One Button Alert which can be activated by pressing the center button on the front panel or by using the web based UI Option two is to set up an Automatic weekly test generator The One Butt...

Page 18: ...tup Station Main and find the Automatic Random Weekly Test Generation check box shown in red check to enable Below this check box is the day and timeslot selection options Select the settings needed shown in purple shown in green Note Be sure to Accept Time Changes otherwise the inputted settings will not take affect Indicated by the exclamation mark The randomly generated RWT appears at the top o...

Page 19: ...age navigate to Setup GPIO The GPIO setup screen has a table at the top which shows the current programming for each GPIO and their current state The GPIO configuration menu gives you many options for both inputs and outputs To select and set GPIO actions click on the appropriate drop down depending on what you re setting up input drop down in green output drop down in red Input and output setting...

Page 20: ...dd a from name with Have Email MTA use From Name as Sender checked shown in red Note A non authentication setup requires port 25 to be opened For a more secure setup that uses authentication check the Use Authentication box followed by an SMTP server name or IP address shown in purple Add the email address followed by the password used to login into that email address shown in blue Use that same e...

Page 21: ...n in red Additional setup is needed to apply the desired email scenarios for DASDEC III to conduct This setup can be completed by adding users recipients Click the green plus icon for Add New User shown in blue Click the edit button to change the email field for the recipient shown in green Check the boxes for the items that the user will receive shown in red Note Any changes made in these section...

Reviews: