background image

User Manual

User Manual

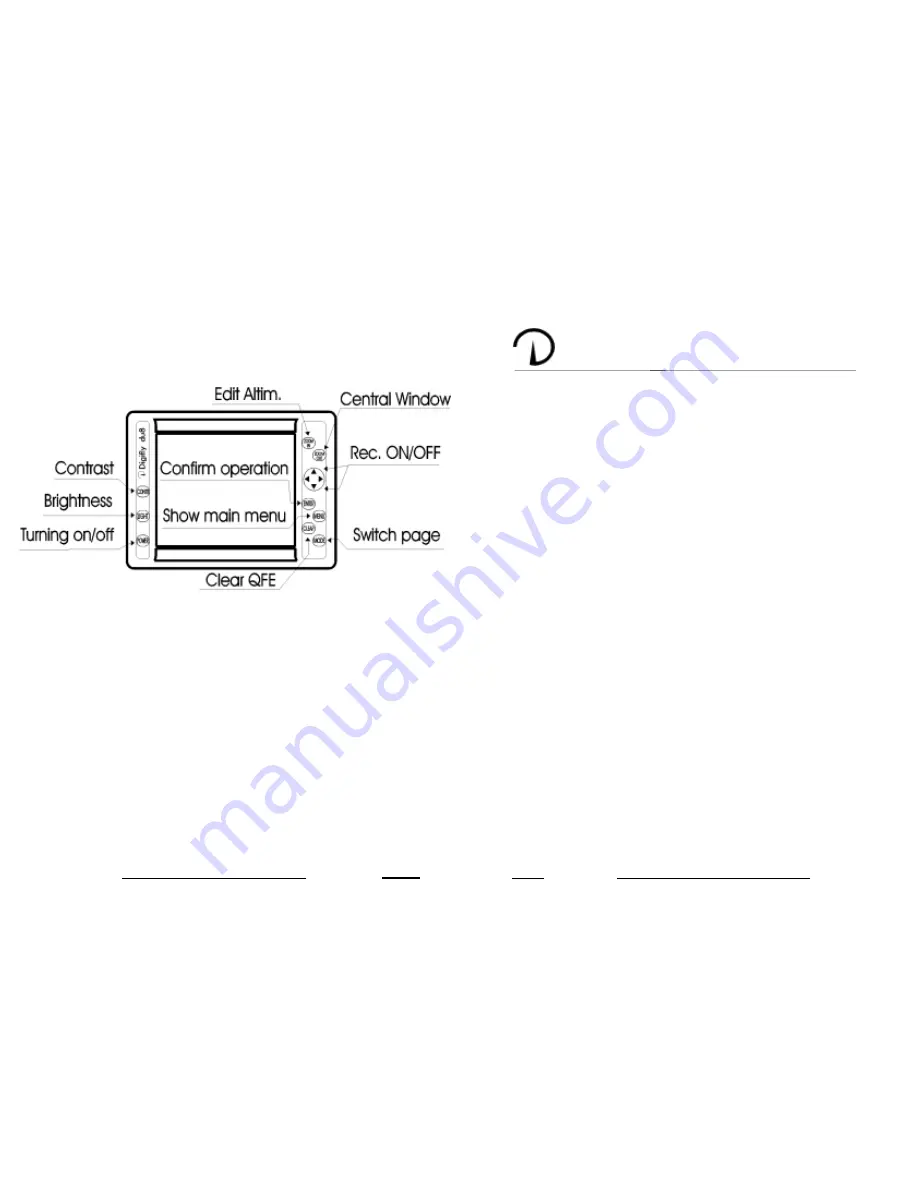
2.3 - The keyboard.

The following figure show the keyboard's main functions.

2.3.1 - Turning on / off.

Before turning on the instrument make sure that all connections  were
made correctly. Make sure the engine is turned on before the instrument.
To turn on the DUx, press the  POWER   button. After a few seconds, the
Moving Map or Instrumentation page is viewed to search for the
connection and for the initial internal tests.
To turn off the DUx, press (and keep pressed for at least 2 seconds) the
POWER button again.

2.3.2 - Contrast.

To regulate contrast keep the button  CONTR  pressed until the contrast
menu appears. Now the regulation is executed with the UP-DOWN
ARROW 
buttons. Press CONTR again to quit the menu.
N.B. In the System Test page, contrast is regulated just pressing the
CONTR button.

chapter 4
SYSTEM TEST

To enter in the System Test Page press and keep pressed the key
POWER together with any other key. As soon as the key is released,
the following menu will appear on the screen:

                                      SYSTEM TEST
                                      (software version)

KEYBOARD TEST
INPUT DATA DISPLAY
INSTRUMENTATION
EEPROM TEST
CONNECTOR TEST
CLEAR RAM
CHOOSE PORT 1
RESERVED TEST

Pressing the UP-DOWN ARROW keys, the desired entry will be
selected. Activate it with the RIGHT ARROW key.
Pressing the ZOOM IN o ZOOM OUT keys, will be activated the
variometer or anemometer reset.

1) KEYBOARD TEST
This test verifies keyboard misfunctioning.
2) INPUT DATA DISPLAY
In this operation mode, the DUx screen becomes a terminal displaying
input data.
3) INSTRUMENTATION.
Allows to qualify the intrumentation page.
4-5) EEPROM TEST - CONNECTOR TEST.
Not usable by the user.
6) CLEAR RAM
Selecting this function, it is possible to delete DUx’s internal memory.
By a submenu you can clear alle the DATABASE or all the SETTINGS
7-8) CHOOSE PORT - RESERVED TEST
Not usable by the user.


4

      17

Summary of Contents for DU8

Page 1: ...OSD Open System Digifly DIGIFLY Display Unit 8 INSTRUMENTATION SW 2 02 USER MANUAL ...

Page 2: ...witching the central window par 3 1 3 Functions menù par 3 2 Replay par 3 3 Agenda par 3 4 Set Up par 3 5 In lines set up par 3 5 1 Measure units par 3 5 2 Warnings par 3 5 3 Chapter 4 System test Chapter 5 Installation General warnings par 5 1 Electrical wiring par 5 2 Technical features par 5 3 5 3 Technical features Monochrome high resolution 8 480 x 640 pixel LCD backlighted Antiscratch protec...

Page 3: ...ust be set up in SLA VE mode In this manner the viewing device MASTER will direct data transmission operations and one or more devices SLAVE will operate only as viewers Only the MASTER device will be capable of adjusting the flight recorder settings The MASTER SLAVE mode can be set in Set Up Therefore the Digifly Open System is now even more advanced and complete in order to meet any need of pilo...

Page 4: ...User Manual User Manual chapter 2 GETTING STARTED 2 1 Front panel 2 2 The display chapter 5 INSTALLATION 5 1 General warnings 3 18 ...

Page 5: ...r 4 SYSTEM TEST To enter in the System Test Page press and keep pressed the key POWER together with any other key As soon as the key is released the following menu will appear on the screen SYSTEM TEST software version KEYBOARD TEST INPUT DATA DISPLAY INSTRUMENTATION EEPROM TEST CONNECTOR TEST CLEAR RAM CHOOSE PORT 1 RESERVED TEST Pressing the UP DOWN ARROW keys the desired entry will be selected ...

Page 6: ...it is exceeded the relative warning appears in the specific window At the same time the bar indicator starts blinking 16 5 2 3 3 Brightness To regulate backlighting press the LIGHT button Each time the button is pressed light will be increased 2 3 4 Page toggle To toggle pages between Instrumentation and Moving Map pages press the MODE button in the main screen 2 3 5 Basic functions The key Allows...

Page 7: ...s possible to set up warnings There are 11 presettable engine warnings and 1 presettable flight warning anemometer 3 5 1 In lines set up For each in line is possible to define the type of probe connected None means that no probe is connected 15 chapter 3 INSTRUMENTATION 3 1 Main functions The upper part of the screen includes the flight instrumentation the lower one engine data We will distinguish...

Page 8: ... set up type of DAU10 it can not be modified by the user type of engine ENGINE 1 ENGINE 2 ENGINE 3 of this setting depends the bar graphics 1 ENGINE 1 4 EGT H20 OIL temp OIL press 2 ENGINE 2 2 EGT 2 CHT 3 ENGINE 3 2 EGT H20 1 CHT date and time mode master slave see Chapter 1 aircratf type AIRPLANE HELICOPTER GYROCOPTER of this setting depends the instrument Tachometer Rotor 7 1 AIRPLANE tachometer...

Page 9: ...Up page ENGINE TYPE TYPE 1 4 cylinders liquid cooled eg ROTAX 912 TYPE 2 2 cylinders air cooled eg ROTAX 503 TYPE 3 2 cylinders liquid cooled eg ROTAX 582 5 exhausted gas temperatures EGT1 2 3 4 Are represented in the left part of the bar graphics Measure unit C or F and alarms are presettable Scale Engine type 1 LOW 800 1600 F HIGH 1200 2000 F Engine type 2 3 400 2000 F 3 4 Agenda Use UP DOWN ARR...

Page 10: ...his instrument is express in percent 7b rotor It is an analog instrument with presettable alarm It is displaied if the aircraft type is set up as HELICOPTER or GYROCOPTER In the first case the value is express in percent in the second case the value is express in absolute 8 hourcounter It is a digital instrument presettable in the Set Up It indicates the working hours of the engine 9 oil and water...

Page 11: ...ing R will appear 12 on the upper left hand corner of the screen If you push ENTER within 5 seconds the recording is activated if not the recorder will not start working To stop the recording press DOWN ARROW and ENTER within 5 seconds The recording is automatically interrupted when the maximum recording time is exceeded The maximum recording time is related to the Sampling rate that is the freque...

Reviews: