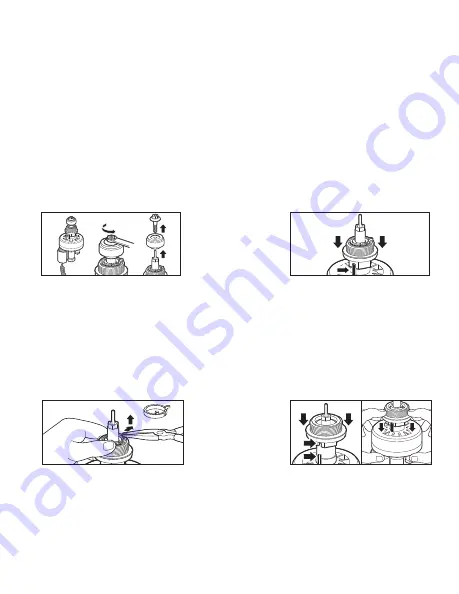
6.4.1 CHANGING TO A 1” ADAPTER:
The valve actuator is factory set to fit a 3/4” brass manual anti-siphon valve. To
install the controller on an actuator with a 1” manual anti-siphon valve, the 3/4”
seat washer and adapter must be removed and replaced with the 1” adapter and
seat washer, which are included with the actuator (Figures P1-P6).
1. Turn the actuator so that the seat washer and the 3/4” threaded adapter
face up.
2. Using pliers or a 5/16” wrench, remove the seat washer screw by turning it
counterclockwise and pull off the 3/4” seat washer assembly (Figure P1).
3. Press the 3/4” threaded adapter down towards the actuator to ease the
tension on the retainer clip (Figure P2).
4. Next, place your thumb on one side of the retainer clip, and with a pair of
pliers, grip the other side of the retainer clip. Pull away and upwards from your
thumb, removing the clip from the base of the 3/4” threaded adapter. Then,
remove the adapter (Figure P3).
5. Install the 1” threaded adapter by pushing it onto the actuator stem and
making sure the notch on the adapter lines up with the notch on the stem of
the actuator (Figure P4).
6. Spread the retainer clip with your thumbs and push the retainer into the
adapter until it clicks (Figure P5).
7. Install the 1” seat washer assembly as shown. Insert the seat washer screw
into the bottom of the actuator stem and tighten by turning clockwise
(Figure P6). Do not overtighten.
Figure P2
Figure P1
Figure P3
Figure P4
10


