22
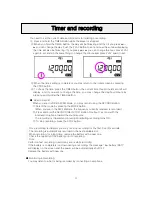
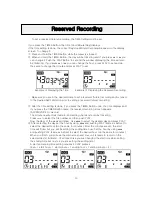
1. Press the TIMER Button twice and the reserved recording screen appears.
The minute needle clock indicator and setting channel should be flickering.
Press
to select the file number and then push PLAY.
Now the days of the week will flicker. Use
to select the desired day and press PLAY.
2. After selecting the day set the hour by using
and pushing PLAY (same as before) to
select the desired hour (do the same for minutes). After the minutes are set, the start time
will flicker but you will be setting the ending time now. Set the hour by using
and
pushing PLAY (same as before) to select the desired hour (do the same for minutes). When
you finish, you will see the main screen and your unit is ready to record on the selected
day(s) & time(s).
(It will seem like you are changing the start time when setting the ending time but trust us
you are setting the ending time)
A start and ending time setting requires 4 PLAY presses.
(Exp- 1 start hour + 1 start 1 ending hour + 1 ending minute = 4 )
You may set up to 10 reserved recordings for all the sections in AM/FM/VOICE.
● AM Region Setting
You can change
Voice Bank’s
AM region setting from EUROPE (9) to USA (10) or USA (10)
to EUROPE (9).
1. In VOICE or MP3 mode, press and hold the MODE button.
2. Press and hold the A-B button for about 3 seconds. (With the mode button still held
down)
3. Let go of the A-B button and you should see
Voice Bank
display USA or EUROPE on the
LCD.
4. Let go of the MODE button and use the A-B button to change between USA (10) &
EUROPE (9).
5. Press PLAY to select the desired setting.
* If you take too long to confirm your selections, you have to start the procedure all over
again.
AM/FM SD card Reserved Recording
1. Make sure you are in tuned to the desired AM/FM station prior to setting a reserved
(future) recording. Push the A-B button on
Voice Bank
to switch to the SD/MMC card
and next press the TIMER Button twice and the reserved recording screen appears. The
minute needle clock indicator and setting channel should be flickering. Press FW or RW
to select the file number and then push PLAY. Now the days of the week will flicker. Use
FW or RW to select the desired day and press PLAY.
2. After selecting the day, set the hour by using FW or RW and pushing PLAY (same as
before) to select the desired hour (do the same for minutes). After the minutes are set,
the start time will flicker but you will be setting the ending time now. Set the hour by
using FW or RW and pushing PLAY (same as before) to select the desired hour (do the
same for minutes). When you finish, you will see the main screen and your unit is ready
to record on the selected day(s) & time(s). You may set up to 10 reserved recordings for
all the sections in AM/FM/VOICE.

