background image

ii

Copyright Notice

Copyright 2002, Mitsubishi Electric Australia Pty. Ltd. All rights reserved. No
part of this publication may be reproduced, transmitted, transcribed, stored in
a retrieval system or translated into any language or computer language, in
any form or by any means, electronic, mechanical, magnetic, optical,
chemical, manual or otherwise, without the prior written permission.

Disclaimer

Mitsubishi Electric Australia Pty. Ltd. makes no representations or
warranties, either expressed or implied, with respect to the contents hereof
and specifically disclaims any warranties, merchantability or fitness for any
particular purpose. Further, Mitsubishi Electric Australia reserves the right to
revise this publication and to make changes from time to time in the contents
hereof without obligation to notify any person of such revision or changes.

Reference Information

For future reference, write the following information about your monitor in
the space below.  The serial number is on the back of the product or on the
bottom of its stand.

Monitor Information

Product Name:

Diamond View 1998E

Serial Number:

Date of Purchase:

Dealer Information

Dealer:

Telephone
Number:

Address:

Summary of Contents for 1998E

Page 1: ...DIAMOND VIEW 1998E Colour Monitor 19 48cm CRT Size 18 45 7cm Viewable Area User s Manual ...

Page 2: ...mark of Mitsubishi Electric Australia Pty Ltd Microsoft and Windows are registered trademarks of Microsoft Corporation Apple and Macintosh are registered trademarks of Apple Computer Inc All other trademarks remain the property of their respective owners ...

Page 3: ...llennium Edition 4 5 Adjusting the Monitor 5 Selecting Functions and Making Adjustments 6 Contrast Hotkey 6 Brightness Hotkey 6 The Main Menu 6 Make adjustments 7 Timing and Refresh Rate Setting 11 Factory Preset Timings 12 6 Troubleshooting 13 7 Specifications 15 8 Service Contacts 17 Australian Service Contacts 17 New Zealand Service Contacts 18 ...

Page 4: ...d or implied with respect to the contents hereof and specifically disclaims any warranties merchantability or fitness for any particular purpose Further Mitsubishi Electric Australia reserves the right to revise this publication and to make changes from time to time in the contents hereof without obligation to notify any person of such revision or changes Reference Information For future reference...

Page 5: ...cessible 4 Unplug the monitor s power cable from the wall outlet before cleaning Do not use liquid or aerosol cleaners Use a soft cloth to clean the monitor housing and screen 5 Slots and openings on the back or top of the cabinet are provided for ventilation They must not be blocked or covered This product should never be placed near or over a radiator or other heat source or in a built in instal...

Page 6: ...ewable Size With its 45 7 cm 18 diagonal viewable screen size the 1998E offers a larger viewable screen area than many other 19 CRT monitors Easy to Use On Screen Display The On Screen Display OSD allows you to adjust all settings simply with on screen menus Power Saving Function The power management complies with VESA DPMS standard When the system is idle off mode the monitor automatically cuts i...

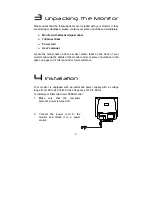
Page 7: ...al number label on the back of your monitor and write the details of the monitor and your place of purchase in the space on page ii of this manual for future reference 4 4 Installation Your monitor is equipped with an automatic power supply with a voltage range from 100 to 240 Volts AC at a frequency of 50 to 60 Hz To install your Diamond View 1998E monitor 1 Make sure that the computer system s p...

Page 8: ...ndows will detect the Diamond View 1998E monitor the first time you turn the computer on after installing it The Add New Hardware wizard will prompt for drivers Install the standard Windows Plug Play Monitor driver This driver will work correctly and allow you to use the monitor with its optimal resolutions and refresh rates A specific driver that includes the Windows ICC ICM colour profile for th...

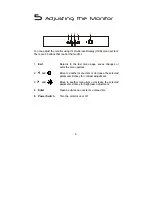
Page 9: ...1 Exit Returns to the last menu page saves changes or quits the menu system 2 and Move to another menu item or decrease the selected parameter Hotkey for contrast adjustment 3 and Move to another menu item or increase the selected parameter Hotkey for brightness adjustment 4 Enter Open a sub menu or selects a menu item 5 Power Switch Turn the monitor on or off 3 4 ...

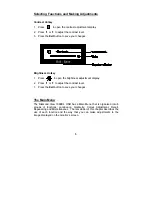
Page 10: ...ness adjustment display 2 Press or to adjust the contrast level 1 Press the Exit button to save your changes The Main Menu The Diamond View 1998E s OSD has a Main Menu that is organised into 6 groups of functions Luminance Geometry Colour Adjustment Recall Degaussing and Miscellaneous The remainder of this chapter describes the use of each function and the way that you can make adjustments to the ...

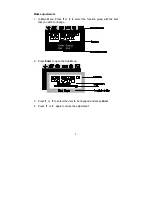
Page 11: ...In Main Menu Press or to select the function group with the item that you wish to change 2 Press Enter to open the Sub Menu 3 Press or to select the item to be changed and press Enter 4 Press or again to make the adjustment ...

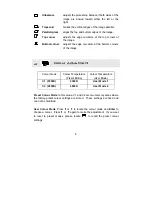
Page 12: ...image Brightness adjusts the brightness of the displayed image 2 Geometry Hor Position adjusts the horizontal position of the image Hor Size adjusts the image width Ver Position adjusts the vertical position of the image Ver Size adjusts the image height Rotation corrects any tilting of the image Pincushion corrects curves in the vertical edges of the image ...

Page 13: ...the bottom corners of the image 3 Colour Adjustment Colour mode Colour Temperature Preset Mode Colour Temperature User Mode C1 9300K 9300K User Mode 1 C2 6500K 6500K User Mode 2 Preset Colour Mode In this mode C1 and C2 are two memory areas where the factory preset colour settings are stored These settings are fixed and can not be modified User Colour Mode Press or to locate the colour mode and En...

Page 14: ...at corresponds with one of the monitor s presets 5 Manual Degaussing To eliminate colour shading or impurity induced by magnetism Press Enter to degauss the monitor Use this function after moving the monitor or changing the direction that it is facing 6 Miscellaneous Hor Moire adjusts horizontal Moiré Ver Moire adjusts vertical Moiré If the picture is unstable when you adjust the Moiré reduction s...

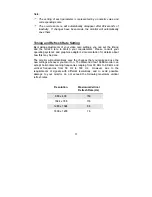
Page 15: ...ng system s and graphics adaptor s documentation for details about how this may be done The monitor will automatically save the changes that you make and use the new settings whenever you turn it on The Diamond View 1998E monitor can accept horizontal scanning frequencies ranging from 30 KHz to 98 kHz and vertical frequencies from 50 Hz to 160 Hz However due to the requirements of signals with dif...

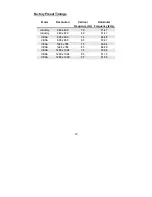
Page 16: ...y Hz Horizontal Frequency kHz Industry 640 x 400 70 31 47 Industry 640 x 480 60 31 47 VESA 800 x 600 75 46 88 VESA 800 x 600 85 53 67 VESA 1024 x 768 75 60 02 VESA 1024 x 768 85 68 68 VESA 1280 x 1024 75 79 98 VESA 1280 x 1024 85 91 15 VESA 1600 x 1200 65 81 25 ...

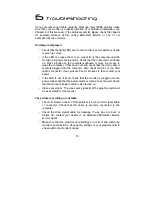
Page 17: ...curely plugged into the computer Also check the pins of the VGA cable s connector If any pins are bent or broken off then contact your dealer If the LED is not lit at all check that the monitor is plugged into the power socket and that the power switch is turned on at the wall Check that the monitor s power switch is also turned on Video sync signal The video sync signal from the graphics card mus...

Page 18: ...upplies AC adaptors The image is blurred or there is visible ghosting Have you used a VGA extension cable If so remove the extension cable and check the displayed image Is the image quality improved Depending on the characteristics and type of the extension cable some blurring or distortion may occur due to conduction losses in the extension cable You can minimise the distortion by using an extens...

Page 19: ...ximum Resolution 1600 x 1200 pixels at 75 Hz Recommended Resolution 1280 x 1024 pixels at 85 Hz Horizontal Frequency 30 98 kHz Vertical Frequency 50 160 Hz Video Bandwidth 176 MHz Microprocessor Controlled Graphics 9 factory preset timings 15 user modes Signal Connection 15 pin mini D sub cable Video Input VGA type 15 pin mini D sub connector Video Signal RGB analog Positive polarity 0 7 Vpp 75 Oh...

Page 20: ...al Characteristics Power Management VESA DPMS Energy Star Maximum Power Consumption 110 Watts Consumption in Power Saving Modes 5 Watts Operating Voltage Automatic switched mode power supply 100 240 V 50 60 Hz Dimensions W x H x D 455 x 466 x 463 mm Weight 20 kg Temperature Operating Storage 5 C 40 C 20 C 60 C Air Humidity Operating Storage 20 90 10 90 Regulatory Certification Safety AS NZS 60950 ...

Page 21: ...ils of your nearest Mitsubishi Electric Authorised Service Centre or contact the Service Department for your state New South Wales and Australian Capital Territory 348 Victoria Road Rydalmere NSW 2116 Telephone 02 9684 7669 Fax 02 9684 7684 Queensland 1 104 Newmarket Road Windsor Qld 4030 Telephone 07 3357 8877 Fax 07 3357 8488 South Australia and Northern Territory 77 Port Road Hindmarsh SA 5007 ...

Page 22: ...262 9899 Fax 03 9262 9850 Western Australia 5 329 Collier Road Bassendean WA 6054 Telephone 08 9377 3411 Fax 08 9377 3499 New Zealand Service Contacts Contact Melco New Zealand Ltd 1 Parliament St Lower Hutt Wellington Telephone 04 560 9100 Fax 04 560 9140 Web site www melco co nz ...

Reviews: