background image

3

©2008 Diamond Audio Technologies. All rights reserved.

FEATURES 

• Hard Annodized Aluminum Cone
• Rubber Surround
• High Density Proprietary Composite Frame
• Flat Progressive Spider
• Inductively Controlled Motor Design
• Rubber Boot Magnet Protector
• Model Specific Crossovers

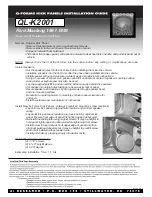
D6 CONVERTIBLE SPEAKER SYSTEMS

CONVERTIBILITY

Your new D6 speaker system has the unique ability to 
be used as either a component or a coaxial speaker.  
Depending on your installation requirements, the tweeter 
can be installed separately or mounted directly to the 
midbass/midrange unit with the supplied kit.  This 
provides for the most installation flexibility possible.  
See the drawing below for more details.

Step 2 - Unscrew Phase Plug 

Twist phase plug in a counter-

clockwise direction.

Step 1 - Remove Boot

Carefully remove the rubber  

boot from the magnet.

Step 3 - Assemble Tweeter Post

Carefully feed the tweeter wires through 

the holes and snap tweeter into place on 

top of the post .Secure with screw.

Step 4 - Attach Tweeter

Carefully feed the tweeter wires through 

the post and through the magnet.

Step 5 - Attach Tweeter Wires

Attach the tweeter wires to their 

proper terminals.

Step 6 - Carefully Replace Boot

Carefully replace the motor boot to 

cover and protect the tweeter wires.

Firmly grasp the 

tweeter post and  turn 

to unlock until you 

feel a “click”.

After you feel the “click” of 
the tweeter post unlocking, 

carefully pull the post straight 

up from the cone.

Removing the Tweeter

Summary of Contents for D652

Page 1: ...CONVERTIBLE SPEAKER INSTALLATION MANUAL D652 D662 D672 ...

Page 2: ...chnology and like all Diamond Audio products are hand built and tested using the highest grade components and state of the art techniques When installed properly they will provide many years of accurate sound reproduction Please keep in mind that prolonged exposure to sound pressure levels in excess of 100 dB can cause permanent hearing loss This high performance speaker system can exceed that lev...

Page 3: ...ility possible See the drawing below for more details Step 2 Unscrew Phase Plug Twist phase plug in a counter clockwise direction Step 1 Remove Boot Carefully remove the rubber boot from the magnet Step 3 Assemble Tweeter Post Carefully feed the tweeter wires through the holes and snap tweeter into place on top of the post Secure with screw Step 4 Attach Tweeter Carefully feed the tweeter wires th...

Page 4: ...luded and correct mounting assembly of the D6 midbass speaker and tweeter The grill on the midbass is optional Parts List 2 D6 Component Midbass Midrange Speakers 2 D6 Component Tweeters 2 D6 Grills w Mounting Ring except D672 2 Mounting Gaskets 1 Mounting Hardware Kit Screw Clips Gasket Mounting Screws Mid bass Driver Grill ...

Page 5: ......

Page 6: ...Qts 0 5 0 82 0 54 0 65 Fs Hz 57 8 60 0 1650 1520 Vas L 11 0 15 6 n a n a Re ohm 3 6 3 62 5 6 5 6 Xmax mm 3 6 4 8 n a n a Impedance ohm 4 4 8 8 Power Watts Nom Max 60 120 75 150 D672 86 5 1 06 76 0 10 3 3 5 4 0 4 60 120 50 100 50 100 The illustration below shows how to connect one channel of the D6 component system Crossover Mid bass Driver Tweeter Amplifier Optional RAF ...

Page 7: ...6 50 1 9 Mounting Diameter 4 60 117 3 5 50 1 64 Screw Hole Diameter 5 23 6 14 N A Mounting Depth 2 16 2 32 0 5 48 26 41 65 12 7 Magnet Diameter A B C D E 3 07 133 55 78 3 40 165 4 140 6 156 59 86 4 N A in mm in mm in mm in mm in mm D672 5 53 x 8 65 6 92 x 4 95 8 03 x 4 98 2 25 3 07 140 6 x 219 8 176 0 x 125 8 204 0 x 126 7 57 2 78 0 ...

Page 8: ...bers have been removed altered or defaced HOW TO OBTAIN WARRANTY SERVICE In the event a DAT product should require service you should visit the authorized DAT retailer you purchased the product from and they can expedite your claim All claims must fall into the guidelines listed above and be accompanied by a copy of the original sales and installation receipt from that authorized DAT retailer Prod...

Reviews: