background image

dg_nvmeip_linux_instruction_intel_en.doc


19-Feb-18 

Page 6 


10) Check LED status on FPGA board. The description of LED is shown as follows. 


Table 1 LED Definition 

GPIO LED 

ON 

OFF 

0  

Normal operation 

System is in reset condition 

1  

System is busy 

Idle status 

2  

Error detect 

Normal operation 

3  

Data verification fail  Normal operation 


Figure 2-7 4-bit LED Status for user output 


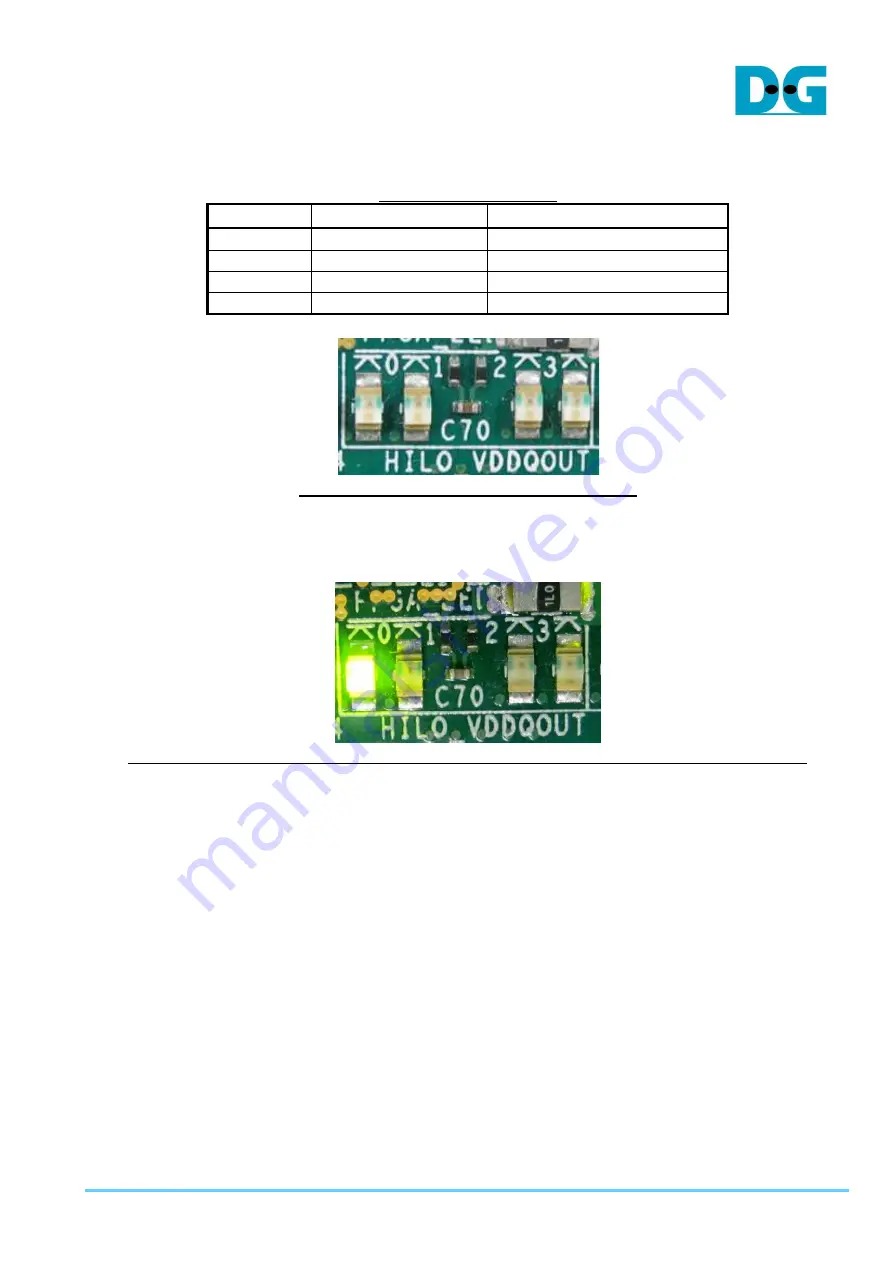
11) After  programming  completely,  LED[0]  and  LED[1]  are  ON  which  mean  that  PCIe 

initialization is processing. Then, LED[1] is OFF to show that PCIe completes initialization 
process and system is ready to receive command from user. 


Figure 2-8 LED status after program configuration file and PCIe initialization complete 


Summary of Contents for NVMe-IP

Page 1: ...n the demo FPGA configuration file as image file is prepared in microSD card After that install microSD card to FPGA board for configuration after power on board 1 Environment Requirement To demo NVMe IP Linux demo on IntelFPGA board please prepare the following hardware software 1 IntelFPGA board Arria10 SoC Development board 2 PC with Serial console software i e HyperTerminal 3 Power adapter of ...

Page 2: ...dg_nvmeip_linux_instruction_intel_en doc 19 Feb 18 Page 2 Figure 1 1 NVMe IP Linux Demo on Arria10 SoC Development Board ...

Page 3: ... 3 Open Win32DiskImage application 4 Copy sd_card_image_a10 img to microSD by using Win32DiskImage as shown in Figure 2 1 a Select drive to microSD card drive b Browse to directory path of sd_card_image_a10 img file c Click Write to start dump data d Confirm overwrite window is displayed Click Yes to confirm data dump e Wait until progress status updated from 0 to 100 Complete window with Write Su...

Page 4: ... system 2 Insert microSD card to the socket on daughter cards 3 Connect NVMe SSD to PCIe connector on FPGA board as shown in Figure 2 2 Figure 2 2 NVMe SSD connection on FPGA board 4 Connect mini USB cable from FPGA board to PC for Serial console as shown in Figure 2 3 Figure 2 3 USB cable connection ...

Page 5: ... SoC board 6 Connect FPGA power adapter to FPGA board as shown in Figure 2 5 7 Power on FPGA development board Figure 2 5 Power on FPGA board 8 Open Serial console software such as HyperTerminal Software setting is BaudRate 115 200 Data 8 bit Non Parity and Stop 1 9 On PC Serial console please wait Linux boot up until login required as shown in Figure 2 6 Figure 2 6 Linux Boot up ...

Page 6: ...Idle status 2 Error detect Normal operation 3 Data verification fail Normal operation Figure 2 7 4 bit LED Status for user output 11 After programming completely LED 0 and LED 1 are ON which mean that PCIe initialization is processing Then LED 1 is OFF to show that PCIe completes initialization process and system is ready to receive command from user Figure 2 8 LED status after program configurati...

Page 7: ...y login name as root as shown in Figure 3 1 Figure 3 1 Login to Linux system Next insert module and running test application by typing following command insmod dg_universal ko dg_universal application dguTestApp After that main menu is displayed on Serial console as shown in Figure 3 2 Figure 3 2 Insert module and running test application ...

Page 8: ...on_intel_en doc 19 Feb 18 Page 8 3 1 Identify Device Select 0 to send Identify command to NVMe SSD When operation is completed SSD capacity and model name are displayed on the console Figure 3 3 Result from Identify Device menu ...

Page 9: ... decimal unit when input only digit number User can add 0x to be prefix when input is hexadecimal unit 3 Test pattern Select test pattern of test data for writing to SSD Five types can be selected i e 32 bit increment 32 bit decrement all 0 all 1 and 32 bit LFSR counter As shown in Figure 3 4 if all inputs are valid the operation will be started During writing data current transfer size is display...

Page 10: ...est data of each sector has different 64 bit header which consists of 48 bit LBA address and 16 bit all 0 value 48 bit LBA address is unique value for each sector After that the test pattern is filled following user selection such as 32 bit increment pattern left window of Figure 3 5 32 bit LFSR pattern right window of Figure 3 5 ...

Page 11: ... Figure 3 8 shows error message when user input is invalid Input is not in range is displayed on the console Then it returns to main menu to receive new command Figure 3 6 Invalid Start LBA input Figure 3 7 Invalid Sector count input Figure 3 8 Invalid Test pattern input ...

Page 12: ...n input only digit number User can add 0x to be prefix when input is hexadecimal unit 3 Test pattern Select test pattern to verify data from SSD Test pattern must be matched with the test pattern which is used during write test Five types can be selected i e 32 bit increment 32 bit decrement all 0 all 1 and 32 bit LFSR counter Similar to write test if all inputs are valid test system will read dat...

Page 13: ... doc 19 Feb 18 Page 13 Figure 3 10 shows the error message when data verification is failed verification fail is displayed with Read data and Expected data User must wait until the test is completed Figure 3 10 Data verification is failed ...

Page 14: ...al unit when input only digit number User can add 0x to be prefix when input is hexadecimal unit Similar to write and read test if the input is valid test system will return data 1 sector 512 byte from SSD Figure 3 11 Dump menu example After displaying one data sector another input is required Input p to display the previous sector of Start LBA Input n to display the next sector of Start LBA Input...

Page 15: ...p_linux_instruction_intel_en doc 19 Feb 18 Page 15 As shown in Figure 3 12 when input n to show the data of the next sector Start LBA is increased by 1 from 0 to 1 Figure 3 12 Example of Dump menu when input n ...

Page 16: ... in Figure 3 13 when input p to show the data of the previous sector Start LBA is decreased by 1 from 1 to 0 Figure 3 13 Example of Dump menu when input p Main menu is displayed when user input e to exit Dump menu as shown in Figure 3 14 Figure 3 14 Exit Dump SSD menu ...

Page 17: ...dg_nvmeip_linux_instruction_intel_en doc 19 Feb 18 Page 17 3 5 Exit Test Select 9 to exit test application Figure 3 15 Exit test application ...

Page 18: ...dg_nvmeip_linux_instruction_intel_en doc 19 Feb 18 Page 18 4 Revision History Revision Date Description 1 0 19 Feb 18 Initial version release ...

Reviews: