Dexin MWP5016 User Manual Download Page 4

4

Step 3. Connecting the power

1.  Connect the AC plug of power adaptor into AC power outlet.

2.  Connect the DC output connector of the adaptor into the female DC jack on the

back of charger.

3.  Then the red LED will be lighten on.

Step 4.    Full charge the batteries

1.  Put the wireless optical mouse with its rechargeable batteries on the correct

location of the charger.

2.  Before you use the wireless optical mouse, you have to charge the batteries as

full as possible. It will take about 3 to 4 hours to full charge the lithium-ion

batteries inside the mouse.

3.  During charging the lithium-ion battery, the lefts green LED on the charger base

will be lighten on. When the battery is full charged, the green LED will be turned

off.

Please follow the procedures to set up:

1. Installing the Batteries

To apply the battery, please follow the following steps:


n


Turn the mouse to the bottom side and remove the battery cover by moving the

opening tab and pull the battery cover out.

n


There are signs to indicate the polarity of the battery. Follow the signs to place

the battery.

n


Place the battery cover back and make sure it is firmly closed.

Battery Warning!

Be sure to use the included lithium battery.

Do not use a standard AA battery, which does not have an enough voltage level to trigger
the internal circuitry.

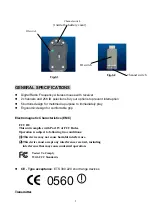
2.  Establishing communication between the receiver and the mouse

n


First, make sure that channel switches on the mouse and the receiver are placed

at the same channel, i.e., channel A or channel B.

n


Press and release the connect button, or ID SW, on bottom of the wireless mouse

(refer to Fig-3.1).

n


Press and release the connected button, or ID SW, on the receiver (refer to Fig-

3.2). Note: The location of the ID switch may vary according to different model of

receiver.

n


The "connect" light on the top cover of receiver will flash while the same ID is

selected on both of the receiver and the mouse.

Summary of Contents for MWP5016

Page 1: ...1 STANDARD RF OPTICAL MOUSE USER S MANUAL Model MWP5016 ...

Page 2: ...unction require Win98 2000 Me XP l If without driver installed 4th 5th button require Win2000 XP if without driver installed Before you begin l Keep this installation guide for future reference It contains Important Troubleshooting Information l Keep your old PS 2 mouse as a back up device Getting Started Congratulations on your purchase of an RF Radio Frequency wireless multimedia mouse By using ...

Page 3: ...n you operate the mouse right in front of the notebook or PC and the receiver is connected on the back of the notebook or PC However the RF mouse should work properly while you are operating the mouse just beside your notebook computer or PC Installation Guide Step 1 Connecting the Receiver By using this MWP5016 mouse you need to keep a free USB port for the included receiver Please follow the ste...

Page 4: ...n Turn the mouse to the bottom side and remove the battery cover by moving the opening tab and pull the battery cover out n There are signs to indicate the polarity of the battery Follow the signs to place the battery n Place the battery cover back and make sure it is firmly closed Battery Warning Be sure to use the included lithium battery Do not use a standard AA battery which does not have an e...

Page 5: ...gn for comfortable grip Electromagnetic Characteristics EMC FCC ID This unit complies with Part 15 of FCC Rules Operation is subject to following two conditions 1 This device may not cause harmful interference 2 This device must accept any interference received including interference that may cause undesired operation l CE Type acceptance ETS 300 220 short range devices 0560 Transmitter Tested To ...

Page 6: ...ht 16 grams Recharger l Charging Current 70 mA typical l Power 5V DC 450 mA l Dimensions 112 87 54 mm l Weight 110 g ELECTRIC SPECIFICATIONS l Operating Voltage Transmitter 3 7V DC powered by batteries Receiver 4 5 to 5 5V DC powered by USB port l Operating Current Transmitter 45 55mA Receiver 30mA typical l Standby Current Transmitter 10mA or lower l Sleep Mode Current Transmitter below 10uA l Mo...

Page 7: ... aluminum copper or other metal may act like a shielding to the RF antenna of the mouse and the receiver 3 Interference with other RF wireless mouse Please switch the channel to the other one To do so you need to slide the channel switch on both the receiver and the mouse to the other side A new identification code may require if there happens a cross reception of RF signal from other same model o...

Page 8: ... off and on the user is encouraged to try to correct the interference by one of the following measures Reorient or relocate the receiving antenna Increase the separation between the equipment and receiver Connect the equipment into an outlet on a circuit different from that to which the receiver is connected Consult the dealer or an experienced radio TV technician for help This device complies wit...

Reviews: