background image

ENGlIsh

38

Important Safety Instructions for All 

Battery Chargers


WARNING: Read all safety warnings, instructions, 

and cautionary markings for the battery pack, 

charger and product. Failure to follow the 

warnings and instructions may result in electric 

shock, fire and/or serious injury.

• 

DO NOT attempt to charge the battery pack with 

any chargers other than a 

D

e

WALT

 charger.


D

e

WALT


chargers and battery packs are specifically designed to 
work together.

• 

These chargers are not intended for any uses other 

than charging 

D

e

WALT

 rechargeable battery packs. 

Charging other types of battery packs may cause them to 
overheat and burst, resulting in personal injury, property 
damage, fire, electric shock or electrocution.

• 

Do not expose the charger to rain or snow.

• 

Do not allow water or any liquid to enter charger.

• 

Pull by the plug rather than the cord when 

disconnecting the charger.

 This will reduce the risk of 

damage to the electric plug and cord.

• 

Make sure that the cord is located so that it will not 

be stepped on, tripped over or otherwise subjected to 

damage or stress.

• 

Do not use an extension cord unless it is absolutely 

necessary.

 Use of improper extension cord could result in 

risk of fire, electric shock or electrocution.

• 

When operating a charger outdoors, always provide 

a dry location and use an extension cord suitable 

for outdoor use. 

Use of a cord suitable for outdoor use 

reduces the risk of electric shock.

shipping the 

D

e

WALT

 FlEXVOlT™ Battery pack

The 

D

e

WALT

 FLEXVOLT™ battery pack has a battery cap that 

should be used when shipping the battery pack.

Attach the cap to the battery pack to ready it for shipping.   
This converts the battery pack to three separate 20V 
batteries. The three batteries have the Watt hour rating 
labeled “Shipping” on the battery pack. If shipping without 
the cap or in a tool, the pack is one battery at the Watt hour 
rating labeled “Use”.

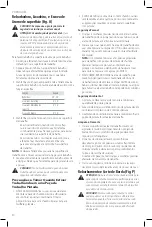
Example battery pack label:


USE: 120 Wh   SHIPPING: 3 x 40 Wh

In this example, the battery pack is three batteries with 
40 Watt hours each when using the cap. Otherwise, the 
battery pack is one battery with 120 Watt hours.

When transporting individual battery packs, make 
sure that the battery terminals are protected and well 
insulated from materials that could contact them and 
cause a short circuit. 

NOTE: 

Li-ion battery packs should 

not be put in checked baggage on airplanes and must 
be properly protected from short circuits if they are in 
carry-on baggage.

the trigger switch locked on. Never tape the trigger 

switch in the ON position.

• 

Do not incinerate the battery pack even if it is severely 

damaged or is completely worn out.

 The battery pack 

can explode in a fire. Toxic fumes and materials are created 
when lithium-ion battery packs are burned.

• 

Do not expose a battery pack or appliance to fire or 

excessive temperature.

 Exposure to fire or temperature 

above 265 °F (130 °C) may cause explosion.

• 

Follow all charging instructions and do not charge the 

battery pack or appliance outside of the temperature 

range specified in the instructions.

 Charging improperly 

or at temperatures outside of the specified range may 
damage the battery and increase the risk of fire.

• 

If battery contents come into contact with the skin, 

immediately wash area with mild soap and water. 

If 

battery liquid gets into the eye, rinse water over the open 
eye for 15 minutes or until irritation ceases. If medical 
attention is needed, the battery electrolyte is composed of a 
mixture of liquid organic carbonates and lithium salts.

• 

Contents of opened battery cells may cause 

respiratory irritation.

 Provide fresh air. If symptoms 

persist, seek medical attention.

• 

Battery liquid may be flammable if exposed to spark 

or flame.

• 

Never attempt to open the battery pack for any 

reason. If the battery pack case is cracked or 

damaged, do not insert into the charger.

 Do not crush, 

drop or damage the battery pack. Do not use a battery pack 
or charger that has received a sharp blow, been dropped, 
run over or damaged in any way (e.g., pierced with a nail, 
hit with a hammer, stepped on). Damaged battery packs 
should be returned to the service center for recycling.

Storage Recommendations

The best storage place is one that is cool and dry, away 
from direct sunlight and excess heat or cold.  Store the fully 
charged battery pack out of the charger.

Battery Pack Cleaning Instructions

Dirt and grease may be removed from the exterior of the 
battery pack using a cloth or soft non‑metallic brush. Do not 
use water or any cleaning solutions.

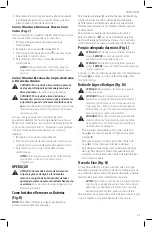
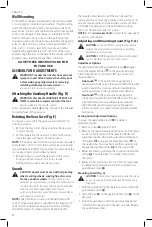
Fuel Gauge Battery Packs (Fig. B)

Some  battery packs include a fuel gauge. When the 
fuel gauge button is pressed and held, the LED lights 
will indicate the approximate level of charge remaining. 
This does not indicate tool functionality and is subject to 
variation based on product components, temperature, and 
end‑user application.

Transportation


WARNING:


Fire hazard. Do not store, carry, or 

transport the battery pack so that metal objects 

can contact exposed battery terminals. 

For 

example, do not place the battery pack in aprons, 
pockets, tool boxes, product kit boxes, drawers, etc., 
with loose nails, screws, keys, coins, hand tools, etc. 

Summary of Contents for XR LI-ION DCG418

Page 1: ...m www DeWALT com br Questions See us on the World Wide Web at www DeWALT com DCG418 Esmeriladora Inalámbrica de 60 V Máx con Kickback BrakeTM 60 V Max Esmerilhadeira Sem Fios com Kickback BrakeTM 60V Max Cordless Grinder with Kickback BrakeTM Manual de Instrucciones Manual de Instruções Instruction Manual ...

Page 2: ...Español traducido de las instrucciones originales 4 Português traduzido das instruções originais 19 English original instructions 33 ...

Page 3: ...ura lateral 6 Disco de rebarbar Fig H 7 Flange de apoio não rosqueada 8 Flange trava 9 Proteção Tipo 27 x2 150 mm 6 e 115 mm 4 5 10 Alavanca para soltar proteção 11 Conjunto de bateria 12 Botão de destrava da bateria 4 5 9 12 2 1 3 10 7 8 11 Componentes 1 Interruptor de gatillo 2 Palanca de bloqueo de apagado 3 Botón de bloqueo de husillo 4 Husillo 5 Manija lateral 6 Rueda de esmeril Fig H 7 Brida...

Page 4: ...4 cargada 50 charged Chargé de 50 50 cargada Pack needs to be charged Le bloc piles doit être rechargé La batería tiene que cargarse Indicators Témoin Indicador Charging Bloc piles en Cours de Chargement Unidad en Proceso de Carga Fully Charged Bloc piles Chargé Unidad Cargada Hot Cold Pack Delay Suspension de Charge Contre le Chaud Froid Restraso por Unidad Caliente Fría ...

Page 5: ...3 Fig H Fig I Fig J Fig K Fig L 8 6 7 4 20 19 18 3 4 12 11 1 2 Fig M 3 Fig N Fig O Fig P 5 Fig Q 23 22 21 13 ...

Page 6: ...erramienta eléctrica puede provocar lesiones personales graves b Utilice equipos de protección personal Siempre utilice protección para los ojos En las condiciones adecuadas el uso de equipos de protección ADVERTENCIAS GENERALES DE SEGURIDAD PARA HERRAMIENTAS ELÉCTRICAS ADVERTENCIA Lea todas las advertencias de seguridad instrucciones ilustraciones y especificaciones incluidas con esta herramienta...

Page 7: ...r irritación o quemaduras e No use un paquete de batería o herramienta que estén dañados o modificados Las baterías dañadas o modificadas pueden presentar un comportamiento como máscaras para polvo calzado de seguridad antideslizante cascos o protección auditiva reducirá las lesiones personales c Evite el encendido por accidente Asegúrese de que el interruptor esté en la posición de apagado antes ...

Page 8: ...rte que hagan contacto con cable vivo pueden tener partes de metal expuestas de la herramienta eléctrica viva y podrían dar al operador una descarga eléctrica k Nunca coloque la herramienta eléctrica hacia abajo hasta que el accesorio se detenga por completo El accesorio giratorio puede agarrar la INSTRUCCIONES DE SEGURIDAD PARA TODAS LAS OPERACIONES Advertencias de seguridad comunes para Esmerila...

Page 9: ...rar el accesorio giratorio y causar pérdida de control o retroceso e No conecte una cadena de sierra hoja para tallar en madera ni hoja de sierra dentada Tales cuchillas crean retrocesos frecuentes y pérdida de control superficie y extraer la herramienta eléctrica salga de su control l No opere la herramienta eléctrica mientras la lleva a su lado El contacto accidental con el accesorio giratorio p...

Page 10: ...otectores laterales y un protector facial completo que cumpla con la norma ANSI Z87 1 Advertencias de seguridad específicas para pulido y Operaciones de corte abrasivo a Utilice sólo los tipos de ruedas recomendados para su herramienta eléctrica y la protección específica diseñada para la rueda seleccionada Las ruedas que no estén diseñadas para la herramienta eléctrica no se pueden proteger adecu...

Page 11: ...nguna parte de ella Podría resultar en daño o lesiones personales ADVERTENCIA SIEMPRE use gafas de seguridad Las gafas de uso diario NO son gafas de seguridad También use una careta o máscara de polvo si la operación de corte produce polvo SIEMPRE USE EQUIPO DE SEGURIDAD CERTIFICADO Protección para los ojos ANSI Z87 1 CAN CSA Z94 3 Protección auditiva ANSI S12 6 S3 19 Protección respiratoria NIOSH...

Page 12: ... permita que agua o ningún otro líquido entre al paquete de batería No almacene ni use la herramienta y el paquete de baterías en lugares donde la temperatura pueda alcanzar o exceder los 40 C 104 F como cobertizos exteriores o edificios de metal en verano Para obtener la mejor vida útil guarde los paquetes de baterías en un lugar fresco y seco NOTA No guarde los paquetes de baterías en una herram...

Page 13: ... carga del paquete Esta característica garantiza la vida máxima del paquete de batería producto La falla en seguir las advertencias e instrucciones puede resultar en descarga eléctrica incendio y o lesiones serias NO intente cargar el paquete de batería con cargadores diferentes al cargador DeWALT Los cargadores DeWALT y los paquetes de batería están diseñados específicamente para funcionar juntos...

Page 14: ...FUTURO Montaje en Pared Algunos cargadores DeWALT están diseñados para montarse en pared o colocarse verticales sobre una mesa o superficie de trabajo Si se monta en pared localice el cargador dentro del alcance de un tomacorriente eléctrico y lejos de una esquina u otras obstrucciones que puedan impedir el flujo de aire Use la parte posterior del cargador como una plantilla para la ubicación de l...

Page 15: ...e utilizarse un protector tipo 1 41 para cualquier disco cuando el esmerilado de superficies esté prohibido Los cortes pueden realizarse también utilizando un disco tipo 1 41 y un protector tipo 1 41 NOTA Consulte la Tabla de accesorios para seleccionar la combinación apropiada de protector accesorio Ajustar y Montar el Protector Figs F G ATENCIÓN Apague la unidad y desenchufe la herramienta antes...

Page 16: ...la herramienta Montaje de Cepillos de Copa de Alambre y Discos de Alambre ATENCIÓN Para reducir el riesgo de lesiones corporales use guantes de trabajo cuando maneje cepillos y discos de alambre Pueden estar afilados ATENCIÓN Para reducir el riesgo de daño a la herramienta el disco o el cepillo no deben tocar el protector al montarse o durante su uso Podría Montaje y Retiro de los Discos con Cubo ...

Page 17: ...a del área de trabajo Limpieza y Eliminación de Residuos 1 Todas las superficies del área de trabajo deben ser limpiadas en profundidad y repasadas con aspiradora todos los días mientras dure el proyecto de lijado Esmerilado Lijado y Cepillado Metálico de Superficies Fig O ATENCIÓN Utilice siempre un protector correcto según las instrucciones de este manual Para realizar un trabajo en la superfici...

Page 18: ...ado de la herramienta y de una limpieza periódica MANTENIMIENTO ADVERTENCIA Para reducir el riesgo de lesiones personales apague la unidad y retire el paquete de batería antes de realizar cualquier ajuste o retirar instalar conexiones o accesorios Esmerilado y Corte de Bordes Fig P ADVERTENCIA No use discos de esmerilado corte de bordes para aplicaciones de esmerilado de superficies porque estos d...

Page 19: ...s ADVERTENCIA Para asegurar la SEGURIDAD y la CONFIABILIDAD del producto las reparaciones el mantenimiento y los ajustes deben inclusive inspección y cambio de carbones ser realizados en un centro de mantenimiento en la fábrica DeWALT o en un centro de mantenimiento autorizado DeWALT Utilice siempre piezas de repuesto idénticas ...

Page 20: ...rte abrasivo tipo 1 41 brida de bloqueo roscada Protector tipo 1 41 brida de respaldo sin rosca disco de corte de diamante brida de bloqueo roscada Discos de alambre Protector tipo 27 cepillo de copa de alambre 76 2 127 mm 3 5 Protector tipo 27 disco de alambre de 100 150 mm 4 6 Discos de lijado almohadilla de respaldo de goma disco de lijado tuerca de fijación TABLA DE ACCESORIOS Los protectores ...

Page 21: ... nas condições apropriadas para reduzir ferimentos corporais c Evite um acionamento acidental da ferramenta Se certifique que o disjuntor está na posição de desligado antes de ligar a energia elétrica e ou o conjunto de baterias levantar ou transportar a ferramenta Transportar ferramentas elétricas com ADVERTÊNCIAS GERAIS DE SEGURANÇA DE FERRAMENTAS ELÉTRICAS ATENÇÃO Leia todas as instruções e avi...

Page 22: ...por fornecedores de serviços autorizados seu dedo no disjuntor ou ligar a energia ferramentas elétricas ligadas pode resultar em acidentes d Remova chaves de ajuste ou chaves fixas antes de ligar a ferramenta Se deixar uma chave de ajuste ou chave ligada a uma peça móvel da ferramenta elétrica pode resultar em injúrias pessoais e Não a sobrecarregue Mantenha sempre o equilíbrio e o apoio para os p...

Page 23: ... auxiliar deve sempre ser usada para manter o controle da ferramenta r Quando ligar a ferramenta com um disco novo ou de reposição ou for instalada uma escova de arames nova ou de reposição coloque a sua INSTRUÇÕES DE SEGURANÇA PARA TODAS AS OPERAÇÕES Advertências de Segurança Comuns para Rebarbar Lixar Escova de Arameou Operações de Corte Abrasivo a Essa ferramenta elétrica é projetada para funci...

Page 24: ...do por um minuto Se o disco tiver uma racha ou defeito não detectado ele estourará em menos de um minuto Se a escova de arame tiver fios soltos esses serão detectados Nunca ligue a ferramenta com uma pessoa que esteja na direção do disco Inclusive o operador s Não se recomenda o uso de acessórios não especificados nesse manual pois pode oferecer perigo A utilização de amplificadores de potência qu...

Page 25: ...leta para o rosto de acordo com ANSI Z87 1 se estiver a uma distância de 15 2 m 50 do local onde o produto está sendo usado quebra do disco As flanges para discos de corte podem ser diferentes da flange de discos rebarbadores f Não use discos gastos de ferramentas elétricas maiores Discos para ferramentas elétricas maiores não são apropriados para as velocidades mais altas de uma ferramenta menor ...

Page 26: ...ritação respiratória Providencie ar fresco Se os sintomas persistirem procure cuidados médicos O líquido da bateria pode ser inflamável se exposto a uma faísca ou chama Nunca tente abrir o conjunto de baterias por qualquer razão Se a caixa do conjunto de baterias está quebrada ou danificada não o insira no carregador Não esmague deixe cair ou danifique o LEIA TODAS AS INSTRUÇÕES Instruções de Segu...

Page 27: ...TE 3 x 40 Wh Nesse exemplo o conjunto de baterias é composto por três baterias com 40 Watt horas cada usando a tampa Caso contrário o conjunto de bateria é uma bateria de 120 Watt horas Remessa de conjunto de baterias DeWALT FLEXVOLT O conjunto de baterias DeWALT FLEXVOLT tem uma tampa de bateria que se deve usar para o transporte do conjunto de baterias Fixe a tampa ao conjunto de baterias para q...

Page 28: ... centro de assistência técnica local 3 Você pode carregar um conjunto de baterias parcialmente usado se desejar sem ter algum efeito adverso no conjunto de baterias Tensão Volts Comprimento do cabo de extensão em metros m 120 127 V 0 7 7 15 15 30 30 50 220 240 V 0 15 15 30 30 60 60 100 Faixa de Corrente nominal Amperes Secção mínima do cabo de extensão em milímetros quadrados mm2 0 6A 1 0 1 5 1 5 ...

Page 29: ...r simultaneamente girada no sentido horário ou anti horário usuário voltado para o fuso Como Definir Opções de Ajuste de Proteções Para ajustar a alavanca de liberação da proteção 10 para a opção de ajuste desejada Como Girar a Caixa de Engrenamento Fig E Para melhorar o conforto do usuário a caixa de engrenamento gira 90 para operações de corte 1 Remover os quatro parafusos dos cantos que fixam a...

Page 30: ... trava com uma chave 5 Para retirar o disco pressione o botão de trava do eixo e solte a flange trava rosqueada com uma chave Flanges e Discos ATENÇÃO Para reduzir o risco de ferimentos corporais graves desligue a unidade e remova o conjunto de baterias antes de realizar ajustamentos ou remover instalar fixações ou acessórios Um acionamento acidental pode causar ferimentos Como Montar Discos Sem C...

Page 31: ...nta e garanta que não se desengatem Para remover as baterias da ferramenta pressione o botão de liberação 12 e as puxe firmemente para fora da empunhadura da ferramenta Insira as no carregador conforme descrito na seção do carregador deste manual Como Instalar e Remover as Baterias Fig K NOTA Para obter melhores resultados verifique se as baterias estão totalmente carregadas OPERAÇÃO ATENÇÃO Para ...

Page 32: ... remoção Devem ser colocados em recipientes de resíduos selados e descartados pelos procedimentos normais de recolha de resíduos Durante a limpeza manter crianças e mulheres grávidas afastadas da zona direta de trabalho 3 Todos os brinquedos mobiliário e utensílios laváveis devem ser muito bem lavados antes de se usar de novo Rebarbadora Lixadeira e Escova de Arame de superfície Fig O CUIDADO Semp...

Page 33: ...goso Para reduzir o risco de Limpeza ATENÇÃO Sopre sujeira e poeiras para fora de todas as saídas de ar com ar limpo e seco pelo menos uma vez por semana Para minimizar o risco de lesões nos olhos use sempre proteção ocular aprovada para fazer esse procedimento ATENÇÃO Nunca use diluentes ou outros químicos agressivos para limpar as peças não metálicas da ferramenta Esses químicos podem enfraquece...

Page 34: ...o 1 41 disco de corte abrasivo flange de trava rosqueada Proteção tipo 1 41 flange de apoio não rosqueada disco de corte diamante flange de trava rosqueada Discos de Arame Proteção tipo 27 escova de arame com taça 76 2 127 mm 3 5 Proteção tipo 27 disco de arame 100 150 mm 4 6 Discos de lixamento almofada de apoio de borracha discos de lixamento porca de aperto TABELA DE ACESSÓRIOS As proteções do ...

Page 35: ...and gloves away from moving parts Loose clothes jewelry or long hair can be caught in moving parts g If devices are provided for the connection of dust extraction and collection facilities ensure these are connected and properly used Use of dust collection can reduce dust related hazards GENERAL POWER TOOL SAFETY WARNINGS WARNING Read all safety warnings instructions illustrations and specificatio...

Page 36: ...tools allow you to become complacent and ignore tool safety principles A careless action can cause severe injury within a fraction of a second 4 Power Tool Use and Care a Do not force the power tool Use the correct power tool for your application The correct power tool will do the job better and safer at the rate for which it was designed b Do not use the power tool if the switch does not turn it ...

Page 37: ...of the material causing the wheel to climb out or kick out The wheel may either jump toward or away from the operator depending on direction of the wheel s your power tool Incorrectly sized accessories cannot be adequately guarded or controlled f Threaded mounting of accessories must match the grinder spindle thread For accessories mounted by flanges the arbor hole of the accessory must fit the lo...

Page 38: ...essive load to movement at the point of pinching Abrasive wheels may also break under these conditions Kickback is the result of tool misuse and or incorrect operating procedures or conditions and can be avoided by taking proper precautions as given below a Maintain a firm grip on the power tool and position your body and arm to allow you to resist kickback forces Always use auxiliary handle if pr...

Page 39: ...lt WARNING ALWAYS use safety glasses Everyday eyeglasses are NOT safety glasses Also use face or dust mask if cutting operation is dusty ALWAYS WEAR CERTIFIED SAFETY EQUIPMENT ANSI Z87 1 eye protection CAN CSA Z94 3 ANSI S12 6 S3 19 hearing protection NIOSH OSHA MSHA respiratory protection WARNING Some dust created by power sanding sawing grinding drilling and other construction activities contain...

Page 40: ... switch locked on Never tape the trigger switch in the ON position Do not incinerate the battery pack even if it is severely damaged or is completely worn out The battery pack can explode in a fire Toxic fumes and materials are created when lithium ion battery packs are burned Do not expose a battery pack or appliance to fire or excessive temperature Exposure to fire or temperature above 265 F 130 C...

Page 41: ...t the charger from the AC outlet before cleaning Dirt and grease may be removed from the exterior of the charger using a cloth or soft non metallic brush Do not use water or any cleaning solutions An extension cord must have adequate wire size for safety The smaller the gauge number of the wire the greater the capacity of the cable that is 16 gauge has more capacity than 18 gauge An undersized cor...

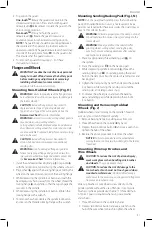
Page 42: ...ugs engage and rotate them in the groove on the gear case hub Release the guard release lever Rotating the Gear Case Fig E To improve user comfort the gear case will rotate 90 for cutting operations 1 Remove the four corner screws attaching the gear case to motor housing 2 Without separating the gear case from motor housing rotate the gear case head to desired position NOTE If the gear case and mo...

Page 43: ... backing pad and sanding pad while depressing the spindle lock button Flanges and Wheels WARNING To reduce the risk of serious personal injury turn unit off and remove the battery pack before making any adjustments or removing installing attachments or accessories An accidental start up can cause injury Mounting Non Hubbed Wheels Fig H WARNING Failure to properly seat the flange clamp nut wheel co...

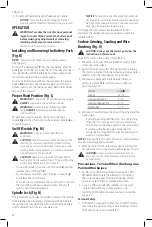
Page 44: ...ndle until you are unable to rotate the spindle further Spindle Lock Fig N The spindle lock button 3 is provided to prevent the spindle from rotating when installing or removing wheels Operate the spindle lock only when the tool is turned off the battery is removed and has come to a complete stop On Off Switch Fig M WARNING Do not switch the tool off while under load CAUTION Hold the auxiliary han...

Page 45: ...ARNING Do not use edge grinding cutting wheels for surface grinding applications because these wheels are not designed for side pressures encountered with surface grinding Wheel breakage and injury may result CAUTION Wheels used for edge grinding and cutting may break or kick back if they bend or twist while the tool is being used In all edge grinding cutting operations the open side of the guard ...

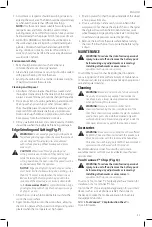
Page 46: ... or a DeWALT authorized service center Always use identical replacement parts Installing the Tool Connect Chip 1 Remove the retaining screws 21 that hold the Tool Connect Chip protective cover 22 into the tool 2 Remove the protective cover and insert the Tool Connect Chip into the empty pocket 23 3 Ensure that the Tool Connect Chip is flush with the housing Secure it with the retaining screws and ...

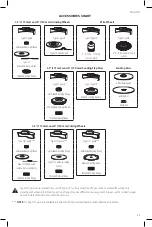
Page 47: ... unthreaded backing flange Type 1 41 abrasive cutting wheel threaded locking flange Type 1 41 guard unthreaded backing flange diamond cutting wheel threaded locking flange Wire Wheels Type 27 guard 3 5 76 2 127 mm wire cup brush Type 27 guard 4 6 100 150 mm wire wheel Sanding Discs rubber backing pad sanding disc clamp nut ACCESSORIES CHART Type 1 41 guards are intended for use with Type 1 41 cutt...

Page 48: ...46 ...

Page 49: ...47 ...

Page 50: ...48 ...

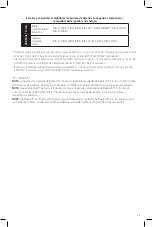
Page 51: ...erias de lítio íon DeWALT 60 V Max combinadas Maximum initial battery voltage measured without a workload is 12 20 60 or 120 volts Nominal voltage is 10 8 18 54 or 108 120V Max is based on using 2 DeWALT 60V Max lithium ion batteries combined BT Bluetooth NOTA La palabra y los logotipos de Bluetooth son marcas registradas propiedad de Bluetooth SIG Inc y DeWALT utiliza dichas marcas bajo licencia ...

Page 52: ...ico Importado por Black and Decker S A de C V Antonio Dovali Jaime 70 Torre C Piso 8 Col Santa Fé Alvaro Obregón Ciudad de México México C P 01210 Tel 52 55 53267100 R F C BDE8106261W7 Importado por Black Decker do Brasil Ltda Rod BR 050 s n Km 167 Dist Industrial II Uberaba MG Cep 38064 750 CNPJ 53 296 273 0001 91 Insc Est 701 948 711 00 98 S A C 0800 703 4644 Máquinas Y Herramientas Black Decker...

Reviews: