background image

7

WARNING:


Burn Hazard.

 ALWAYS wear gloves         

FIG. 6

D25124-XE, 

D25314-XE ONLY

J

M

L

K


when changing bits. Accessible metal parts on the tool 

and bits may get extremely hot during operation. Small 

bits of broken material may damage bare hands.

NOTICE:


Do not use chipping bits in this tool.

 Using 

chipping bits may cause the tool to bind-up and damage 

to the tool may occur.

To insert bit,

 insert shank of bit about 19 mm (3/4") into 

chuck. Push and rotate bit until it locks in place. The bit 

will be securely held.

To release bit,

 pull the sleeve (J) back and remove the bit.

OPERATION

Overload Clutch

If the drill bit becomes jammed or caught, the drive to the drill spindle is interrupted. 

Because of the forces that occur as a result, always hold the machine securely with 

both hands and take a firm stance.

Drilling Tools

The machine is intended for hammerdrilling in concrete, brick and stone. It is also 

suitable for drilling without impact in wood, metal, ceramic and plastic. Machines with 

electronic control and right/left rotation are also suitable for screw driving and thread 

cutting.

Chipping Tools

The machine is intended for chipping in concrete, brick and stone. 

Drilling

WARNING: Shock Hazard.


To reduce the risk of serious personal injury, turn tool off 

and disconnect tool from power source before making any adjustments or removing/

installing attachments or accessories.

WARNING: To reduce the risk of personal injury, ALWAYS

 ensure workpiece is 

anchored or clamped firmly. If drilling thin material, use a wood “back-up” block to 

prevent damage to the material.

  1.  Always unplug the drill when attaching or changing bits or accessories.
  2.  Use sharp drill bits only. For WOOD, use twist drill bits, spade bits, power 

auger bits, or hole saws. For METAL, use steel twist drill bits or hole saws. For 

MASONRY, such as brick, cement, cinder block, etc., use carbide-tipped bits 

rated for percussion drilling. Be sure the material to be drilled is anchored or 

clamped firmly. If drilling thin material, use a wood “back-up” block to prevent 

damage to the material.

  3.  Always apply pressure in a straight line with the bit. Use enough pressure to keep 

drill biting, but do not push hard enough to stall the motor or deflect the bit.

  4.  Hold tool firmly to control the twisting action of the drill.
 5. 

IF DRILL STALLS,

 it is usually because it is being overloaded or improperly used. 

RELEASE TRIGGER IMMEDIATELY,

 remove drill bit from work, and determine 

cause of stalling. 

DO NOT CLICK TRIGGER ON AND OFF IN AN AT TEMPT TO 

START A STALLED DRILL — THIS CAN DAMAGE THE DRILL.

  6.  To minimize stalling or breaking through the material, reduce pressure on drill and 

ease the bit through the last fractional part of the hole.

  7.  Keep the motor running when pulling the bit back out of a drilled hole. This will 

help prevent jamming.

  8.  With variable speed drills there is no need to center punch the point to be drilled. 

Use a slow speed to start the hole and accelerate by squeezing the trigger harder 

when the hole is deep enough to drill without the bit skipping out.

Removable SDS Plus

®

 Chuck & Three Jaw Keyless Chuck 

D25124-XE, D25314-XE

The D25124-XE and D25314-XE are equipped with a removable quick change 

SDS Plus

®

 chuck as well as a removable three jaw keyless chuck. The hammer 

mechanism  does not function when the three jaw keyless chuck is used.
Both the SDS Plus

®

 and three jaw keyless chuck can be easily removed by turning the 

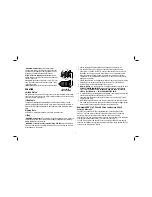
collar (K) into the unlocked position (L) to release the chuck (Fig. 6).
The SDS Plus

®

 and three jaw keyless chuck can be easily attached by inserting the 

chuck into the spindle of the tool and turning the collar to the locked position (M). The 

chuck will click when properly installed.

Summary of Contents for HEAVY-DUTY SDS PLUS D25123-XE

Page 1: ...D25123 XE D25124 XE D25213 XE D25314 XE D25315 XE HEAVY DUTY SDS PLUS ROTARY HAMMERS D25330 XE HEAVY DUTY SDS PLUS CHIPPING HAMMER INSTRUCTION MANUAL ...

Page 2: ......

Page 3: ...expose power tools to rain or wet conditions Water entering a power tool will increase the risk of electric shock d Do not abuse the cord Never use the cord for carrying pulling or unplugging the power tool Keep cord away from heat oil sharp edges or moving parts Damaged or entangled cords increase the risk of electric shock e When operating a power tool outdoors use an extension cord suitable for...

Page 4: ...ng tools sharp and clean Properly maintained cutting tools with sharp cutting edges are less likely to bind and are easier to control g Use the power tool accessories and tool bits etc in accordance with these instructions and in the manner intended for the particular type of power tool taking into account the working conditions and the work to be performed Use of the power tool for operations dif...

Page 5: ...y damage bare hands Never lay the tool down until the bit has come to a complete stop Moving bits could cause injury Do not strike jammed bits with a hammer to dislodge them Fragments of metal or material chips could dislodge and cause injury Slightly worn chisels can be resharpened by grinding Keep the power cord away from the rotating bit Do not wrap the cord around any part of your body An elec...

Page 6: ... properly assembled Hold tool with both hands to maximize control A side handle A is supplied with this rotary hammer It clamps to the front of the gear case without depth rod B as shown in Figure 1 and can be rotated 360 to permit right or left hand use The side handle can be tightened by rotating the black plastic portion of the side handle clockwise and loosened by rotating it counterclockwise ...

Page 7: ...ecting the plug from the power supply Failure to do so will cause the hammerdrill to start immediately the next time it is plugged in Damage or personal injury could result The lock on button is for use only when the rotary hammer is stationary mounted in a drill press stand or for chipping applications Before using the tool each time be sure that the lock on button release mechanism is working fr...

Page 8: ... before activating the mode actuator button or damage to the tool may result DRILL ONLY MODE To use drill only mode depress button I and turn the mode selector G so the yellow arrow points to the corresponding symbol as shown Use drill only mode for wood metal and plastics HAMMER DRILL MODE To use hammer drill mode depress the button and turn the mode selector so the yellow arrow points to the cor...

Page 9: ...r METAL use steel twist drill bits or hole saws For MASONRY such as brick cement cinder block etc use carbide tipped bits rated for percussion drilling Be sure the material to be drilled is anchored or clamped firmly If drilling thin material use a wood back up block to prevent damage to the material 3 Always apply pressure in a straight line with the bit Use enough pressure to keep drill biting b...

Page 10: ... accessory please contact Stanley Black Decker 82 Taryn Drive Epping VIC 3076 Australia or call 1800 444 224 or NZ 0800 339 258 DRILLING IN METAL D25123 XE D25124 XE D25213 XE D25314 XE An SDS Plus to round shank adaptor chuck is required Ensure that tool is in drill only mode Start drilling with slow speed and increase to full power while applying firm pressure on the tool A smooth even flow of m...

Page 11: ... warranty DEWALT tools are covered by our FREE ONE YEAR SERVICE CONTRACT DEWALT will also maintain the tool for free at any time during the first year of purchase This includes labour parts and lubrication required to restore the product to sound mechanical and or electrical condition Normal wear parts are not covered in this service Carbon brushes worn more then 50 will be replaced NOTE Three Yea...

Page 12: ... XE D25124 XE D25213 XE D25314 XE D25315 XE D25330 XE Copyright 2007 2009 2011 DEWALT The following are trademarks for one or more DEWALT power tools the yellow and black color scheme the D shaped air intake grill the array of pyramids on the handgrip the kit box configuration and the array of lozenge shaped humps on the surface of the tool ...

Reviews: