background image

11

ENGLISH

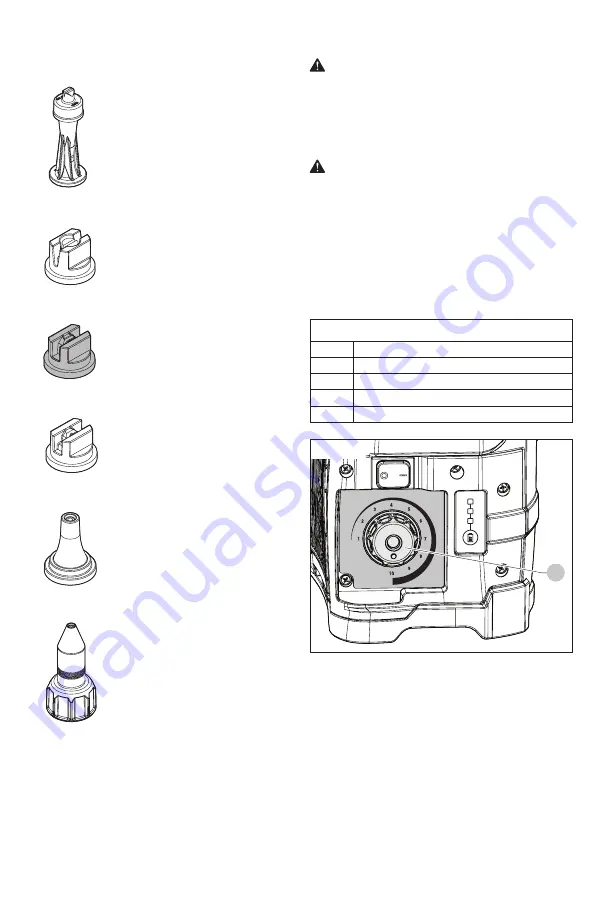
Nozzle Functionality and Uses

Foaming Nozzle (Black)

•  Visibly marks treated weeds when 

used with weed killer or added 
surfactant.

•  Spot spraying weeds in lawn, or 

around flower beds, trees, and shrubs.

•  Edging along fences, driveways, and 

walkways.

High-Volume Wide Fan Nozzle (Brown)

•  Flat spray for very broad coverage and 

higher viscosity liquids.

Low-Volume Wide Fan Nozzle (Red)

•  Replacing lawns. Kills lawn and weeds 

before planting a new lawn.

•  Preparing large areas for planting of 

ornamental and vegetable gardens.

Low-Volume Narrow Fan Nozzle (Yellow)

•  Precision spraying in confined areas 

such as gardens and flower beds.

Jet Stream Nozzle (Orange)

•  Pinpoint stream for targeted 

applications from a distance.

•  Ideal for spraying soffits, cracks, 

crevices, and other hard to reach 
targets. 

Adjustable Cone Nozzle

•  Spot spraying in flower beds, 

walkways, driveways, and patios, 
around trees and shrubs.

•  Edging along fences, driveways, and 

walkways.

•  Killing brush such as poison ivy, poison 

oak, kudzu, and wild blackberry.

ASSEMBLY

WARNING:


 RISK OF PERSONAL INJURY AND/OR 

PROPERTY DAMAGE DUE TO CHEMICAL EXPOSURE. After 
initial assembly, always inspect the sprayer for damage, 
and test it with plain water to check for proper function. 
Ensure all connections are secure and leak free, and the 
hose is free from damage, prior to using the sprayer with 
chemicals. 

WARNING:


 Only use attachments recommended or sold 

by the manufacturer.

Flow Control

Flow can be controlled by turning the control knob (1). 
The backpack functions to keep flow rate constant 
regardless of battery depletion state; when a preferred 
knob setting is chosen for a given nozzle, the spray 
pattern and flow rate will remain the same through the 
entire application.

Flow Control Chart (GPM)

Position

Flow

1–3

1–3 work off a low pressure cutoff

 4–10

4–10 work off a high pressure cutoff

N/A*

 Spray pattern not recommended for typical use

N/A** 

 Overworking of pump may occur

Fig. 3 

1

Nozzle Flow Rate Chart:

NOTICE: 


RISK OF PROPERTY DAMAGE. Always turn 

flow control knob to low GPM setting (1–3) when 
switching to a low flow nozzle.

NOTICE: 


RISK OF PROPERTY DAMAGE. Failure to 

abide by Nozzle Flow Chart recommendations may 
result in a damaged pump and void warranty.

See Nozzle Flow Chart on page 18.

Summary of Contents for DXSP190681

Page 1: ...STRUCCIONES PARA VOLVER A CONSULTAR EN EL FUTURO If you have questions or comments contact us Pour toute question ou tout commentaire nous contacter Si tiene dudas o comentarios contáctenos 1 800 311 9903 4 Gallon Lithium ion Powered Backpack Sprayer Pulvérisateur sac à dos alimente au Lithium ion de 15L Pulverizador de mochila de iones de litio de 4 galones DXSP190681 ...

Page 2: ...2 English original instructions 1 Español traducido de las instrucciones originales 23 Français traduction de la notice d instructions originale 43 ...

Page 3: ...e not related to personal injury which if not avoided may result in property damage WARNING Read all safety warnings and all instructions Failure to follow the warnings and instructions may result in serious injury WARNING To reduce the risk of injury read the instruction manual 1 5 10 6 11 7 8 9 4 3 2 1 Tank 2 Built in Carry Handle 3 Built in Vertical Wand Storage 4 Variable Flow Control 5 Sealed...

Page 4: ... not operate unit when you are tired Do not point sprayer stream at anyone including yourself Do not attempt to clear clogs from unit without first removing the battery Do not immerse any part of the unit in liquid Do not use unit if switch does not turn it on or off A unit that cannot be controlled with the switch is dangerous and must be repaired Do not overreach Keep proper footing and balance ...

Page 5: ...ould create a dangerous chemical atmosphere Never use caustics bleach acids hot water or pressure producing chemicals in this sprayer Keep the sprayer and all chemicals out of the reach of children and pets Only spray when the air is calm no wind or air movement to prevent chemical spray from drifting onto non targeted surfaces Always release pressure when sprayer is not in use and before performi...

Page 6: ...or 15 minutes or until irritation ceases If medical attention is needed the battery electrolyte is composed of a mixture of liquid organic carbonates and lithium salts Contents of opened battery cells may cause respiratory irritation Provide fresh air If symptoms persist seek medical attention WARNING Burn hazard Battery liquid may be flammable if exposed to spark or flame WARNING Fire hazard Neve...

Page 7: ...m ion batteries to an authorized DEWALT service center or to your local retailer for recycling You may also contact your local recycling center for information on where to drop off the spent battery RBRC is a registered trademark of Call 2 Recycle Inc Important Safety Instructions for All Battery Packs WARNING Read all safety warnings and all instructions for the battery pack charger and power too...

Page 8: ...NING Burn hazard Do not submerge the battery pack in any liquid or allow any liquid to enter the battery pack Never attempt to open the battery pack for any reason If the plastic housing of the battery pack breaks or cracks return to a service center for recycling CAUTION Burn hazard To reduce the risk of injury charge only DEWALT rechargeable battery packs Other types of batteries may overheat an...

Page 9: ...his occurs place the lithium ion battery pack on the charger until it is fully charged Wall Mounting DCB107 DCB112 DCB113 DCB115 DCB118 DCB132 These chargers are designed to be wall mountable or to sit upright on a table or work surface If wall mounting locate the charger within reach of an electrical outlet and away from a corner or other obstructions which may impede air flow Use the back of the...

Page 10: ...before attempting to clean 6 Do not freeze or immerse the charger in water or any other liquid Storage Recommendations 1 The best storage place is one that is cool and dry away from direct sunlight and excess heat or cold 2 For long storage it is recommended to store a fully charged battery pack in a cool dry place out of the charger for optimal results NOTE Battery packs should not be stored comp...

Page 11: ...ARNING RISK OF PERSONAL INJURY AND OR PROPERTY DAMAGE DUE TO CHEMICAL EXPOSURE After initial assembly always inspect the sprayer for damage and test it with plain water to check for proper function Ensure all connections are secure and leak free and the hose is free from damage prior to using the sprayer with chemicals WARNING Only use attachments recommended or sold by the manufacturer Flow Contr...

Page 12: ... length through to allow for step 2 4 Loop excess strap below and back through the bottom cutout Be sure that the strap loops around below the harness rod 5 As the strap is pushed it will follow the curved surface of the plastic lower base and come back outward from the back cutout 6 Pull excess material through to loop back through first section of buckle NOTE If the strap comes right out of the ...

Page 13: ...pect the sprayer hose shut off wand and all connections for damage before each use A damaged or loose hose connection can result in unintended exposure to the pressurized chemicals resulting in serious injury or property damage Before you Begin Test the sprayer with plain water before use with chemicals prior to initial use and after prolonged storage Place the sprayer on a stable surface and ensu...

Page 14: ...ace and turned OFF 2 Open the battery compartment by releasing the metallic latch attached to the side door and swing the door open sidewards 3 Press the battery release button 2 and remove the battery from the compartment 4 Close the door and ensure that the metallic door latch 1 is engaged Battery Life Indicator 1 When the battery is installed you can check the battery life This feature is activ...

Page 15: ...ations Leaving chemical liquids in the sprayer when not in use can lead to premature sprayer wear Never store the sprayer with chemicals in any part of the sprayer 1 Ensure the sprayer is OFF and remove the battery according to the Removing the Battery section 2 Remove the cap 1 and empty any extra chemical from the tank into a suitable container for later use or dispose according to the chemical ...

Page 16: ...location out of direct sunlight and away from any sources of moisture or intense heat Do not store the sprayer where freezing temperatures below 32 F 0 C will occur Allowing water to freeze inside the sprayer may cause damage to the pump seals shut off or other components and void the sprayer warranty TRANSPORTATION WARNING FIRE HAZARD Do not store carry or transport the battery pack so that metal...

Page 17: ...s If a nozzle clogs remove and disassemble the nozzle assembly Clean the openings of any obstructions or residue Do not use sharp tools that could scratch or damage the nozzles as spray pattern could be affected Do not hit nozzle against surfaces to unclog Cap and Filter Basket Maintenance Check the check valve 2 on the cap 1 and the filter basket gasket 3 on the filter basket 4 to ensure they do ...

Page 18: ...knob to low GPM setting 1 3 when switching to a low flow nozzle NOTICE RISK OF PROPERTY DAMAGE Failure to abide by Nozzle Flow Chart recommendations may result in a damaged pump and void warranty Nozzles Included with Product Variable Control Dial Setting NOTE Pressure and Flow may vary 10 1 2 3 4 Flow gpm Pressure psi Flow gpm Pressure psi Flow gpm Pressure psi Flow gpm Pressure psi Foaming Black...

Page 19: ...67 0 28 32 0 31 39 0 34 46 0 35 49 0 36 54 0 38 60 0 28 33 0 31 40 0 33 48 0 34 51 0 36 55 0 38 62 0 37 9 0 42 12 0 46 15 0 49 17 0 53 20 0 58 24 0 34 17 0 38 21 0 42 25 0 44 28 0 47 32 0 50 37 0 34 17 0 38 21 0 42 25 0 44 28 0 47 32 0 50 37 0 21 60 0 22 69 0 24 77 0 28 33 0 31 40 0 33 48 0 34 51 0 36 55 0 38 62 Optimal spray pattern May not be optimal spray pattern Not recommended may over work a...

Page 20: ... nozzle is clogged Clean the nozzle See Nozzle Maintenance The pump is not primed Allow at least 30 seconds for the pump to prime The pump does not fully prime The liquid level in the tank is low Add liquid to the tank See Filling the Sprayer The pump was run dry without liquid before the tank was refilled Ensure the sprayer is OFF and squeeze the shut off lever until all pressure is relieved Ther...

Page 21: ...n the charger and allow it to charge The battery pack does not charge The battery pack is not inserted in the charger Insert the battery pack into the charger until the red charging light illuminates The charger is not plugged in Plug the charger into a working outlet The surrounding air temperature is too hot or too cold Move the battery pack to a surrounding air temperature of above 40 F 4 5 C o...

Page 22: ...ce improper use negligence accident normal wear alterations or operation or any other activity or action which is not in accordance with the instruction manual Any parts that are deemed wearable parts are not part of the limited warranty In no event shall FGI be liable for any incidental special consequential or punitive damages or for any attorney fees expenses losses or delays alleged to be as a...

Page 23: ...ría provocar daños a la propiedad ADVERTENCIA Lea todas las advertencias de seguridad y todas las instrucciones No cumplir con las advertencias e instrucciones puede provocar lesiones graves ADVERTENCIA Para reducir el riesgo de lesiones lea el manual de instrucciones 1 5 10 6 11 7 8 9 4 3 2 1 Tanque 2 Asa de transporte incorporada 3 Almacenamiento vertical de varilla integrado 4 Control de caudal...

Page 24: ...Manténgase alerta preste atención a lo que hace Use el sentido común No utilice la unidad cuando esté cansado No apunte el chorro del pulverizador a nadie ni siquiera a usted mismo No intente quitar las obstrucciones de la unidad sin antes quitar la batería No sumerja ninguna parte de la unidad en líquido No use la unidad si el interruptor no la enciende o apaga Una unidad que no se puede controla...

Page 25: ...ol de los productos químicos a alta presión No rocíe cerca de llamas expuestas superficies calientes o cualquier cosa que podría vaporizar el líquido De hacerlo se podría generar una atmósfera química peligrosa Nunca use sustancias cáusticas cloro ácidos agua caliente o productos químicos que produzcan presión en este pulverizador Mantenga el pulverizador y todos los productos químicos fuera del a...

Page 26: ... F 130 C pude provocar una explosión Si el contenido de la batería entra en contacto con la piel lave inmediatamente el área con agua y jabón suave Si el líquido de la batería entra en el ojo enjuague con agua con el ojo abierto durante 15 minutos o hasta que cese la irritación Si se necesita atención médica el electrolito de la batería está compuesto por una mezcla de carbonatos orgánicos líquido...

Page 27: ...quel cadmio hidruro metálico de níquel o iones de litio gastadas a un centro de servicio autorizado DEWALT o a su distribuidor local para su reciclaje También puede ponerse en contacto con su centro de reciclaje local para obtener información sobre dónde entregar las baterías gastadas RBRC es una marca registrada de Call 2 Recycle Inc Instrucciones de seguridad importantes para todas las baterías ...

Page 28: ...rse una descarga eléctrica ADVERTENCIA Peligro de quemaduras No sumerja la batería en ningún líquido ni permita que ningún líquido entre en la batería No intente abrir nunca la batería por ninguna razón Si la carcasa de plástico de las baterías se rompe o agrieta devuélvala a un centro de servicio para su reciclaje PRECAUCIÓN Peligro de quemaduras Para reducir el riesgo de lesiones cargue solo las...

Page 29: ...ones de litio en el cargador hasta que esté completamente cargada Montaje en la pared DCB107 DCB112 DCB113 DCB115 DCB118 DCB132 Estos cargadores están diseñados para montarse en la pared o para descansar en posición vertical sobre una mesa o superficie de trabajo Si lo monta en la pared ubique el cargador cerca de una toma de corriente y lejos de una esquina u otras obstrucciones que puedan impedi...

Page 30: ...or en agua ni en ningún otro líquido Recomendacionesparaelalmacenamiento 1 El mejor lugar para el almacenamiento es uno que sea fresco y seco alejado de la luz solar directa y del exceso de calor o frío 2 Para un almacenamiento prolongado se recomienda almacenar la batería completamente cargada en un lugar fresco y seco lejos del cargador para obtener resultados óptimos NOTA Las baterías no deben ...

Page 31: ...S A LA PROPIEDAD DEBIDO A LA EXPOSICIÓN A PRODUCTOS QUÍMICOS Después del ensamblaje inicial inspeccione siempre si el pulverizador está dañado y pruebe con agua corriente para verificar el funcionamiento correcto Asegúrese de que todas las conexiones estén fijas y no tengan fugas y que la manguera no esté dañada antes de usar el pulverizador con productos químicos ADVERTENCIA Solo use accesorios r...

Page 32: ...continuar con el paso 2 4 Pase la correa sobrante por debajo y hacia atrás a través del corte inferior Asegúrese de que la correa pase por debajo de la varilla del arnés 5 A medida que se empuja la correa seguirá la superficie curva de la base inferior de plástico y volverá hacia afuera a través del corte trasero 6 Tire del material sobrante de forma que vuelva a pasar a través de la primera secci...

Page 33: ...y todas las conexiones para descartar daños antes de cada uso Una conexión de manguera dañada o suelta puede dar lugar a una exposición involuntaria a los productos químicos presurizados lo que provocaría lesiones graves o daños a la propiedad Antes de empezar Pruebe el pulverizador con agua corriente antes de usarlo con productos químicos antes de su uso inicial y después de un almacenamiento pro...

Page 34: ...esté apagado y sobre una superficie estable 2 Abra el compartimiento de la batería liberando el pestillo metálico de la puerta lateral y abra la puerta lateralmente 3 Presione el botón de liberación de la batería 2 y retírela del compartimiento 4 Cierre la puerta y asegúrese de que el pestillo metálico de la puerta 1 esté enganchado Indicador de carga de la batería 1 Cuando la batería está instala...

Page 35: ...cos también puede contaminar las aplicaciones posteriores Dejar líquidos químicos en el pulverizador cuando no se usa puede dar lugar a un desgaste prematuro del mismo No almacene nunca el pulverizador con productos químicos en ninguna parte del mismo 1 Asegúresedequeelpulverizadorestéapagadoy quitelabateríaconformealasecciónRetirarlabatería 2 Retire la tapa 1 y vierta cualquier producto químico q...

Page 36: ...a en un lugar cálido y seco fuera de la luz directa del sol y lejos de cualquier fuente de humedad o calor intenso No guarde el pulverizador en donde se produzcan temperaturas de congelación por debajo de 32 F 0 C Permitir que el agua se congele dentro del pulverizador puede causar daños en la bomba a las juntas al cierre o a otros componentes y anular la garantía TRANSPORTE ADVERTENCIA PELIGRO DE...

Page 37: ...e la palanca de cierre para pulverizar hasta que el flujo de líquido se detenga Si una boquilla se obstruye retire y desmonte el conjunto de la boquilla Limpie las aberturas de cualquier obstrucción o residuo No utilice herramientas afiladas que puedan rayar o dañar las boquillas ya que el patrón de pulverización podría verse afectado No golpee la boquilla contra superficies para desatorarla Mante...

Page 38: ...DAD Siempre gire la perilla de control de caudal a un ajuste de GPM bajo 1 3 al cambiar a una boquilla de bajo caudal AVISO RIESGOS DE DAÑO A LA PROPIEDAD No cumplir con las recomendaciones de la Tabla de caudal de las boquillas podría dañar la bomba y anular la garantía Boquillas incluidas con el producto Ajuste de la perilla de control variable NOTA La presión y el caudal pueden variar en un 10 ...

Page 39: ...0 31 39 0 34 46 0 35 49 0 36 54 0 38 60 0 28 33 0 31 40 0 33 48 0 34 51 0 36 55 0 38 62 0 37 9 0 42 12 0 46 15 0 49 17 0 53 20 0 58 24 0 34 17 0 38 21 0 42 25 0 44 28 0 47 32 0 50 37 0 34 17 0 38 21 0 42 25 0 44 28 0 47 32 0 50 37 0 21 60 0 22 69 0 24 77 0 28 33 0 31 40 0 33 48 0 34 51 0 36 55 0 38 62 Patrón de rociado óptimo Puede no ser el patrón de rociado óptimo No recomendado podría hacer tra...

Page 40: ...a Limpie la palanca de cierre Consulte Mantenimiento del conjunto de cierre La boquilla está obstruida Limpie la boquilla Consulte Mantenimiento de la boquilla La bomba no está cebada Deje por lo menos 30 segundos para que la bomba se cebe La bomba no se ceba completamente El nivel de líquido en el tanque es bajo Añada líquido al tanque Ver Llenado del pulverizador La bomba funcionó en seco sin lí...

Page 41: ... diseñada para apagarse abruptamente cuando se agota la carga Ponga la batería en el cargador y deje que se cargue La batería no se carga La batería no está insertada en el cargador Inserte la batería en el cargador hasta que se encienda la luz roja cargando El cargador no está enchufado Enchufe el cargador en una toma de corriente que funcione La temperatura ambiente es muy alta o muy baja Mueva ...

Page 42: ...ste normal modificaciones u operación o cualquier otra actividad o acción que no esté de acuerdo con el manual de instrucciones Las piezas que se consideren piezas desgastables no forman parte de la garantía limitada En ningún caso FGI será responsable de ningún daño incidental especial consecuente o punitivo ni de los honorarios de abogados gastos pérdidas o retrasos que se aleguen como consecuen...

Page 43: ...ui peut entraîner des dommages matériels si elle n est pas évitée AVERTISSEMENT Lisez tous les avertissements de sécurité et toutes les consignes Le non respect des avertissements et des consignes peut entraîner des blessures graves AVERTISSEMENT Pour réduire le risque de blessure veuillez consulter le manuel d instructions 1 5 10 6 11 7 8 9 4 3 2 1 Réservoir 2 Poignée de transport intégrée 3 Rang...

Page 44: ...areil propre pour un rendement optimal et sécuritaire Suivre les consignes pour un entretien adéquat Demeurer vigilant Toujours garder les yeux sur la tâche Faire preuve de bon sens Ne pas utiliser l appareil lorsque l on ressent de la fatigue Ne pas diriger le pulvérisateur vers d autres personnes ou soi même Ne pas tenter de déboucher l appareil sans retirer la batterie au préalable Nepasimmerge...

Page 45: ...le flexible n est pas endommagé Toujours inspecter le flexible et toutes ses connexions avant chaque utilisation Un flexible endommagé ou qui n est pas bien fixé pourrait entraîner une décharge à pression élevée non contrôlée de la substance chimique Ne pas pulvériser près d une flamme nue une surface chaude ou toute autre chose qui pourrait créer une vapeur avec la substance pulvérisée Cela pourr...

Page 46: ...uban adhésif la gâchette en position ON marche Ne pas incinérer le bloc batterie même s il est gravement endommagé ou complètement usé Le bloc batterie peut exploser dans un incendie Des vapeurs et matériaux toxiques sont créés lorsque le bloc batterie au lithium ion est brûlé Ne pas exposer le bloc batterie ou l outil appareil au feu ou à une température excessive L exposition au feu ou à des tem...

Page 47: ...re les batteries nickel cadmium à hydrure métallique de nickel ou lithium ion usagées à la poubelle ou dans les déchets solides municipaux le programme Appel à Recycler offre à cet égard une solution respectueuse de l environnement Appel à Recycler Inc en collaboration avec DEWALT et d autres utilisateurs de batteries a mis en place ce programme aux États Unis et au Canada pour faciliter la collec...

Page 48: ...s de décharge électriques Le retrait du bloc batterie ne réduira pas ce risque NEJAMAIStenterdebrancherdeuxchargeursensemble Le chargeur est conçu pour fonctionner selon une alimentation électrique de résidence standard de 120 V Ne pas essayer de l utiliser avec toute autre tension Ceci ne s applique pas au chargeur pour véhicule AVERTISSEMENT Risque de décharges électriques Ne laisser aucun liqui...

Page 49: ... soit complètement chargée Installation au mur DCB107 DCB112 DCB113 DCB115 DCB118 DCB132 Ces chargeurs sont conçus pour être fixés au mur ou pour être posés verticalement sur une table ou un plan de travail En cas de montage mural placer le chargeur à portée d une prise électrique et à l écart d un coin ou d autres obstructions qui pourraient entraver la circulation de l air Utiliser l arrière du ...

Page 50: ...geler ou immerger le chargeur dans l eau ou tout autre liquide Recommandations d entreposage 1 Le meilleur endroit pour l entreposage est un endroit frais et sec à l abri de la lumière directe du soleil et des températures extrêmes 2 Pour un entreposage prolongé il est recommandé de conserver une batterie entièrement chargée dans un endroit frais et sec hors du chargeur pour des résultats optimaux...

Page 51: ...EMBLAGE AVERTISSEMENT RISQUE DE BLESSURES PERSONNELLES ET DE DOMMAGES MATÉRIELS DÉCOULANT D UNE EXPOSITION À UNE SUBSTANCE CHIMIQUE Après l assemblage initial toujours inspecter le pulvérisateur pour détecter tout dommage et effectuer un test avec de l eau pure pour vérifier qu il fonctionne adéquatement Avant d utiliser le pulvérisateur avec une substance chimique s assurer que toutes les connexi...

Page 52: ...t de longueur pour permettre l étape 2 4 Faire passer l excédent de courroie en dessous et en arrière par la découpe du bas Veiller à ce que la courroie s enroule sous la tige du harnais 5 Lorsque la courroie est poussée elle suit la surface incurvée de la base inférieure en plastique et revient vers l extérieur à partir de la découpe arrière 6 Tirer l excédent de matériel pour le faire passer dan...

Page 53: ...iques AVERTISSEMENT Avant chaque utilisation inspecter le pulvérisateur le flexible l assemblage d arrêt la lance et toutes les connexions au cas où ces pièces seraient endommagées Une connexion de flexible endommagée ou mal fixée peut occasionner une exposition accidentelle des substances chimiques pressurisées entraînant des blessures graves ou des dommages matériels Avant de commencer Effectuer...

Page 54: ... stable et à l ARRÊT 2 Ouvrir le compartiment à batterie en relâchant le loquet métallique fixé à la porte latérale et faire pivoter la porte vers le côté 3 Appuyer sur le bouton de dégagement de la batterie 2 et retirer la batterie du compartiment 4 Fermer la porte et s assurer que le loquet métallique 1 est bien fermé Voyant de charge de la batterie 1 Lorsque la batterie est installée vous pouve...

Page 55: ...lorsqu iln estpasutilisépeut entraîneruneusureprématurée Nejamaisentreposerle pulvérisateurs ilcontientdessubstanceschimiquesdans n importequelledesespièces 1 S assurer que le pulvérisateur est en position d ARRÊT et enlever la batterie comme décrit à la section Retrait de la batterie 2 Enlever le capuchon 1 et vider ce qui reste de substance chimique du réservoir dans un contenant qui convient po...

Page 56: ...quées 2 Fig 50 F 1 2 ENTREPOSAGE Entreposer le pulvérisateur et la batterie à l intérieur dans un endroit sec et tempéré à l écart de la lumière directe du soleil et loin de toute source d humidité ou de chaleur intense Ne pas entreposer le pulvérisateur où les températures descendent sous 0 C ou 32 F Si l eau gelait à l intérieur du pulvérisateur cela pourrait endommager la pompe les joints l ass...

Page 57: ...e et presser ensuite le levier d arrêt pour pulvériser jusqu à ce que l écoulement de liquide cesse Si la buse est bouchée enlever et désassembler l assemblage de la buse Nettoyer les ouvertures de toute obstruction ou de tout résidu Ne pas utiliser un outil pointu qui pourrait égratigner ou endommager les buses car les différents jets pourraient être affectés Ne pas frapper la buse contre les sur...

Page 58: ...ge du débit à la position GPM basse 1 à 3 lorsque la buse est changée pour une buse à débit faible AVIS RISQUE DE DÉGÂTS MATÉRIELS Si les recommandations qui se trouvent dans le tableau de débits des buses ne sont pas suivies cela pourrait entraîner des dommages à la pompe et l annulation de la garantie Buses incluses avec le produit Bouton de contrôle des réglages variables REMARQUE La pression e...

Page 59: ...0 35 49 0 36 54 0 38 60 0 28 33 0 31 40 0 33 48 0 34 51 0 36 55 0 38 62 0 37 9 0 42 12 0 46 15 0 49 17 0 53 20 0 58 24 0 34 17 0 38 21 0 42 25 0 44 28 0 47 32 0 50 37 0 34 17 0 38 21 0 42 25 0 44 28 0 47 32 0 50 37 0 21 60 0 22 69 0 24 77 0 28 33 0 31 40 0 33 48 0 34 51 0 36 55 0 38 62 Type de jet pour une pulvérisation optimale N est peut être pas le type de jet pour une pulvérisation optimale No...

Page 60: ...arrêt est bouché Nettoyer le levier d arrêt Voir Entretien de l assemblage d arrêt La buse est bouchée Nettoyer la buse Voir Entretien de la buse La pompe n est pas amorcée Attendre au moins 30 secondes pour que la pompe s amorce La pompe ne s amorce pas complètement Le niveau du liquide dans le réservoir est bas Ajouter du liquide dans le réservoir Voir Remplissage du réservoir La pompe a fonctio...

Page 61: ...r lorsque la charge est épuisée Placer la batterie sur le chargeur et la laisser recharger Le bloc batterie ne charge pas Le bloc batterie n est pas bien inséré dans le chargeur Insérer le bloc batterie dans le chargeur jusqu à ce que le voyant rouge charge s allume Le chargeur n est pas branché Brancher le chargeur dans une prise qui fonctionne La température ambiante est trop chaude ou trop froi...

Page 62: ...THIS PAGE INTENTIONALLY LEFT BLANK ESTA PÁGINA SE HA DEJADO EN BLANCO INTENCIONALMENTE CETTE PAGE A INTENTIONNELLEMENT ÉTÉ LAISSÉE EN BLANC ...

Page 63: ...ce d un accident de l usure normale de modifications ou d une utilisation ou de toute autre activité ou action non conforme au manuel d instructions Toutes les pièces considérées comme des pièces d usure ne font pas partie de la garantie limitée En aucun cas FGI ne sera tenu responsable des dommages accessoires spéciaux consécutifs ou punitifs ou des honoraires d avocat des dépenses des pertes ou ...

Page 64: ...nd logos are registered trademarks owned by the Bluetooth SIG Inc and any use of such marks by DEWALT is under license Other trademarks and trade names are those of their respective owners Battery Datecode 201536 or later X Indicates that the battery pack is not compatible with that specific charger All charge times are approximate Actual charge time may vary Read the instruction manual for more s...

Reviews: