background image

5

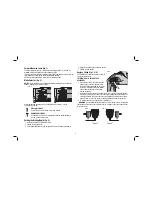
Forward/Reverse Lever (fig. 1)

The forward/reverse lever (C), located above the trigger switch (A), is used for 

withdrawing bits from tight holes and removing screws. 
To reverse the motor, release the trigger switch FIRST and then push the lever to the 

right (viewed when holding the drill in the operating position). 
After any reversing operations, return lever to forward position.

Mode Selector (fig. 2)

NOTICE:


Tool must come to a complete stop before activating the mode selector 

button or damage to the tool may result.

FIG. 2

I

Select the required operating mode by sliding the mode selector (I) to the 

corresponding symbol.


DRILL-ONLY MODE


 Use drill-only mode for wood, metal, and plastics.


HAMMER-ONLY MODE


 Use hammer-only mode for simultaneous rotating and impacting for 

masonry, brick and concrete. 

Setting the Drilling Depth (fig. 3)

  1.     Insert the required drill bit into the chuck. 
    2.   Loosen the side handle (G). 
    3.   Fit the depth adjustment rod (H) through the hole in the side handle clamp. 

    4.   Adjust the drilling depth as shown in figure 3. 
    5.   Tighten  the  side  handle. 

Keyless Chuck (fig. 1, 3–5) 

D

FIG. 3

The DWD024S-XE features a keyless chuck (D) 

for greater convenience. 

TO INSERT A DRILL BIT OR OTHER 

ACCESSORY

  1. Grasp the rear half of the chuck with one 

hand and use your other hand to rotate 

the front half counterclockwise, as shown 

in Figure 5. Rotate far enough so that the 

chuck opens sufficiently to accept the 

desired accessory.

  2. Insert the bit or other accessory about 19 mm (3/4") into the chuck and tighten 

securely by holding the rear half of the chuck and rotating the front portion in the 

clockwise direction. When the chuck is nearly tightened, you will hear a clicking 

sound. After 4–6 clicks, the chuck is securely tightened around the accessory.

  3. To release the accessory, repeat step 1 listed above.

WARNING: 

Do not attempt to tighten drill bits (or any other accessory) by gripping 

the front part of the chuck and turning the tool on. Damage to the chuck and personal 

injury may result.

FIG. 4

FIG. 5

Summary of Contents for DWD024S-XE

Page 1: ...DWD024S XE VARIABLE SPEED REVERSIBLE PERCUSSION DRILL INSTRUCTION MANUAL ...

Page 2: ......

Page 3: ...Keep work area clean and well lit Cluttered or dark areas invite accidents b Do not operate power tools in explosive atmospheres such as in the presence of flammable liquids gases or dust Power tools create sparks which may ignite the dust or fumes c Keep children and bystanders away while operating a power tool Distractions can cause you to lose control 2 ELECTRICAL SAFETY a Power tool plugs must...

Page 4: ...ons to operate the power tool Power tools are dangerous in the hands of untrained users e Maintain power tools Check for misalignment or binding of moving parts breakage of parts and any other condition that may affect the power tool s operation If damaged have the power tool repaired before use Many accidents are caused by poorly maintained power tools f Keep cutting tools sharp and clean Properl...

Page 5: ... this type of work To reduce your exposure to these chemicals work in a well ventilated area and work with approved safety equipment such as those dust masks that are specially designed to filter out microscopic particles Avoid prolonged contact with dust from power sanding sawing grinding drilling and other construction activities Wear protective clothing and wash exposed areas with soap and wate...

Page 6: ... and subsequent loss of control Hold tool with both hands to maximize control A side handle comes assembled with the DWD024S XE The side handle G can be adjusted to suit both right hand and left hand users TO ADJUST THE SIDE HANDLE 1 Loosen the side handle G by turning it counterclockwise 2 Rotate the side handle to the desired position 3 Tighten the side handle by turning it clockwise TO CHANGE S...

Page 7: ...le G 3 Fit the depth adjustment rod H through the hole in the side handle clamp 4 Adjust the drilling depth as shown in figure 3 5 Tighten the side handle Keyless Chuck fig 1 3 5 D FIG 3 The DWD024S XE features a keyless chuck D for greater convenience TO INSERT A DRILL BIT OR OTHER ACCESSORY 1 Grasp the rear half of the chuck with one hand and use your other hand to rotate the front half counterc...

Page 8: ... shown in figure 6 WARNING To reduce the risk of serious personal injury ALWAYS hold securely in anticipation of a sudden reaction Proper hand position requires one hand on the main FIG 6 handle J with the other hand on the side handle G Drilling WARNING To reduce the risk of serious personal injury turn tool off and disconnect tool from power source before making any adjustments or removing insta...

Page 9: ... brush assemblies are available at authorized DEWALT service centers Always use identical replacement parts Lubrication Your power tool requires no additional lubrication Cleaning WARNING Blow dirt and dust out of all air vents with clean dry air at least once a week To minimize the risk of eye injury always wear ANSI Z87 1 approved eye protection when performing this WARNING Never use solvents or...

Page 10: ...is includes labour parts and lubrication required to restore the product to sound mechanical and or electrical condition Normal wear parts are not covered in this service Carbon brushes worn more then 50 will be replaced NOTE Three Year Warranty is not applicable to items deemed as consumables Radial arm saws are covered by a one 1 year warranty only DEWALT Reserves the right to review its warrant...

Page 11: ...9 ...

Page 12: ...a AUG09 Part No N038907 DWD024S XE Copyright 2009 DEWALT The following are trademarks for one or more DEWALT power tools the yellow and black color scheme the D shaped air intake grill the array of pyramids on the handgrip the kit box configuration and the array of lozenge shaped humps on the surface of the tool ...

Reviews: