


6. Replace punch and reassemble tool by reversing steps 2-5
above.
BE SURE TO THOROUGHLY CLEAN AND LIGHTLY OIL ALL
LOCATING SURFACES BEFORE REASSEMBLY TO PREVENT
DAMAGE TO TOOL. ALSO MAKE CERTAIN THAT STRIPPER IS
SECURELY LOCKED IN POSITION AND PUNCH IS PROPERLY
SEATED BEFORE FINALLY TIGHTENING THE PUNCH
RETAINING SET SCREW.
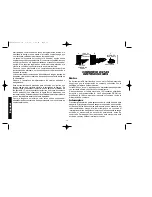
Removing Die
1. Remove 2 die screws located an an angle at bottom rear of shoe
and remove die (Figure 1).
2. If sharpening of die is required, sharpen on a surface grinder by
removing material from only the top surface of the die. Grinding by
a qualified machine shop is preferred.
CAUTION: Remember
that the total amount of metal removed from both the punch and
the die cannot exceed 3/32".
3. Clean die and shoe surface thoroughly.
4. Insert die in tool.
5. Replace screws and tighten securely.
Maintenance
Nibblers should be cleaned, inspected, and lubricated at certified
D
E
WALT service centers every month with heavy usage, every two or
three months with light usage.
Inspect carbon motor brushes frequently by unplugging tool,
removing the brush inspection caps, and withdrawing the brush and
spring assembly. Replace the assembly when the brushes are worn
down to the line closest to the spring, or when spring exerts
insufficient pressure to hold brush against commutator. Keep brushes
clean and sliding freely in their guides.
Saturate the felt oiler with SAE 10W or 20W motor oil once very day
of operation in normal use.
3
English
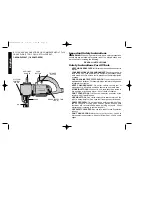
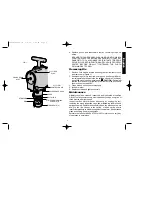
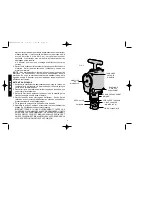
FIG. 1
CRANK DOWN
SLOT
OIL FILLER
PLUG
OIL FLOW
CONTROL KNOB
STRIPPER
SHOE
STRIPPER MOUNTING
SCREWS (2)
DIE
DIE SCREWS (2)
CLEARANCE HOLE
FELT OILER
DW899/384346 IM 5/2/02 1:44 PM Page 3


