English
10
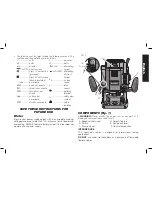
1. Set the final desired routing depth.
Refer to
Setting the
Routing Depth
. For the purpose of this discussion, assume
that the desired depth is 1/2" (13 mm).
2. With a depth of 1/2" (13 mm). set on the shortest screw (Q)
in the turret stop (J), adjust the second shortest screw (R) to a
point about halfway between the bottom of the knurled knob
and the top of the shortest screw, as shown.
3. Leave the vernier setting
FIG. 8
Q
R
J
alone and turn the
adjusted second shortest
screw into position under
the depth stop bar.
4. Make your first cut at this
setting.
5. Rotate the turret stop so
that the shortest screw is
directly under the depth
stop bar and make your
final cut.
NOTE:
The third screw in the turret stop is provided if your cut is
even deeper and you want to make three cuts to achieve the final
depth, or set final depth for multiple cuts at one time.
Operation
CAUTION
: Turn the router on before plunging the cutter head
into the workpiece.
After setting the cutting depth as described, locate the router such
that the bit is directly over the place you will be cutting. With the
router running, lower the unit smoothly down into the workpiece.
DO NOT JAM THE ROUTER DOWN. When the tool reaches the
pre-set depth, depress the plunge lock lever (E, Fig. 1). When you
have finished routing, raise the lever and let the spring lift the router
directly out of the workpiece.
All common routing tasks can be performed with ease with the
plunge cut router: grooving, rabbeting, recessing, veining, and
profiling on all types of wood and plastic.
Always feed the router opposite to the direction in which the cutter
is rotating.
Only carbide-tipped cutters should be used on panels faced with
plastic laminates. The hard laminates will quickly dull steel cutters.
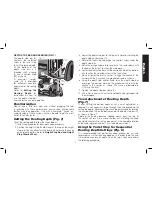
Direction Of Feed (Fig. 9, 10)
The direction of feed is very
FIG. 9
important when routing and can
make the difference between a
successful job and a ruined
project. Figures 9 and 10 show
proper direction of feed for some
typical cuts.
Mold the outside edge of a piece
of stock by molding the end grain, left to right, molding the straight
grain side moving left to right, finish the other end grain side, and
molding the remaining straight grain edge.
FIG. 10
The direction of feed is important in router usage. Be sure the cutter
is rotating into the stock by moving left to right on outside edges
and clockwise on inside cuts.


