background image

English

3

holstering or hanging tool, or when preparing 
work surface for fastening operation.

•  This tool produces SPARKS during operation. 

NEVER use the tool near flammable substances, 
gases or vapors including lacquer, paint, benzine, 
thinner, gasoline, adhesives, mastics, glues 
or any other material that is ‑‑ or the vapors, 
fumes or byproducts of which are ‑‑ flammable, 
combustible or explosive. Using the fastenerer in 
any such environment could cause an EXPLOSION 
resulting in personal injury or death to user 
and bystanders.


WARNING: After driving a fastener, tool may 
bounce back (“recoil”) causing it to move away 
from the work surface. To reduce risk of injury 
always manage recoil by:

•  Always maintaining control of tool.
•  Allowing recoil to move tool away from 

work surface.

•  Not resisting recoil such that tool will be forced 

back into the work surface. In “Contact Actuation 
Mode,” if workpiece contact is allowed to 
re‑contact work surface before the trigger is 
released, an unintended discharge of a fastener 
will occur.

•  Keeping face and body parts away from tool.


WARNING:


Disconnect tool:

•  When not in use.
•  When performing any maintenance or repairs,
•  When clearing a jam.
•  When elevating, lowering or otherwise moving 

tool to a new location.

•  When tool is outside of the operator's supervision 

or control.

•  When loading or removing fasteners from 

the magazine.


WARNING:


When maintaining the tool:

•  Always shut off air supply, and disconnect tool 

from air supply when not in use.

•  When working on air tools note the warnings in 

this manual and use extra care when evaluating 
problem tools.

Additional Safety Warnings


WARNING:

 Do not use this product to fasten electrical 

cables. Fastening electric wires / cables could result in 
electric shock or serious harm.


WARNING:

 Make sure there are no electrical cables, 

gas pipes, etc. that could cause a hazard if damaged 
by use of the tool.


WARNING:

  This tool is not intended for use in 

potentially explosive atmospheres and is not insulated 
from coming into contact with electrical power.

•  Use the 

D

e

WALT

 pneumatic tool only for the purpose for 

which it was designed.

•  Do not use the tool as a hammer.

•  Always carry the tool by the handle with hand off 

trigger/ triggers. 

•  Never lift, pull, lower, or carry the tool by the air hose.
•  Whipping hoses can cause severe injury. Always check for 

damaged or loose hoses or fittings.

•  Never direct compressed air at yourself or anyone else.
•  Compressed air can cause severe injury.
•  Do not alter or modify this tool from the original design or 

function without approval from 

D

e

WALT

.

•  Never clamp or tape the trigger in an actuated position.
•  Ensure tool is always safely engaged on the workpiece and 

cannot slip.

•  Never leave a tool unattended with the air hose attached.

TO PREVENT ACCIDENTAL INJURIES:

•  Never place a hand or any other part of the body in 

fastener discharge area of tool while the air supply 
is connected.

•  Never actuate the tool unless nose is directed at the work.
•  Do not actuate the tool while loading.
•  Keep hands and body parts away from the discharge 

area of the tool. While in use NEVER grasp the tool by the 
magazine or canister, a mis‑driven fastener can exit the 
nose causing injury.

Additional Safety Information


WARNING: ALWAYS 

use safety glasses. Everyday 

eyeglasses are NOT safety glasses. Also use face or 
dust mask if cutting operation is dusty. ALWAYS WEAR 
CERTIFIED SAFETY EQUIPMENT:
•  ANSI Z87.1 eye protection (CAN/CSA Z94.3),
•  ANSI S12.6 (S3.19) hearing protection,
•  NIOSH/OSHA/MSHA respiratory protection.


WARNING: 

Some dust created by power sanding, 

sawing, grinding, drilling, and other construction 
activities contains chemicals known to the State 
of California to cause cancer, birth defects or 
other reproductive harm. Some examples of these 
chemicals are:
•  lead from lead‑based paints,
•  crystalline silica from bricks and cement and other 

masonry products, and

•  arsenic and chromium from chemically‑

treated lumber.

Your risk from these exposures varies, depending on 
how often you do this type of work. To reduce your 
exposure to these chemicals: work in a well ventilated 
area, and work with approved safety equipment, such 
as those dust masks that are specially designed to 
filter out microscopic particles.

• 

Avoid prolonged contact with dust from power 
sanding, sawing, grinding, drilling, and other 
construction activities. Wear protective clothing and 
wash exposed areas with soap and water. 

Allowing 

dust to get into your mouth, eyes, or lay on the skin may 
promote absorption of harmful chemicals.

Summary of Contents for DW451S2

Page 1: ...ntacter Si tiene dudas o comentarios contáctenos 1 800 4 DeWALT Instruction Manual Guide D utilisation Manual de instrucciones DW451S2 16 GA Wide Crown Lathing Stapler Agrafeuse pour lattage à couronne large de calibre 16 Engrapadora de Torno de Corona Ancha 16 GA final page size 8 5 x 5 5 in ...

Page 2: ...English English original instructions 1 Français traduction de la notice d instructions originale 10 Español traducido de las instrucciones originales 20 ...

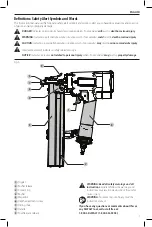
Page 3: ...oided may result in minor or moderate injury Used without word Indicates a safety related message NOTICE Indicates a practice not related to personal injury which if not avoided may result in property damage WARNING Read all safety warnings and all instructions Failure to follow the warnings and instructions may result in electric shock fire and or serious injury WARNING To reduce the risk of inju...

Page 4: ...ce facility for examination repair or mechanical adjustment Warning labels are missing or damaged Tool is not in proper working order Tags and physical segregation shall be used for control Tool is without workpiece contact A tool without workpiece contact can be fired unintentionally causing injury to an operator or a bystander WARNING When operating the tool Always handle the tool with care Neve...

Page 5: ...y the tool by the handle with hand off trigger triggers Never lift pull lower or carry the tool by the air hose Whipping hoses can cause severe injury Always check for damaged or loose hoses or fittings Never direct compressed air at yourself or anyone else Compressed air can cause severe injury Do not alter or modify this tool from the original design or function without approval from DeWALT Neve...

Page 6: ... the tool at the rate of 100 fasteners per minute In this case be sure that your air compressor can deliver a minimum of 2 7 C F M 75 LT MIN at 80 p s i g 5 6 kg cm2 for optimum performance FASTENER SPECIFICATIONS DW451S2 Fastener Gauge Crown width Length DeWALT DW16S2 25GAL 16 1 1 DeWALT DW16S2 38GAL 16 1 1 1 2 BOSTITCH 16S2 25FG 10M 16 1 1 BOSTITCH 16S2 25SG 10M 16 1 1 BOSTITCH 16S2 31FG 10M 16 ...

Page 7: ... injury Preparing the Tool WARNING Read the section titled IMPORTANT SAFETY INSTRUCTIONS at the beginning of this manual Always wear proper eye ANSI Z87 1 CAN CSA Z94 3 and hearing protection ANSI S12 6 S3 19 when operating this tool Keep the tool pointed away from yourself and others For safe operation complete the following procedures and checks before each use of the fastener Before you use the...

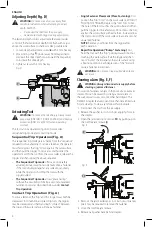
Page 8: ...act Trip Operation Contact Trip Operation Fig A To drive a fastener the trip and the trigger must both be depressed In conventional contact trip tools the trigger may be depressed and held and each contact between the trip and the work surface will drive a fastener Single Fastener Placement Place Fastening First position the trip FULLY on the work surface WITHOUT PULLING THE TRIGGER Depress the tr...

Page 9: ...ork surface and pull the trigger THE TOOL MUST NOT CYCLE Release the trigger The trigger must return to the trigger stop on the frame 3 Pull the trigger and press the contact trip against the work surface THE TOOL MUST NOT CYCLE 4 With finger off the trigger press the contact trip against the work surface Pull the trigger THE TOOL MUST CYCLE Accessories WARNING Since accessories other than those o...

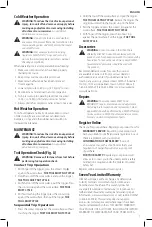
Page 10: ...ts caused by normal use for free any time during the first year after purchase 90 DAY MONEY BACK GUARANTEE If you are not completely satisfied with the performance of your DeWALT Power Tool Laser or Nailer for any reason you can return it within 90 days from the date of purchase with a receipt for a full refund no questions asked LATIN AMERICA This warranty does not apply to products sold in Latin...

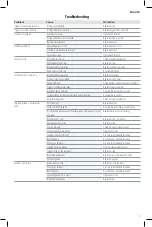
Page 11: ...r Disassemble nose driver to clean Cylinder sleeve not seated correctlyon bottom bumper Disassemble to correct Air pressure too low Check air supply equipment Skipping fasteners intermittent feed Worn bumper Replace bumper Tar dirt in driver channel Disassemble and clean nose and driver Air restriction inadequate air flow through quick disconnect socket and plug Replace quick disconnect fittings W...

Page 12: ...n terme Indique un message propre à la sécurité AVIS indique une pratique ne posant aucun risque de dommages corporels mais qui par contre si rien n est fait pour l éviter pourrait poser des risques de dommages matériels AVERTISSEMENT lire tous les avertissements de sécurité et toutes les directives Le non respect des avertissements et des directives pourrait se solder par un choc électrique un in...

Page 13: ...du corps dans la zone de sortie des fixations de l outil Ne jamais pointer l outil vers vous ou toute autre personne Ne pas appuyer sur la gâchette puisqu un déclenchement accidentel peut se produire causant possiblement une blessure Soyez prudent lorsque vous manipulez des fixations particulièrement lors du chargement et du déchargement puisque les fixations ont des bouts pointus AVERTISSEMENT ne...

Page 14: ...ravail Ne résistant pas au recul de manière à ce que l outil soit forcé de retourner à la surface de travail En mode Activation par contact si le contact avec la pièce à travailler est permis pour entrer à nouveau en contact avec la surface de travail avant que la gâchette soit relâchée une sortie inattendue d une fixation se produira Gardez votre visage et les parties de votre corps hors de porté...

Page 15: ...ème reproducteur Parmi ces produits chimiques on retrouve Le plomb dans les peintures à base de plomb La silice cristallisée dans les briques et le ciment ou autres produits de maçonnerie et L arsenic et le chrome dans le bois ayant subi un traitement chimique Le risque associé à de telles expositions varie selon la fréquence à laquelle on effectue ces travaux Pour réduire toute exposition à ces p...

Page 16: ... comme source d alimentation pour cet outil car l outil risque d exploser pouvant provoquer des blessures corporelles Raccords Installez un raccord mâle sur l outil non obstrué et qui évacue la pression d air de l outil lorsqu il est déconnecté de la source d alimentation Flexibles Les flexibles pneumatiques doivent avoir une pression de service nominale minimale de 10 6 kg cm 150 p s i g ou 150 p...

Page 17: ...outil qui fuit ou qui des pièces endommagées Position correcte des mains Fig B AVERTISSEMENT pour réduire tout risque de dommages corporels graves adopter SYSTÉMATIQUEMENT la position des mains illustrée AVERTISSEMENT pour réduire tout risque de dommages corporels graves maintenir SYSTÉMATIQUEMENT l outil fermement pour anticiper toute réaction soudaine La position des mains adéquate nécessite une...

Page 18: ...lencheur par contact Fig A Pour enfoncer une fixation vous devez appuyer à la fois sur le déclencheur et la gâchette Pour les outils à déclencheur par contact conventionnel vous devez appuyer et maintenir la gâchette et chaque contact entre le déclencheur et la surface de travail enfoncera une fixation Mise en place d une seule fixation placer une fixation Placez d abord COMPLÈTEMENT le déclencheu...

Page 19: ...risque de blessure corporelle éteignez l appareil et déconnectez la source d alimentation de l air avant d effectuer tout ajustement ou de retirer installer des pièces ou des accessoires Un déclenchement accidentel du démarrage peut causer des blessures Vérification du fonctionnement de l outil Fig A AVERTISSEMENT retirez toutes les fixations de l outil avant d effectuer la vérification du fonctio...

Page 20: ...visiter le site www dewalt com ou composer le 1 800 433 9258 1 800 4 DeWALT CETTE GARANTIE LIMITÉE REMPLACE TOUTE AUTRE GARANTIE Y COMPRIS TOUTE GARANTIE IMPLICITE DE QUALITÉ MARCHANDE OU DE CONFORMITÉ À DES FINS PARTICULIÈRES ET EXCLUT TOUT DOMMAGE ACCESSOIRE OU INDIRECT Certains états n autorisent aucune limitation quant à la durée d une garantie implicite ni aucune exclusion ou limitation de ga...

Page 21: ... l enfonceur Démonter le nez enfonceur et nettoyer L extrémité du cylindre n est pas positionnée correctement sur l amortisseur inférieur Démonter et réinstaller Pression d air trop faible Vérifier le circuit d air Fixations se coincent dans l appareil Alimentation Intermittente Amortisseur usé Remplacer l amortisseur Particules obstruant le canal de l enfonceur Démonter le nez enfonceur et nettoy...

Page 22: ... Definiciones Símbolos y Palabras de Alerta de Seguridad Este manual de instrucciones utiliza los siguientes símbolos y palabras de alerta de seguridad para alertarle de situaciones peligrosas y del riesgo de lesiones corporales o daños materiales PELIGRO Indica una situación de peligro inminente que si no se evita provocará la muerte o lesiones graves ADVERTENCIA Indica una situación de peligro p...

Page 23: ...oloque una mano o parte del cuerpo en el área de descarga de los sujetadores de la herramienta Nunca apunte con la herramienta hacia usted o hacia otra persona No apriete el gatillo ya que puede producirse una activación accidental que podría causar lesiones Tenga cuidado al manipular sujetadores especialmente al cargar y descargar ya que los sujetadores tienen puntas afiladas ADVERTENCIA No opere...

Page 24: ...e la herramienta de la superficie de trabajo No resista el retroceso de modo que la herramienta se fuerce a regresar a la superficie de trabajo En Modo de actuación de contacto si se permite que el contacto de la pieza de trabajo vuelva a entrar en contacto con la superficie de trabajo antes de soltar el gatillo se producirá una descarga involuntaria de un sujetador Manteniendo la cara y las parte...

Page 25: ...exposición a estos químicos varía dependiendo de la frecuencia con la cual realiza usted este tipo de trabajo Para reducir su exposición a estas sustancias químicas trabaje en una zona bien ventilada y llevando equipos de seguridad aprobados como mascarillas antipolvo especialmente diseñadas para filtrar partículas microscópicas Evite el contacto prolongado con polvo generado por el lijado aserrad...

Page 26: ...te causar lesiones Accesorios Instale una conexión macho en la herramienta que tenga flujo libre y que libere presión de aire de la herramienta cuando se desconecte de la fuente de suministro Mangueras Las mangueras de aire deben tener un mínimo de 10 6 kg cm2 150 p s i g de clasificación de presión de trabajo o 150 por ciento de la presión máxima que podría producirse en el sistema neumático La m...

Page 27: ...or de las válvulas y empaques Nunca use una herramienta que tenga fugas o partes dañadas Posición Adecuada de las Manos Fig B ADVERTENCIA Parareducirelriesgodelesiónpersonal grave tengaSIEMPRElasmanosenunaposición adecuadacomosemuestra ADVERTENCIA Parareducirelriesgodelesiónpersonal grave sujeteSIEMPREbienencasodequehayauna reacciónrepentina La posición de mano adecuada requiere una mano en la man...

Page 28: ...eración de Disparo de Contacto Fig A Para introducir un sujetador tanto el disparo como el gatillo deben presionarse En herramientas de disparo de contacto convencionales el gatillo puede presionarse y sostenerse y cada contacto entre el disparo y la superficie de trabajo introducirá un sujetador Colocación de sujetador individual fijación de lugar Primero coloque el disparo TOTALMENTE sobre la su...

Page 29: ...o de aire antes de realizar cualquier ajuste o retirar instalar conexiones o accesorios Una activación de arranque accidental puede causar lesiones Verificación de Operación de Herramienta Fig A ADVERTENCIA Retire todos los sujetadores de la herramienta antes de realizar la verificación de operación de la herramienta Operación de Disparo de Contacto 1 Con el dedo fuera del gatillo presione el disp...

Page 30: ...__ Nombre y domicilio del distribuidor donde se adquirió el producto ___________________________________________ Este producto está garantizado por un año a partir de la fecha de entrega contra cualquier defecto en su funcionamiento así como en materiales y mano de obra empleados para su fabricación Nuestra garantía incluye la reparación o reposición del producto y o componentes sin cargo alguno p...

Page 31: ...entre Además de la garantía las herramientas DeWALT están cubiertas por 1 AÑO DE SERVICIO GRATUITO DeWALT mantendrá la herramienta y reemplazará las piezas gastadas por su uso normal sin cobro en cualquier momento durante un año a contar de la fecha de compra GARANTÍA DE REEMBOLSO DE SU DINERO POR 90 DÍAS Si no está completamente satisfecho con el desempeño de su máquina herramienta láser o clavad...

Page 32: ...mblar la nariz impulsor para limpiar La manga del cilindro no está asentada debidamente en el amortiguador de abajo Desensamblar para corregir Presión de aire demasiado baja Verifique el equipo de suministro de aire Sujetadores que saltan Alimentación intermitente Amortiguador desgastado Reemplazar el amortiguador Alquitrán polvo en el canal del impulsor Desensamblar y limpiar la nariz y el impuls...

Page 33: ......

Page 34: ......

Page 35: ......

Page 36: ...DW451S2 Copyright 2018 DeWALT The following are trademarks for one or more DeWALT power tools the yellow and black color scheme the D shaped air intake grill the array of pyramids on the handgrip the kit box configuration and the array of lozenge shaped humps on the surface of the tool ...

Reviews: