background image

English

6

throughout the entire charging cycle and will not return to 
maximum charge rate even if the battery pack warms.
The DCB118 charger is equipped with an internal fan 
designed to cool the battery pack. The fan will turn on 
automatically when the battery pack needs to be cooled.
Never operate the charger if the fan does not operate 
properly or if ventilation slots are blocked. Do not permit 
foreign objects to enter the interior of the charger.

Electronic Protection System

Li-Ion appliances are designed with an Electronic 
Protection System that will protect the battery pack against 
overloading, overheating or deep discharge.
The appliance will automatically turn off if the Electronic 
Protection System engages. If this occurs, place the lithium-
ion battery pack on the charger until it is fully charged.

Wall Mounting

These chargers are designed to be wall mountable or to 
sit upright on a table or work surface.  If wall mounting, 
locate the charger within reach of an electrical outlet, 
and away from a corner or other obstructions which may 
impede air flow. Use the back of the charger as a template 
for the location of the mounting screws on the wall. Mount 
the charger securely using drywall screws (purchased 
separately) at least 1" (25.4  mm) long, with a screw head 
diameter of 0.28–0.35" (7–9 mm), screwed into wood to an 
optimal depth leaving approximately 7/32" (5.5 mm) of the 
screw exposed. Align the slots on the back of the charger 
with the exposed screws and fully engage them in the slots.

Charger Cleaning Instructions


WARNING: 

Shock hazard. Disconnect the charger 

from the AC outlet before cleaning. Dirt and grease 
may be removed from the exterior of the charger using 
a cloth or soft non-metallic brush. Do not use water or 
any cleaning solutions.

Important Charging Notes

1.  Longest life and best performance can be obtained if 

the battery pack is charged when the air temperature is 
between 65 °F and 75 °F (18 ° – 24 °C). DO NOT charge 
the battery pack in an air temperature below +40 °F 
(+4.5 °C), or above +104 °F (+40 °C). This is important 
and will prevent serious damage to the battery pack.

2.  The charger and battery pack may become warm to the 

touch while charging. This is a normal condition, and 
does not indicate a problem. To facilitate the cooling of 
the battery pack after use, avoid placing the charger or 
battery pack in a warm environment such as in a metal 
shed or an uninsulated trailer.

3.  If the battery pack does not charge properly:

a.  Check operation of receptacle by plugging in a lamp 

or other appliance;

b.  Check to see if receptacle is connected to a light 

switch which turns power off when you turn out the 
lights;

c.  Move the charger and battery pack to a location 

where the surrounding air temperature is 
approximately 65 °F – 75 °F (18 ° – 24 °C);

d.  If charging problems persist, take the battery pack 

and charger to your local service center.

4.  The battery pack should be recharged when it fails to 

produce sufficient power on jobs which were easily 
done previously. DO NOT CONTINUE to use under these 
conditions. Follow the charging procedure. You may 
also charge a partially used pack whenever you desire 
with no adverse effect on the battery pack.

5.  Foreign materials of a conductive nature such as, but 

not limited to, grinding dust, metal chips, steel wool, 
aluminum foil, or any buildup of metallic particles 
should be kept away from charger cavities. Always 
unplug the charger from the power supply when there 
is no battery pack in the cavity. Unplug the charger 
before attempting to clean.

6.  Do not freeze or immerse the charger in water or any 

other liquid.

Storage Recommendations

1.  The best storage place is one that is cool and dry, away 

from direct sunlight and excess heat or cold.

2.  For long storage, it is recommended to store a fully 

charged battery pack in a cool dry place out of the 
charger for optimal results.

nOTE:

 Battery packs should not be stored completely 

depleted of charge. The battery pack will need to be 
recharged before use.

SAVE THESE INSTRUCTIONS FOR 

FUTURE USE

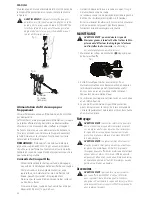
COMPONENTS (FIG. A)


WARNING: 

Never modify the appliance or any part of 

it. Damage or personal injury could result.

Refer to Figure A at the beginning of this manual for a 
complete list of components.

INTENDED USE

This string trimmer is designed for professional trimming 
applications 

DO nOT

 use under wet conditions or in 

presence of flammable liquids or gases.
This is not an edger and is not intended to be used for 
edging.
This string trimmer is a professional appliance. 

DO nOT


let children come into contact with the tool. Supervision is 
required when inexperienced operators use this appliance.

ASSEMBLY AND ADJUSTMENTS


WARNING: To reduce the risk of serious personal 
injury, turn unit off and remove the battery pack 
before making any adjustments or removing/
installing attachments or accessories.

 An 

accidental start-up can cause injury.

Summary of Contents for DCST970

Page 1: ...taire nous contacter Si tiene dudas o comentarios contáctenos 1 800 4 DeWALT Instruction Manual Guide D utilisation Manual de instrucciones DCST970 60V Max Lithium String Trimmer Taille bordure au lithium ion de 60 V max Podadora de cuerda con batería de iones de litio de 60 V Máx ...

Page 2: ... English 1 Français 12 Español 24 ...

Page 3: ...icates a safety related message NOTICE Indicates a practice not related to personal injury which if not avoided may result in property damage WARNING Read all safety warnings and all instructions Failure to follow the warnings and instructions may result in electric shock fire and or serious injury WARNING To reduce the risk of injury read the instruction manual If you have any questions or commen...

Page 4: ...angled with a foreign object stop appliance immediately remove battery check for damage and have any damage repaired before further operation is attempted Do not operate with a broken hub or spool REMOVE BATTERY when not in use when replacing line or prior to cleaning AVOID DANGEROUS ENVIRONMENTAL CONDITIONS Do not use electric appliances in damp or wet locations Follow all instructions in this In...

Page 5: ...ever tape the trigger switch in the ON position Do not incinerate the battery pack even if it is severely damaged or is completely worn out The battery pack can explode in a fire Toxic fumes and materials are created when lithium ion battery packs are burned If battery contents come into contact with the skin immediately wash area with mild soap and water If battery liquid gets into the eye rinse ...

Page 6: ...or lithium ion batteries or battery packs indicates that the costs to recycle these batteries or battery packs at the end of their useful life have already been paid by DeWALT In some areas it is illegal to place spent nickel cadmium nickel metal hydride or lithium ion batteries in the trash or municipal solid waste stream and the Call 2 Recycle program provides an environmentally conscious altern...

Page 7: ...le battery packs Other types of batteries may overheat and burst resulting in personal injury and property damage NOTICE Under certain conditions with the charger plugged into the power supply the charger can be shorted by foreign material Foreign materials of a conductive nature such as but not limited to grinding dust metal chips steel wool aluminum foil or any buildup of metallic particles shou...

Page 8: ...ttery pack in a warm environment such as in a metal shed or an uninsulated trailer 3 If the battery pack does not charge properly a Check operation of receptacle by plugging in a lamp or other appliance b Check to see if receptacle is connected to a light switch which turns power off when you turn out the lights c Move the charger and battery pack to a location where the surrounding air temperatur...

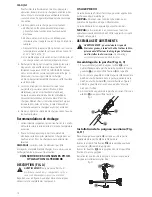
Page 9: ... WARNING Always use proper eye protection that conforms to ANSI Z87 1 CAN CSA Z94 3 while operating this appliance WARNING Remove the battery before making any assembly adjustments or changing accessories Such preventive safety measures reduce the risk of starting the TRIMMER accidentally CAUTION Before you begin trimming only use the appropriate type of cutting line CAUTION Inspect area to be tri...

Page 10: ...ng cut As you use the trimmer the string will get shorter due to wear Gently bump the trimmer on the ground while running at normal speed and the line will feed NOTE Extending nylon line beyond the 13 inch 330 mm swath will negatively affect performance runtime and the life of the trimmer due to potential of damaging motor Doing so may void the warranty Helpful Cutting Tips Use the tip of the stri...

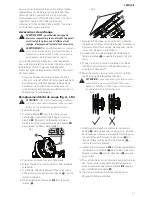
Page 11: ...so be used but may degrade runtime of the trimmer Using any other line with the trimmer can degrade performance and or cause damage to the trimmer Replacing the Cutting Line Fig A J M CAUTION To avoid appliance damage if the cutting line protrudes beyond the trimming blade cut it off so that it just reaches the blade 1 Remove battery 2 Turn spool 21 clockwise to unlock as shown in figure J The whi...

Page 12: ...guard firmly in place Damage or personal injury could result 1 Remove the spool housing as described in the Replacing Spool Housing section 2 Remove the 4 guard screws 34 shown in figure P 3 Lift the guard off at an angle as shown in figure Q fig P 34 34 fig Q 4 To attached a new guard slide the tab 35 of the new guard under the lip 36 of the motor housing 6 then lower the back of the guard into p...

Page 13: ...nce and replace worn parts caused by normal use for free any time during the first year after purchase DeWALT BATTERY PACKS Product warranty voided if the battery pack is tampered with in any way DeWALT is not responsible for any injury caused by tampering and may prosecute warranty fraud to the fullest extent permitted by law 90 DAY MONEY BACK GUARANTEE If you are not completely satisfied with th...

Page 14: ...rporels mais qui par contre si rien n est fait pour l éviter pourrait poser des risques de dommages matériels AVERTISSEMENT lire tous les avertissements de sécurité et toutes les directives Le non respect des avertissements et des directives pourrait se solder par un choc électrique un incendie et ou une blessure grave AVERTISSEMENT afin de réduire le risque de blessures lire le mode d emploi de l...

Page 15: ... sur la détente lorsque les piles sont en place UTILISER LE BON OUTIL Ne pas utiliser cet outil pour tout autre type de travail sauf pour celui pour lequel il est prévu NE PAS TROP TENDRE LES BRAS Conserver son équilibre en tout temps NE FORCEZ PAS L APPAREIL Le travail sera mieux fait à la vitesse pour laquelle il a été conçu et le risque de blessure sera moindre DOMMAGE À L OUTIL Si vous frappez...

Page 16: ...ues sont dégagées En cas de contact du liquide de la pile avec la peau rincer immédiatement au savon doux et à l eau En cas de contact oculaire rincer l œil ouvert à l eau claire une quinzaine de minutes ou jusqu à ce que l irritation cesse Si des soins médicaux s avéraient nécessaires noter que l électrolyte de la pile est composé d un mélange de carbonates organiques liquides et de sels de lithi...

Page 17: ...s piles de wattheure supérieur L étiquette du bloc piles donne deux estimations de wattheures se reporter à l exemple Selon comment le bloc piles est expédié l estimation appropriée de wattheure doit être utilisée pour déterminer les modalités d expédition lui correspondant Si le capuchon d expédition est utilisé le bloc piles sera considéré comme 3 blocs piles au wattheure indiqué pour Expédition...

Page 18: ...d une rallonge est utilisée pour obtenir une certaine longueur s assurer que chaque rallonge présente au moins le calibre de fil minimum Le tableau ci dessous illustre les calibres à utiliser selon la longueur de rallonge et l intensité nominale indiquée sur la plaque signalétique En cas de doute utiliser le calibre suivant Plus le calibre est petit plus la rallonge peut supporter de courant Calib...

Page 19: ...ux blocs piles une durée de vie maximale Un bloc piles froid se rechargera moins vite qu un bloc piles chaud Le bloc piles se rechargera à ce rythme plus lent tout au cours du cycle de charge et ne retournera pas à sa vitesse maximale de charge même s il venait à se réchauffer Le chargeur DCB118 est équipé d un ventilateur interne destiné à refroidir le bloc piles Le ventilateur se mettra automati...

Page 20: ...blocs piles ne devraient pas être entreposés complètement déchargés Il sera nécessaire de recharger le bloc piles avant réutilisation CONSERVER CES CONSIGNES POUR UTILISATION ULTÉRIEURE DESCRIPTION FIG A AVERTISSEMENT ne jamais modifier l outil électrique ni aucun de ses composants car il y a risques de dommages corporels ou matériels Reportez vous en figure A au début de ce manuel pour obtenir la...

Page 21: ...E de manière à bien l enfoncer et à entendre un déclic Assurez vous que le bloc piles est bien logé et enclenché en place Veillez à ce que le bloc piles est bien en place et complètement verrouillé en position Retrait du bloc piles Enfoncer le bouton de dégagement du bloc piles 14 sur le compartiment puis retirer le bloc piles de l appareil comme le montre la figure F fig E fig F Position correcte...

Page 22: ...é de la gauche à droite Vous éviterez jetant les débris à l opérateur Éviter les arbres et les arbustes Écorce d arbre moulures de bois parement et piquets de clôture peuvent facilement être endommagés par la chaîne MAINTENANCE AVERTISSEMENT pour réduire le risque de blessures graves éteindre l outil et retirer le bloc piles avant d effectuer tout réglage et d enlever ou d installer tout accessoir...

Page 23: ... déverrouillée fig J 21 23 3 Pour retirer la bobine tirez la en ligne droite 4 Enlevez l herbe et les saletés présentes dans la bobine et le boîtier 5 Tout d abord enroulez le nouveau fil dans le canal de la bobine la plus proche des fentes de retenue 24 comme le montre la figure K 6 Placez l extrémité du fil de coupe 25 dans le trou de retenue 26 fig K 26 25 24 7 Enroulez le fil de coupe sur la b...

Page 24: ...ur fixer un nouveau pare main glisser la languette 35 du nouveau pare main sous le rebord 36 du boîtier du moteur 6 puis abaisser l arrière du pare main pour le poser comme le montre la figure R 5 Remettre les quatre vis du pare main 34 et bien serrer 6 Remplacer le boîtier de la bobine comme le décrit la section Remplacement du boîtier de la bobine fig R 36 35 Réparations Le chargeur et le bloc p...

Page 25: ...tretiendra l outil et remplacera les pièces usées au cours d une utilisation normale et ce gratuitement pendant une période d un an à compter de la date d achat BLOCS PILES DeWalt La garantie de se produit sera annulée si le bloc piles a été altéré de quelque façon que ce soit DeWALT ne peut être tenu responsable de tout dommage corporel causé par l altération du produit et pourra poursuivre toute...

Page 26: ...2 Paquete de baterías 13 Botóndeliberacióndelabatería 14 Manija Definiciones Símbolos y palabras de alerta de seguridad Este manual de instrucciones utiliza los siguientes símbolos y palabras de alerta de seguridad para alertarle de situaciones peligrosas y del riesgo de lesiones corporales o daños materiales PELIGRO Indica una situación de peligro inminente que si no se evita provocará la muerte ...

Page 27: ...quilibrio adecuado y manténgase parado correctamente en todo momento NO FUERCE EL APARATO Hará mejor el trabajo y habrá menos probabilidad de riesgo de lesiones a la velocidad para la que se diseñó DAÑO A LA UNIDAD Si golpea o se enreda con un objeto extraño detenga el aparato de inmediato quite la batería verifique si hay daños y haga reparar cualquier daño antes de intentar un uso adicional No u...

Page 28: ...idad y todas las instrucciones para la batería el cargador y la herramienta eléctrica No seguir las advertencias y las instrucciones puede provocar una descarga eléctrica un incendio y o lesiones graves No cargue o use la unidad de batería en atmósferas explosivas como en presencia de líquidos gases o polvos inflamables Puede que al insertar o sacar la unidad de batería del cargador se inflamen el...

Page 29: ...enta de ciertos reglamentos de transporte que se imponen a las baterías con mayor capacidad nominal de vatios hora La etiqueta en la batería indica dos capacidades nominales de vatios hora ver el ejemplo Dependiendo de cómo se transporta la batería debe usarse la capacidad nominal vatios hora apropiada para determinar los requisitos de transporte aplicables Si se utiliza la tapa de transporte la u...

Page 30: ...largador deben ser de un calibre apropiado AWG o American Wire Gauge para su seguridad Mientras menor sea el calibre del hilo mayor la capacidad del cable Es decir un hilo calibre 16 tiene mayor capacidad que uno de 18 Un cable de un calibre insuficiente causará una caída en la tensión de la línea dando por resultado una pérdida de energía y sobrecalentamiento Cuando se utilice más de un alargador...

Page 31: ... la batería a un centro de servicio autorizado para que sean sometidos a pruebas Retraso por batería caliente fría Cuando el cargador detecta que una batería está demasiado caliente o demasiado fría inicia automáticamente un Retraso por batería caliente fría y suspende la carga hasta que la batería alcanza una temperatura adecuada En ese momento el cargador inicia automáticamente el modo de carga ...

Page 32: ...comendaciones de almacenamiento 1 El mejor lugar de almacenamiento es uno que sea fresco y seco lejos de la luz solar directa y del exceso de calor o frío 2 Para resultados óptimos durante tiempos prolongados de almacenamiento se recomienda almacenar la unidad de batería completamente cargada en un lugar fresco y seco fuera del cargador NOTA Las unidades de batería no deberían almacenarse completa...

Page 33: ...gada ADVERTENCIA Antes de quitar o instalar la batería asegúrese de que el botón de bloqueo en apagado esté accionado para evitar el accionamiento del interruptor Para instalar el paquete de baterías Inserte el paquete de baterías 12 en la caja de la batería 13 como se muestra en la figura E hasta que esté completamente asentado y se escuche un clic Asegúrese de que el paquete de baterías esté bie...

Page 34: ...a guía de borde a lo largo de elementos como cercos casas y canteros Los cercos de alambre y de estacas provocan un mayor desgaste de la cuerda e incluso su rotura Los muros de piedra y ladrillo las cunetas y la madera pueden desgastar la cuerda rápidamente No permita que la tapa del carrete se arrastre sobre el suelo u otras superficies En crecimientos largos corte desde arriba hacia abajo y no e...

Page 35: ...la vida de la recortadora El uso de otra línea con el condensador de ajuste puede degradar el rendimiento y o dañar el condensador de ajuste Reemplazodelacuerdadecorte Fig A J M ADVERTENCIA Para evitar que se dañe el aparato si la cuerda de corte sobresale más allá de la hoja de recorte córtela de manera que llegue solo hasta la hoja 1 Quite la batería 2 Para desbloquear gire hacia la derecha el c...

Page 36: ...o de los tres orificios para evitar que la caja del carrete gire 2 Gire hacia la derecha la caja del carrete como se muestra en la figura O 3 Inserte un destornillador hacia atrás a través de los tres orificios 29 31 y 32 y enrosque la nueva caja del carretee hacia la izquierda y ajústela firmemente sobre el perno 33 que sobresale de la podadora fig N 30 29 32 31 fig O 33 Reemplazo del protector F...

Page 37: ...sí como los gastos de transportación razonablemente erogados derivados del cumplimiento de este certificado Para hacer efectiva esta garantía deberá presentar su herramienta y esta póliza sellada por el establecimiento comercial donde se adquirió el producto de no contar con ésta bastará la factura de compra Excepciones Esta garantía no será válida en los siguientes casos Cuando el producto se hub...

Page 38: ...ey GARANTÍA DE REEMBOLSO DE SU DINERO POR 90 DÍAS Si no está completamente satisfecho con el desempeño de su máquina herramienta láser o clavadora DeWALT cualquiera sea el motivo podrá devolverlo hasta 90 días de la fecha de compra con su recibo y obtener el reembolso completo de su dinero sin necesidad de responder a ninguna pregunta AMÉRICA LATINA Esta garantía no se aplica a los productos que s...

Page 39: ......
Page 40: ...70 70 70 185 120 90 X 60 X 60 60 120 X DCB205 20 X X X X 95 95 95 240 150 112 X 75 X 75 47 75 150 X DCB207 20 X X X X 30 30 30 60 40 30 X 22 X 22 22 X X DC9182 18 X 40 40 X X X 40 X X X X X X X X X 40 DCB120 12 X X X X 30 30 30 60 45 35 X 20 X X X 45 X DCB127 12 X X X X 35 35 35 90 60 50 X 30 X X X 60 X DCB080 8 X X X 60 X X X X X X X X X X X X X BT Bluetooth NOTE The Bluetooth word mark and logos...

Reviews: