background image

3

English

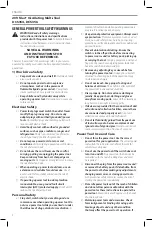
damaged, have the power tool repaired before 
use. 

Many accidents are caused by poorly maintained 

power tools.

f ) 

Keep cutting tools sharp and clean. 

Properly 

maintained cutting tools with sharp cutting edges are 
less likely to bind and are easier to control.

g ) 

Use the power tool, accessories and tool bits etc. 
in accordance with these instructions, taking 
into account the working conditions and the 
work to be performed. 

Use of the power tool for 

operations different from those intended could result 
in a hazardous situation.

h ) 

Keep handles and grasping surfaces dry, clean 
and free from oil and grease.

 Slippery handles and 

grasping surfaces do not allow for safe handling and 
control of the tool in unexpected situations.

1) Battery Tool Use and Care

a ) 

Recharge only with the charger specified by the 
manufacturer.

 A charger that is suitable for one type 

of battery pack may create a risk of fire when used 
with another battery pack.

b ) 

Use power tools only with specifically designated 
battery packs.

 Use of any other battery packs may 

create a risk of injury and fire.

c ) 

When battery pack is not in use, keep it away 
from other metal objects, like paper clips, coins, 
keys, nails, screws or other small metal objects, 
that can make a connection from one terminal to 
another.

 Shorting the battery terminals together may 

cause burns or a fire.

d ) 

Under abusive conditions, liquid may be ejected 
from the battery; avoid contact. If contact 
accidentally occurs, flush with water. If liquid 
contacts eyes, additionally seek medical help.


Liquid ejected from the battery may cause irritation 
or burns.

e ) 

Do not use a battery pack or tool that is 
damaged or modified.

 Damaged or modified 

batteries may exhibit unpredictable behavior resulting 
in fire, explosion or risk of injury.

f ) 

Do not expose a battery pack or tool to 
fire or excessive temperature.

 Exposure to 

fire or temperature above 265 °F (130 °C) may 
cause explosion.

g ) 

Follow all charging instructions and do not 
charge the battery pack or tool outside the 
temperature range specified in the instructions. 

Charging improperly or at temperatures outside the 
specified range may damage the battery and increase 
the risk of fire. 

Service

a ) 

Have your power tool serviced by a qualified 
repair person using only identical replacement 
parts.


This will ensure that the safety of the power 

tool is maintained.

b ) 

Never service damaged battery packs. 

Service 

of battery packs should only be performed by the 
manufacturer or authorized service providers.

Additional Safety Rules for Oscillating 
Multi-Tools

• 

Hold power tool by insulated gripping surfaces, 
when performing an operation where the cutting 
accessory may contact hidden wiring. 

Cutting 

accessory contacting a “live” wire may make exposed 
metal parts of the power tool “live” and could give the 
operator an electric shock.

• 

Use clamps or another practical way to secure and 
support the work piece to a stable platform. 

Holding 

the work by hand or against your body leaves it unstable 
and may lead to loss of control.

• 

Air vents often cover moving parts and should be 
avoided. 

Loose clothes, jewelry or long hair can be 

caught in moving parts.

• 

Disconnect power before using tool near live wires or 
where there may be hidden wiring. 

Cutting accessory 

contacting a “live” wire may make exposed metal parts 
of the power tool “live” and could give the operator an 
electric shock.” Always check for hidden wiring, gas lines, 
or other utilities before performing any material cutting or 
removal operations with the tool.

• 

Wait for the cutter to stop before setting the tool 
down. 

An exposed cutter may engage the surface leading 

to possible loss of control and serious injury.

• 

Do not operate this tool for long periods of time. 

Vibration caused by the operating action of this tool may 
cause permanent injury to fingers, hands, and arms. Use 
gloves to provide extra cushion, take frequent rest periods, 
and limit daily time of use.

• 

Do not restart the cutting operation in the 
work piece. 

Let the tool reach full speed and carefully 

re-enter the cut.

• 

Do not “jam” the saw blade or apply excessive 
pressure. 

Do not attempt to make an excessive depth 

of cut.

• 

Always keep the handle dry, and free of oil or grease.

• 

Keep your hands away from cutting area. 

Do not 

reach under the material being cut.

• 

Do not use dull or damaged blades. 

Bent blade 

can break easily or cause kickback. Exercise extreme 
caution when handling the accessories. The accessories 
are very sharp. Wear protective gloves when changing 
cutting accessories. Accessories become hot after 
prolonged usage.

• 

Before scraping, check work piece for nails.

 If there 

are nails, either remove them or set them well below 
intended finished surface. Striking a nail with accessory 
edge could cause the tool to jump.

• 

Do not wet sand with this tool.

 Liquids entering the 

motor housing are an electrical shock hazard.

• 

Never work in area which is soaked with a liquid, 
such as a solvent or water, or dampened such as 
newly applied wallpaper. 

There is an electrical shock 

hazard when working in such conditions with a power 

Summary of Contents for DCS354

Page 1: ... nous contacter Si tiene dudas o comentarios contáctenos 1 800 4 DeWALT DCS354 DCS356 20V Max Oscillating Multi Tool Outil multifonctions à oscillations sans fil 20 V max Multi herramienta oscilante inalámbrica de 20 V Máx Instruction Manual Guide D utilisation Manual de instrucciones ...

Page 2: ...English original instructions 1 Français traduction de la notice d instructions originale 14 Español traducido de las instrucciones originales 28 ...

Page 3: ... injury Used without word Indicates a safety related message NOTICE Indicates a practice not related to personal injury which if not avoided may result in property damage WARNING Read all safety warnings and all instructions Failure to follow the warnings and instructions may result in electric shock fire and or serious injury WARNING To reduce the risk of injury read the instruction manual If you...

Page 4: ...se instructions to operate the power tool Power tools are dangerous in the hands of untrained users e Maintain power tools and accesories Check for misalignment or binding of moving parts breakage of parts and any other condition that may affect the power tool s operation If GENERAL POWER TOOL SAFETY WARNINGS WARNING Read all safety warnings instructions illustrations and specifications provided w...

Page 5: ...s should only be performed by the manufacturer or authorized service providers Additional Safety Rules for Oscillating Multi Tools Hold power tool by insulated gripping surfaces when performing an operation where the cutting accessory may contact hidden wiring Cutting accessory contacting a live wire may make exposed metal parts of the power tool live and could give the operator an electric shock ...

Page 6: ...of lead based paint is NOT RECOMMENDED due to the difficulty of controlling the contaminated dust The greatest danger of lead poisoning is to children and pregnant women Since it is difficult to identify whether or not a paint contains lead without a chemical analysis we recommend the following precautions when sanding any paint Personal Safety No children or pregnant women should enter the work a...

Page 7: ...l and battery pack in locations where the temperature may reach or exceed 104 F 40 C such as outside sheds or metal buildings in summer For best life store battery packs in a cool dry location NOTE Do not store the battery packs in a tool with the trigger switch locked on Never tape the trigger switch in the ON position Do not expose battery pack or tool appliance to fire or excessive temperature ...

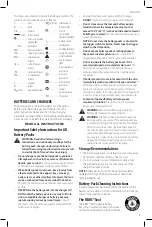
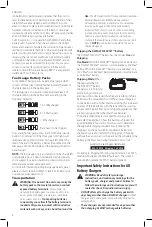
Page 8: ... center for information on where to drop off the spent battery RBRC is a registered trademark of Call 2 Recycle Inc Fuel Gauge Battery Packs Some DeWALT battery packs include a fuel gauge which consists of three green LED lights that indicate the level of charge remaining in the battery pack The fuel gauge is an indication of approximate levels of charge remaining in the battery pack according to ...

Page 9: ...en service or repair is required Incorrect reassembly may result in a risk of electric shock electrocution or fire Disconnect the charger from the outlet before attempting any cleaning This will reduce the risk of electric shock Removing the battery pack will not reduce this risk NEVER attempt to connect 2 chargers together The charger is designed to operate on standard 120V household electrical p...

Page 10: ...ed trailer 3 If the battery pack does not charge properly a Check operation of receptacle by plugging in a lamp or other appliance b Check to see if receptacle is connected to a light switch which turns power off when you turn out the lights c Move the charger and battery pack to a location where the surrounding air temperature is approximately 65 F 75 F 18 C 24 C d If charging problems persist ta...

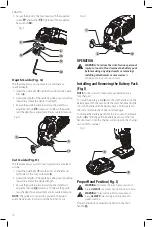
Page 11: ...l of the pins 13 on the holder and is flush with the shaft 4 Release the accessory clamping lever 5 Some accessories such as scrapers and blades can be mounted at an angle if required as shown in Figure C 3 Firmly press the base with the sanding sheet attached against a flat surface and briefly switch the tool on This provides for good adhesion between the platen and the sanding sheet and also hel...

Page 12: ...right sides of the cut guide block 6 2 Adjust the length of the guide by pulling out or pushing inward to achieve the desired length 3 Secure the guide in place by turning the depth cut adjustment knob 19 clockwise To release the guide turn the depth cut adjustment knob counterclockwise NOTE The guide arm can also be placed in the guard assembly vertically in order to set the height of a cut Fig G...

Page 13: ...er to wear away it will damage the sanding pad Always keep the blade sharp LED Worklight Fig A CAUTION Do not stare into worklight Serious eye injury could result The LED worklight 2 will activate any time the trigger is depressed and will remain on for 20 seconds after trigger is released NOTE The worklights are for lighting the immediate work surface and are not intended to be used as a flashlig...

Page 14: ...sories or damage caused where repairs have been made or attempted by others THIS LIMITED WARRANTY IS GIVEN IN LIEU OF ALL OTHERS INCLUDING THE IMPLIED WARRANTY OF MERCHANTABILITY AND FITNESS FOR A PARTICULAR PURPOSE AND EXCLUDES ALL INCIDENTAL OR CONSEQUENTIAL DAMAGES Some states do not allow limitations on how long an implied warranty lasts or the exclusion or limitation of incidental or conseque...

Page 15: ...ttery in tool handle Battery is not charged Place battery on charger and install a fully charged battery pack in tool Battery or power tool is overheated Allow battery and or tool to cool after extended use or replace overheated battery pack with a cool one Switch is damaged Have switch replaced at an authorized service center ...

Page 16: ...IS indique une pratique ne posant aucun risque de dommages corporels mais qui par contre si rien n est fait pour l éviter pourrait poser des risques de dommages matériels AVERTISSEMENT lire tous les avertissements de sécurité et toutes les directives Le non respect des avertissements et des directives pourrait se solder par un choc électrique un incendie et ou une blessure grave AVERTISSEMENT afin...

Page 17: ...e peut réduire les dangers engendrés par les poussières h Ne pas laisser votre connaissance acquise suite l utilisation fréquente des outils vous permettre de baisser la garde et ignorer les principes de AVERTISSEMENTS GÉNÉRAUX SUR LA SÉCURITÉ DES OUTILS AVERTISSEMENT lisez tous les avertissements de sécurité toutes les instructions les illustrations et les caractéristiques fournis avec cet outil ...

Page 18: ...ec un autre type de b loc piles b Utiliser les outils électriques uniquement avec les blocs piles conçus à cet effet L utilisation de tout autre bloc piles risque de causer des blessures ou un incendie c Lorsque le bloc piles n est pas utilisé le tenir éloigné des objets métalliques notamment des trombones de la monnaie des clés des clous des vis ou autres petits objets métalliques qui peuvent éta...

Page 19: ...core humidifiée comme c est le cas pour le papier peint nouvellement appliqué De telles conditions de travail avec un outil électrique peuvent causer un risque de décharge électrique et le chauffage du liquide causé par le raclage peut entraîner l émission de vapeurs nocives de la pièce à travailler Utilisez seulement pour le ponçage à sec L eau qui pénètre dans un outil électrique augmente le ris...

Page 20: ...es nettoyer soigneusement pendant toute la durée du projet de ponçage Changer fréquemment les filtres d aspirateur Recueillir toute toile de protection plastifiée utilisée et s en défaire avec toute particule de poussière ou autre débris à éliminer Les placer dans un contenant hermétique pour déchets et les jeter conformément à la procédure normale d élimination des ordures Pendant le nettoyage ma...

Page 21: ...u jusqu à ce que l irritation cesse Si des soins médicaux s avéraient nécessaires noter que l électrolyte de la pile est composé d un mélange de carbonates organiques liquides et de sels de lithium Le contenu des cellules d une pile ouverte peut causer une irritation respiratoire En cas d inhalation exposer l individu à l air libre Si les symptômes persistent consulter un médecin AVERTISSEMENT ris...

Page 22: ...arge restant dans le bloc piles en fonction des voyants suivants Chargé de 75 à 100 Chargé de 51 à 74 Chargé de 50 Le bloc piles doit être rechargé Pour activer le témoin de charge maintenez appuyé le bouton du témoin de charge Une combinaison des trois voyants Del s allumera indiquant le niveau de charge Lorsque le niveau de charge du bloc pile atteint la limite minimale d utilisation le témoin d...

Page 23: ...ndommagée les remplacer immédiatement Ne pas utiliser le chargeur s il a reçu un coup fait une chute ou a été endommagé de quelque façon que ce soit Le ramener dans un centre de réparation agréé Ne pas démonter le chargeur Pour tout service ou réparation le rapporter dans un centre de réparation agréé Le fait de le réassembler de façon incorrecte comporte des risques de chocs électriques d électro...

Page 24: ... le bloc piles au lithium ion sur son chargeur jusqu à ce qu il soit complètement rechargé Remarques importantes concernant le chargement 1 Pour augmenter la durée de vie du bloc piles et optimiser son rendement le recharger à une température ambiante de 18 C à 24 C 65 F à 75 F NE PAS charger lorsque le bloc piles est en dessous de 4 5 C 40 F ou au dessus de 40 C 104 F C est important pour préveni...

Page 25: ...vision est nécessaire auprès de tout utilisateur non expérimenté Installation murale DCB107 DCB112 DCB113 DCB115 DCB118 DCB132 Ces chargeurs ont été conçus pour une installation murale ou pour être posés sur une table ou une surface de travail Pour une fixation murale installez le chargeur à proximité d une prise électrique et à l écart de coins ou de toute autre obstruction au passage de l air Ut...

Page 26: ...r l outil 2 Placez l accessoire sur la rondelle 3 Resserrez fermement l écrou de l adaptateur 15 à l aide de la clé hexagonale Fig D 2 Arrimez le dispositif de guidage au corps de l outil à l aide de la vis 17 et une rondelle 14 fournie à cet effet Resserrez avec la clé hexagonale 18 également fournie Dispositif de guidage de coupe Fig H Cette fonction vous permet de suivre plus précisément un tra...

Page 27: ...contrôlez la vitesse de l outil à l aide de la gâchette de vitesse variable 1 Fig I 9 8 Installation et retrait du bloc piles Fig I REMARQUE pour des résultats optimums s assurer que le bloc piles est complètement chargé Pour installer le bloc piles 8 dans la poignée de l outil alignez le bloc piles sur les rails dans la poignée de l outil et faites le glisser fermement en place puis vérifiez qu i...

Page 28: ...e bloc piles avant d effectuer tout ajustement ou de retirer installer des pièces ou des accessoires Un déclenchement accidentel du démarrage peut causer des blessures Ponçage AVERTISSEMENT risque d incendie Pour le travail effectué sur des surfaces métalliques ne pas utiliser un aspirateur parce que des étincelles peuvent se produire Porter des lunettes de sécurité et un masque anti poussières En...

Page 29: ...ntretiendra l outil et remplacera les pièces usées au cours d une utilisation normale et ce gratuitement pendant une période d un an à compter de la date d achat CONTRAT D ENTRETIEN GRATUIT DE DEUX ANS SUR LES BLOC PILES DeWALT DC9071 DC9091 DC9096 DC9182 DC9280 DC9360 DCB120 DCB122 DCB124 DCB127 DCB201 DCB203BT DCB207 DCB361 CONTRAT D ENTRETIEN GRATUIT DE TROIS ANS SUR LES BLOC PILES DeWALT DCB20...

Page 30: ...idad relacionado AVISO Se refiere a una práctica no relacionada a lesiones corporales que de no evitarse puede resultar en daños a la propiedad ADVERTENCIA Lea todas las advertencias de seguridad e instrucciones El incumplimiento de las advertencias e instrucciones puede provocar descargas eléctricas incendios o lesiones graves ADVERTENCIA Para reducir el riesgo de lesiones lea el manual de instru...

Page 31: ...de recolección y extracción de polvo asegúrese de que estén conectados y que se utilicen correctamente El uso de dispositivos de recolección de polvo puede reducir los peligros relacionados con el polvo ADVERTENCIAS GENERALES DE SEGURIDAD PARA HERRAMIENTAS ELÉCTRICAS ADVERTENCIA Lea todas las advertencias de seguridad instrucciones ilustraciones y especificaciones incluidas con esta herramienta el...

Page 32: ...ones diferentes de aquéllas para las que fue diseñada podría originar una situación peligrosa h Mantenga las manijas y superficies de sujeción secas limpias y libres de aceite y grasa Las manijas y superficies de sujeción resbalosas no permiten el manejo y control seguros de la herramienta en situaciones inesperadas 5 Uso y Mantenimiento de la Herramienta con Baterías a Recargue solamente con el c...

Page 33: ...material que está cortando No utilice hojas sin filo o dañadas Una hoja doblada puede romperse fácilmente o provocar un retroceso Sea extremadamente cuidadoso cuando manipule los accesorios Los accesorios son muy filosos Use guantes de protección cuando cambie accesorios de corte Los accesorios pueden calentarse después de un uso prolongado Antes de raspar revise si hay clavos en la pieza de traba...

Page 34: ...cantidad de polvo generado Las áreas donde se realiza remoción de pintura deben estar selladas con láminas de plástico de 4 mm de grosor El lijado debería hacerse de modo que se reduzcan los vestigios de polvo de pintura fuera del área de trabajo Limpieza Y Eliminación de Residuos Todas las superficies del área de trabajo deben ser limpiadas en profundidad y repasadas con aspiradora todos los días...

Page 35: ...o frío 2 Para resultados óptimos durante tiempos prolongados de almacenamiento se recomienda almacenar la unidad de batería completamente cargada en un lugar fresco y seco fuera del cargador NOTA Las unidades de batería no deberían almacenarse completamente descargadas La unidad de batería deberá recargarse antes de ser usada Instrucciones de Limpieza del Batería Para limpiar la suciedad y grasa d...

Page 36: ...gro de incendio No guarde o transporte la batería de forma que los terminarles expuestos de la misma puedan estar en contacto con objetos metálicos Por ejemplo no ponga la batería en delantales bolsillos cajas de herramientas estuches de productos cajones etc junto con clavos tornillos y llaves etc sueltos El transporte de baterías puede causar incendios si sus terminales inadvertidamente entran e...

Page 37: ...nal de Wh de Transporte puede indicar 3 x 40 Wh lo que significa 3 baterías de 40 vatios hora cada una La capacidad nominal de Wh de Uso puede indicar 120 Wh se implica 1 batería Calibre mínimo de conjuntos de cables Voltios Longitud total del cable en pies metros 120V 25 7 6 50 15 2 100 30 5 150 45 7 240V 50 15 2 100 30 5 200 61 0 300 91 4 Amperaje nominal AWG Más de No Más de 0 6 18 16 16 14 6 1...

Page 38: ...tería Una batería fría puede cargar más lentamente que una batería caliente El cargador DCB118 está equipado con un ventilador interno diseñado para enfriar la batería El ventilador se encenderá automáticamente cuando la batería tenga que enfriarse No opere nunca el cargador si el ventilador no funciona adecuadamente o si las ranuras de ventilación están obstruidas No permita que entren objetos ex...

Page 39: ... el cargador firmemente utilizando tornillos para muro seco comprados por separado de un mínimo de 25 4 mm 1 de largo con una cabeza de un diámetro de 7 9 mm 0 28 0 35 atornillados en madera hasta una profundidad óptima dejando el tornillo expuesto aproximadamente 5 5 mm 7 32 Alinee las ranuras en la parte trasera del cargador con los tornillos expuestos e introdúzcalos totalmente en las ranuras M...

Page 40: ...o la llave hexagonal Fig D Instalación Extracción de las Hojas de Lijado Fig D Una platina con forma de diamante utiliza un sistema de adherencia tipo velcro para instalar las hojas de lijado La platina le permite un uso sobre grandes superficies planas y zonas estrechas o esquinas 1 Sujete el accesorio de la placa de lijado como se describe en Instalación Extracción de Accesorios 2 Alinee los bor...

Page 41: ...da 1 Introduzca el brazo de la guía 7 en las ranuras del lado izquierdo y derecho del bloque de la guía 6 2 Ajuste la longitud de la guía sacando o empujando hacia adentro para lograr la longitud deseada 3 Fije la guía en su sitio girando la perilla de ajuste de profundidad corte 19 en sentido horario Para soltar la guía gire la perilla de ajuste de profundidad corte en sentido antihorario NOTA El...

Page 42: ...sto dañará la almohadilla de lijado Siempre mantenga la hoja afilada Gatillo de Velocidad Variable Fig A J ADVERTENCIA Asegúrese de que el interruptor esté totalmente APAGADO antes de instalar la batería 1 Instale la batería 2 Para encender la herramienta sujétela como se muestra en la Figura J y presione el gatillo de velocidad variable 1 NOTA Cuanto más se presione el interruptor de gatillo más ...

Page 43: ...RO QRO Av San Roque 274 Col San Gregorio 442 2 17 63 14 SAN LUIS POTOSI SLP Av Universidad 1525 Col San Luis 444 814 2383 TORREON COAH Blvd Independencia 96 Pte Col Centro 871 716 5265 VERACRUZ VER Prolongación Díaz Mirón 4280 Col Remes 229 921 7016 VILLAHERMOSA TAB Constitución 516 A Col Centro 993 312 5111 PARA OTRAS LOCALIDADES Si se encuentra en México por favor llame al 55 5326 7100 Si se enc...

Page 44: ...ble de ninguna lesión causada por alteraciones y podría iniciar un procedimiento judicial por fraude de garantía hasta el máximo grado permisible por la ley GARANTÍA DE REEMBOLSO DE SU DINERO POR 90 DÍAS Si no está completamente satisfecho con el desempeño de su máquina herramienta o clavadora DeWALT cualquiera sea el motivo podrá devolverlo hasta 90 días de la fecha de compra con su recibo y obte...

Page 45: ...ía no está cargada Ponga la batería en el cargador e instale una batería totalmente cargada en la herramienta La batería o la herramienta eléctrica está sobrecalentadas Deje que la batería y o la herramienta se enfríen después de un uso prolongado o cambie la batería sobrecalentada por una fría El interruptor está dañado Vaya a un centro de servicio autorizado para que cambien el interruptor ...

Page 46: ......

Page 47: ......

Page 48: ...5 30 90 60 50 X 30 X X X 60 X DCB124 12 X 55 55 45 135 90 75 X 45 X X X 90 X DCB127 12 X 35 35 30 90 60 50 X 30 X X X 60 X DCB080 8 60 X X X X X X X X X X X X X BT Bluetooth NOTE The Bluetooth word mark and logos are registered trademarks owned by the Bluetooth SIG Inc and any use of such marks by DeWALT is under license Other trademarks and trade names are those of their respective owners Battery...

Reviews: