background image

English

7

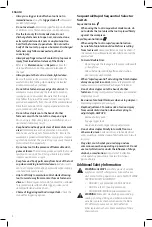
where to drop off the spent battery. RBRC® is a registered 
trademark of Call 2 Recycle, Inc

.

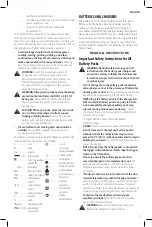
Important Safety Instructions for All 
Battery Chargers


WARNING: Read all safety warnings and all 
instructions for the battery pack, charger and 
power tool. Failure to follow the warnings and 
instructions may result in electric shock, fire and/
or serious injury.

• 

DO NOT attempt to charge the battery pack with 
any chargers other than the ones in this manual.


The charger and battery pack are specifically designed to 
work together.

• 

These chargers are not intended for any uses other 
than charging 

D

e

WALT

 rechargeable batteries. 

Any other uses may result in risk of fire, electric shock 
or electrocution.

• 

Do not expose the charger to rain or snow.

• 

Pull by the plug rather than the cord when 
disconnecting the charger.

 This will reduce the risk of 

damage to the electric plug and cord.

• 

Make sure that the cord is located so that it will not 
be stepped on, tripped over or otherwise subjected 
to damage or stress.

• 

Do not use an extension cord unless it is absolutely 
necessary.

 Use of improper extension cord could result in 

risk of fire, electric shock or electrocution.

• 

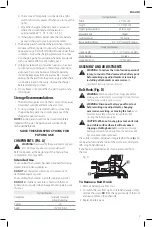
When operating a charger outdoors, always provide 
a dry location and use an extension cord suitable 
for outdoor use. 

Use of a cord suitable for outdoor use 

reduces the risk of electric shock.

• 

An extension cord must have adequate wire size 
(AWG or American Wire Gauge) for safety. 

The smaller 

the gauge number of the wire, the greater the capacity 
of the cable, that is, 16 gauge has more capacity than 18 
gauge. An undersized cord will cause a drop in line voltage 
resulting in loss of power and overheating. When using 
more than one extension to make up the total length, 
be sure each individual extension contains at least the 
minimum wire size. The following table shows the correct 
size to use depending on cord length and nameplate 
ampere rating. If in doubt, use the next heavier gauge. The 
lower the gauge number, the heavier the cord.

Minimum gauge for Cord sets

Volts

Total length of Cord in Feet 

(meters)

120 V

25 (7.6)

50 (15.2) 100 (30.5) 150 (45.7)

240 V

50 (15.2) 100 (30.5) 200 (61.0) 300 (91.4)

Ampere Rating

American Wire gauge

More 

Than

not 

More 

Than

0

6

18

16

16

14

6

10

18

16

14

12

10

12

16

16

14

12

12

16

14

12

Not Recommended

• 

Do not place any object on top of the charger or 
place the charger on a soft surface that might block 
the ventilation slots and result in excessive internal 
heat. 

Place the charger in a position away from any heat 

source. The charger is ventilated through slots in the top 
and the bottom of the housing.

• 

Do not operate the charger with a damaged cord 
or plug.

• 

Do not operate the charger if it has received a sharp 
blow, been dropped or otherwise damaged in any 
way.

 Take it to an authorized service center.

• 

Do not disassemble the charger; take it to an 
authorized service center when service or repair 
is required.

 Incorrect reassembly may result in a risk of 

electric shock, electrocution or fire.

• 

Disconnect the charger from the outlet before 
attempting any cleaning. This will reduce the risk of 
electric shock.

 Removing the battery pack will not reduce 

this risk.

• 

NEVER

 attempt to connect 2 chargers together.

• 

The charger is designed to operate on standard 
120V household electrical power. Do not attempt to 
use it on any other voltage.

 This does not apply to the 

vehicular charger.


WARNING: 

Shock hazard. Do not allow any liquid to 

get inside the charger. Electric shock may result.


WARNING:

 Burn hazard. Do not submerge the 

battery pack in any liquid or allow any liquid to 
enter the battery pack. Never attempt to open the 
battery pack for any reason. If the plastic housing of 
the battery pack breaks or cracks, return to a service 
center for recycling.


CAUTION: 

Burn hazard. To reduce the risk of injury, 

charge only 

D

e

WALT

 rechargeable battery packs. 

Other types of batteries may overheat and burst 
resulting in personal injury and property damage.

NOTICE:

 Under certain conditions, with the charger 

plugged into the power supply, the charger can 
be shorted by foreign material. Foreign materials 
of a conductive nature, such as, but not limited to, 
grinding dust, metal chips, steel wool, aluminum 
foil or any buildup of metallic particles should be 
kept away from the charger cavities. Always unplug 
the charger from the power supply when there is no 
battery pack in the cavity. Unplug the charger before 
attempting to clean.

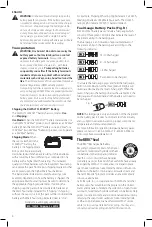
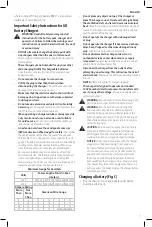
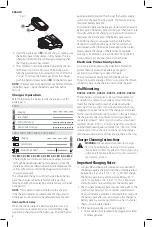
Charging a Battery (Fig. C)

1.  Plug the charger into an appropriate outlet before 

inserting battery pack.

Summary of Contents for DCN682M1

Page 1: ...i tiene dudas o comentarios contáctenos 1 800 4 DeWALT Instruction Manual Guide D utilisation Manual de instrucciones DCN682 20V MAX Cordless 18GA Flooring Stapler Agrafeuse à plancher sans fil calibre 18 20 V MAX Engrapadora inalámbrica para pisos de calibre 18 de 20 V MÁX final page size 8 5 x 5 5 in ...

Page 2: ...English English original instructions 1 Français traduction de la notice d instructions originale 17 Español traducido de las instrucciones originales 34 ...

Page 3: ...to personal injury which if not avoided may result in property damage WARNING Read all safety warnings and all instructions Failure to follow the warnings and instructions may result in electric shock fire and or serious injury WARNING To reduce the risk of injury read the instruction manual If you have any questions or comments about this or any DeWALT tool call us toll free at 1 800 4 DeWALT 1 8...

Page 4: ...t such as dust mask non skid safety shoes hard hat or hearing protection used for appropriate conditions will reduce personal injuries c Prevent unintentional starting Ensure the switch is in the off position before connecting to power source and or battery pack picking up or carrying the tool Carrying power tools with your finger on the switch or energizing power tools that have the switch on inv...

Page 5: ...ce of the tool WARNING if the tool has been dropped or you suspect tool damage perform tool operation check as defined in the mode selection section of the manual If it doesn t perform according to the manual stop using the tool and have it serviced at an authorized dewalt service center Hold tool by insulated gripping surfaces when performing an operation where driven fastners may contact hidden ...

Page 6: ...face as fastener is driven In Rapid sequential mode if contact trip is allowed to recontact work surface before trigger is released an unwanted fastener will be driven Choice of triggering method is important Check the manual for triggering options Sequential Rapid Sequential Selector Switch Sequential Action When using the tool in sequential mode mode do not actuate the tool unless the tool is pl...

Page 7: ... not fully charged out of the carton Before using the battery pack and charger read the safety instructions below and then follow charging procedures outlined When ordering replacement battery packs be sure to include the catalog number and voltage Your tool uses a DeWALT charger Be sure to read all safety instructions before using your charger Consult the chart at the end of this manual for compa...

Page 8: ...ack will be considered 3 batteries at the Watt hour rating indicated for Shipping If shipping without the cap or in a tool the pack will be considered one battery at the Watt hour rating indicated next to Use USE 120 Wh Shipping 3 x 40 Wh Example of Use and Shipping Label Marking For example Shipping Wh rating might indicate 3 x 40 Wh meaning 3 batteries of 40 Watt hours each The Use Wh rating mig...

Page 9: ...pere Rating American Wire Gauge More Than Not More Than 0 6 18 16 16 14 6 10 18 16 14 12 10 12 16 16 14 12 12 16 14 12 Not Recommended Do not place any object on top of the charger or place the charger on a soft surface that might block the ventilation slots and result in excessive internal heat Place the charger in a position away from any heat source The charger is ventilated through slots in th...

Page 10: ...ool the battery pack The fan will turn on automatically when the battery pack needs to be cooled Never operate the charger if the fan does not operate properly or if ventilation slots are blocked Do not permit foreign objects to enter the interior of the charger Electronic Protection System Li Ion tools are designed with an Electronic Protection System that will protect the battery pack against ov...

Page 11: ... wooden workpieces DO NOT use under wet conditions or in presence of flammable liquids or gases Your cordless finish stapler is a professional power tool DO NOT let children come into contact with the tool Supervision is required when inexperienced operators use this tool Tool Specifications Firing Mode Selectable Sequential or Rapid Sequential Voltage 20 Height 12 2 30 9 cm Tool Specifications Wi...

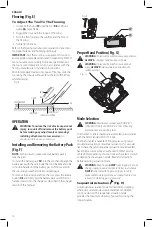
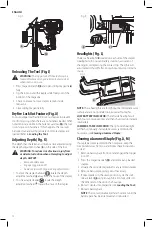
Page 12: ...ted in the tool and ensure that it does not disengage To remove the battery pack from the tool press the release button 13 and firmly pull the battery pack out of the tool handle Insert it into the charger as described in the charger section of this manual Fig F 12 13 Proper Hand Position Fig G WARNING Toreducetheriskofseriouspersonalinjury ALWAYS useproperhandpositionasshown WARNING Toreducetheri...

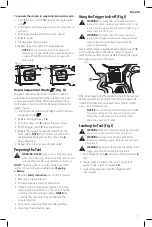
Page 13: ... Check for smooth and proper operation of contact trip and pusher assemblies Do not use tool if either assembly is not functioning properly NEVER use a tool that has the contact trip restrained in the actuated position 5 Keep tool pointed away from yourself and others 6 Insert fully charged battery pack Using the Trigger Lock off Fig I WARNING To reduce the risk of serious personal injury do not k...

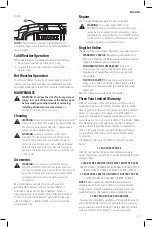
Page 14: ...pth adjustment wheel 3 toward the nose of the stapler Fig K 3 11 Headlights Fig L There is a headlight 4 located on each side of the stapler Headlights turn on upon battery insertion activation of the trigger or depressing the contact trip The lights will automatically shut off after 20 seconds unless tool remains in use Fig L 4 NOTE These headlights are for lighting the immediate work surface and...

Page 15: ...replacement when applicable should be performed by a DeWALT factory service center or a DeWALT authorized service center Always use identical replacement parts Register Online Thank you for your purchase Register your product now for WARRANTY SERVICE Registering your product will help you obtain more efficient warranty service in case there is a problem with your product CONFIRMATION OF OWNERSHIP ...

Page 16: ...ts sold in Latin America see country specific warranty information contained in the packaging call the local company or see website for warranty information FREE WARNING LABEL REPLACEMENT If your warning labels become illegible or are missing call 1 800 4 DeWALT 1 800 433 9258 for a free replacement ...

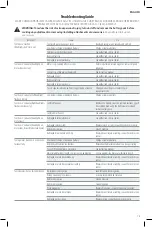
Page 17: ...ate Right headlights flashes continuously Jammed fastener Remove the battery clear the jammed fastener push driver blade back using the stall release lever and reinsert battery pack Jammed mechanism See authorized service center Tool doesn t actuate Headlights on motor runs Damaged internal electronics See authorized service center Tool doesn t actuate Headlights on motor runs driver blade stuck d...

Page 18: ...size or angle fasteners Use only recommended fasteners Damaged or worn driver blade Replace driver return assembly see authorized service center Material and fastener length too rigorous an application Material or fastener length inappropriate Low battery charge or damaged battery Charge or replace battery Debris in nosepiece Clean nosepiece Debris in magazine Clean magazine Worn magazine Replace ...

Page 19: ...pour l éviter pourrait poser des risques de dommages matériels AVERTISSEMENT lire tous les avertissements de sécurité et toutes les directives Le non respect des avertissements et des directives pourrait se solder par un choc électrique un incendie et ou une blessure grave AVERTISSEMENT afin de réduire le risque de blessures lire le mode d emploi de l outil Pour toute question ou remarque au sujet...

Page 20: ...l est impossible d éviter l utilisation d un outil électrique dans un endroit humide brancher l outil dans une prise ou sur un circuit d alimentation dotés d un disjoncteur de fuite à la terre GFCI L utilisation de ce type de disjoncteur réduit les risques de choc électrique 3 Sécurité personnelle a Être vigilant surveiller le travail effectué et faire preuve de jugement lorsqu un outil électrique...

Page 21: ...s médicaux Le liquide qui gicle hors du bloc piles peut provoquer des irritations ou des brûlures 6 Réparation a Faire réparer l outil électrique par un réparateur professionnel en n utilisant que des pièces de rechange identiques Cela permettra de maintenir une utilisation sécuritaire de l outil électrique Consignes de sécurité propres aux agrafes Assumer systématiquement que l outil est chargé L...

Page 22: ... équilibre risque d entraîner une blessure corporelle Utiliser l outil uniquement pour les travaux pour lesquels il a été conçu Ne pas décharger les attaches à l air libre ou dans des matériaux trop durs comme le béton la pierre le bois très dur les nœuds ou toute autre matière trop difficile à pénétrer Ne pas utiliser le corps de l outil ou son couvercle supérieur comme marteau Les attaches éject...

Page 23: ...tion oculaire ANSI Z87 1 CAN CSA Z94 3 Protection auditive ANSI S12 6 S3 19 Protection des voies respiratoires NIOSH OSHA MSHA AVERTISSEMENT les scies meules ponceuses perceuses ou autres outils de construction peuvent produire des poussières contenant des produits chimiques reconnus par l État californien pour causer cancers malformations congénitales ou être nocifs au système reproducteur Parmi ...

Page 24: ...UE ne pas mettre un bloc piles dans un outil dont la gâchette est verrouillée en position de marche Ne jamais bloquer l interrupteur en position de MARCHE Ne pas incinérer le bloc piles même s il est sévèrement endommagé ou complètement usagé car il pourrait exploser et causer un incendie Pendant l incinération des blocs piles au lithium ion des vapeurs et matières toxiques sont dégagées En cas de...

Page 25: ...aintenez appuyé le bouton du témoin de charge Une combinaison des trois voyants Del verts s allumera indiquant le niveau de charge Lorsque le niveau de charge du bloc pile atteint la limite minimale d utilisation le témoin de charge reste éteint et le bloc piles doit être rechargé Fig B REMARQUE le témoin de charge ne fait qu indiquer le niveau de charge du bloc piles Il ne donne aucune indication...

Page 26: ...e molle qui pourrait en bloquer la ventilation et provoquer une surchauffe interne Éloigner le chargeur de toute source de chaleur Le chargeur dispose d orifices d aération sur le dessus et le dessous du boîtier Ne pas le faire fonctionner avec un cordon d alimentation ou une fiche endommagée Ne pas utiliser le chargeur s il a reçu un coup fait une chute ou a été endommagé de quelque façon que ce ...

Page 27: ...male de charge même s il venait à se réchauffer Le chargeur DCB118 est équipé d un ventilateur interne destiné à refroidir le bloc piles Le ventilateur se mettra automatiquement en marche chaque fois que le bloc piles aura besoin de se refroidir N utilisez jamais le chargeur si le ventilateur ne fonctionne pas correctement ou si ses fentes d aération sont bloquées Protégez systématiquement l intér...

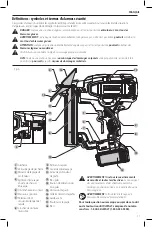
Page 28: ...mais modifier l outil électrique ni aucun de ses composants car il y a risques de dommages corporels ou matériels Reportez vous en Figure A au début de ce manuel pour obtenir la liste complète des composants Usage prévu Votre agrafes de finition sans fil a été conçue pour enfoncer des agrafes dans des pièces en bois NE PAS l utiliser en milieu ambiant humide ou en présence de liquides ou de gaz in...

Page 29: ... retirer le bloc piles avant d effectuer tout réglage et d enlever ou d installer tout accessoire Un démarrage accidentel peut provoquer des blessures Installation et retrait du bloc piles Fig F REMARQUE pour des résultats optimums s assurer que le bloc piles est complètement chargé Pour installer le bloc piles 12 dans la poignée de l outil alignez le bloc piles sur les rails dans la poignée de l ...

Page 30: ... à appuyer sur le déclencheur par contact 5 6 Répétez les étapes 3 à 5 pour tirer l agrafe suivante Préparation de l outil AVERTISSEMENT NE JAMAIS vaporiser ou appliquer de toute autre façon aucun lubrifiant ou solvant de nettoyage dans l outil Cela pourrait affecter sérieusement la durée de vie et les performances de l outil REMARQUE Le bloc pile n est pas complètement chargé au moment de sa livr...

Page 31: ...gasin ne sera pas réapprovisionné en agrafes reportez vous à la section Chargement de l outil Réglage de profondeur Fig K La profondeur à laquelle une attache est enfoncée peut être réglée à l aide de la molette de réglage de profondeur 3 sur le côté de l outil AVERTISSEMENT pour réduire tout risque de dommages corporels graves causés par l activation accidentelle de l outil lors du réglage de pro...

Page 32: ...til dans un liquide Accessoires AVERTISSEMENT puisque les accessoires autres que ceux offerts par DeWALT n ont pas été testés avec ce produit leur utilisation pourrait s avérer dangereuse Pour réduire le risque de blessures utiliser exclusivement les accessoires DeWALT recommandés avec le présent produit Les accessoires recommandés pour cet outil sont vendus séparément au centre de service de votr...

Page 33: ...ponsable de tout dommage corporel causé par l altération du produit et pourra poursuivre toute fraude en matière de garantie dans toute l étendue permise par la loi GARANTIE DE REMBOURSEMENT DE 90 JOURS Si l acheteur n est pas entièrement satisfait pour quelque raison que ce soit du rendement de l outil électrique du laser ou de la agrafes DeWALT celui ci peut le retourner accompagné d un reçu dan...

Page 34: ...appuyer sur le déclencheur par contact en mode séquentiel L outil ne fonctionne pas le voyant gauche clignote 4 fois Charge du bloc piles faible ou bloc piles endommagé Charger ou remplacer le bloc piles L outil ne fonctionne pas le voyant droit clignote en continu Attache coincée Retirer le bloc piles désenrayer le agrafe bloqué repousser la lame de l enfonceur à l aide du levier de désenrayage p...

Page 35: ...andées Débris dans le bec Nettoyer le bec Débris dans le chargeur Nettoyer le chargeur Chargeur usé Remplacer le chargeur consulter un centre de réparation autorisé Embout de la lame d entraînement endommagé ou usé Remplacer l ensemble lame d entraînement mécanisme de rappel consulter un centre de réparation autorisé Ressort du poussoir endommagé Remplacer le ressort consulter un centre de réparat...

Page 36: ...ERTENCIA Indica una situación de peligro potencial que si no se evita podría provocar la muerte o lesiones graves ATENCIÓN Indica una situación de peligro potencial que si no se evita posiblemente provocaría lesiones leves o moderadas Utilizado sin palabras indica un mensaje de seguridad relacionado AVISO Se refiere a una práctica no relacionada a lesiones corporales que de no evitarse puede resul...

Page 37: ...el uso de una herramienta eléctrica en un lugar húmedo es imposible de evitar utilice un suministro protegido con un interruptor de circuito por falla a tierra GFCI El uso de un GFCI reduce el riesgo de descargas eléctricas 3 Seguridad Personal a Permanezca alerta controle lo que está haciendo y utilice el sentido común cuando emplee una herramienta eléctrica No utilice una herramienta eléctrica s...

Page 38: ...s que puedan realizar una conexión desde un terminal al otro Los cortocircuitos en los terminales de la batería pueden provocar quemaduras o incendio d En condiciones abusivas el líquido puede ser expulsado de la batería Evite su contacto Si entra en contacto accidentalmente enjuague con agua Si el líquido entra en contacto con los ojos busque atención médica El líquido expulsado de la batería pue...

Page 39: ...istracciones pueden provocar la pérdida de control Cuando la herramienta no esté en uso se debe guardar en un lugar seguro fuera del alcance de los niños No transporte la herramienta sujetándola por el gatillo Se puede producir una descarga accidental Siempre use el bloqueo del gatillo si no utilizará la herramienta inmediatamente El uso del bloqueo del gatillo evitará la descarga accidental No se...

Page 40: ...tos Un momento de descuido mientras se opera una herramienta eléctrica puede provocar daños personales graves Instrucción Adicional de Seguridad ADVERTENCIA Use SIEMPRE lentes de seguridad Los anteojos de diario NO SON lentes de seguridad Utilice además una cubrebocas o mascarilla antipolvo si la operación de corte genera demasiado polvo SIEMPRE LLEVE EQUIPO DE SEGURIDAD CERTIFICADO protección ocu...

Page 41: ...patible pues puede producir una ruptura en la unidad de batería y causar lesiones corporales graves Consulte la tabla al final de este manual para ver la compatibilidad entre baterías y cargadores Cargue las unidades de batería sólo en los cargadores designados por DeWALT NO salpique con ni sumerja en agua u otros líquidos No guarde ni use la herramienta y unidad de batería en lugares donde la tem...

Page 42: ...al de vatios hora indicada al lado de Uso USE 120 Wh Shipping 3 x 40 Wh Ejemplo de Marcado en Etiqueta de Uso y Transporte Por ejemplo la capacidad nominal de Wh de Transporte puede indicar 3 x 40 Wh lo que significa 3 baterías de 40 vatios hora cada una La capacidad nominal de Wh de Uso puede indicar 120 Wh se implica 1 batería Unidades de Batería con Indicador de Carga Fig B Algunas unidades de ...

Page 43: ...udas sobre cuál calibre usar use un calibre mayor Cuanto menor sea el número del calibre más resistente será el cable Calibre mínimo de conjuntos de cables Voltios Longitud total del cable en pies metros 120 V 25 7 6 50 15 2 100 30 5 150 45 7 240 V 50 15 2 100 30 5 200 61 0 300 91 4 Amperaje nominal AWG Más de Más de 0 6 18 16 16 14 6 10 18 16 14 12 10 12 16 16 14 12 12 16 14 12 Not Recommended No...

Page 44: ...a caliente fría Cuando el cargador detecta que una batería está demasiado caliente o demasiado fría inicia automáticamente un Retraso por batería caliente fría y suspende la carga hasta que la batería alcanza una temperatura adecuada En ese momento el cargador inicia automáticamente el modo de carga de la batería Esta función garantiza la máxima duración de la batería Una batería fría se carga más...

Page 45: ... metálicas deberían mantenerse alejados de las cavidades del cargador Desenchufe siempre el cargador de la toma de corriente cuando no haya una unidad de batería en su cavidad Desenchufe el cargador antes de intentar limpiarlo 6 No congele ni sumerja el cargador en agua o cualquier otro líquido Recomendaciones de almacenamiento 1 El mejor lugar de almacenamiento es uno que sea fresco y seco lejos ...

Page 46: ... IMPORTANTE Compruebe la herramienta en un trozo de piso de desecho para garantizar la colocación adecuada de las grapas y la compatibilidad DeWALT no puede asumir la responsabilidad del rendimiento del producto si la herramienta se utiliza incorrectamente o no conforme a las instrucciones de instalación del fabricante del piso Con la herramienta ubicada adecuadamente en la lengüeta del piso desli...

Page 47: ...o se debe soltar tanto el activador por contacto como el gatillo después de cada grapa Fig H 7 Modo secuencial rápido Fig A H En el modo secuencial rápido la velocidad de rotación del motor se restablece automáticamente después de disparar una grapa para permitir un engrapado rápido consecutivo Aunque ofrece la capacidad de disparar más grapas en menos tiempo este modo agota rápidamente la carga d...

Page 48: ...ra la superficie interna del depósito 6 3 Cierre el depósito deslizante hasta que el seguro del depósito se enganche firmemente Fig J 6 14 Descarga de la herramienta Fig J ADVERTENCIA El botón de bloqueo del gatillo debe siempre estar bloqueado cuando se realicen ajustes o cuando la herramienta no esté utilizándose 1 Presione el seguro del depósito 14 y abra totalmente el depósito deslizante 6 2 I...

Page 49: ...dose frecuentemente en la tobera lleve la herramienta a un centro de servicio autorizado de DeWALT Funcionamiento en clima frío Cuando las herramientas se usan a temperaturas bajo cero 1 Mantenga la herramienta tan caliente como pueda antes de usarla 2 Accione la herramienta 5 o 6 veces en madera de deshecho antes de usar Funcionamiento en clima cálido La herramienta debe funcionar con normalidad ...

Page 50: ...serie Datos para ser llenados por el distribuidor Fecha de compra y o entrega del producto Nombre y domicilio del distribuidor donde se adquirió el producto Este producto está garantizado por un año a partir de la fecha de entrega contra cualquier defecto en su funcionamiento así como en materiales y mano de obra empleados para su fabricación Nuestra garantía incluye la reparación o reposición del...

Page 51: ...7 DCB361 3 AÑOS DE SERVICIO GRATUITO PARA UNIDADES DE ALIMENTACIÓN DEWALT DCB200 DCB204 DCB204BT DCB205 DCB606 NOTA La garantía del producto quedará nula si la unidad de batería ha sido alterada de cualquier manera DeWALT no es responsable de ninguna lesión causada por alteraciones y podría iniciar un procedimiento judicial por fraude de garantía hasta el máximo grado permisible por la ley GARANTÍ...

Page 52: ...Cambie el modo o presione el activador por contacto en el modo secuencial La herramienta no se acciona el faro izquierdo parpadea 4 veces Carga de batería baja o batería dañada Cambie o reemplace la batería La herramienta no se acciona el faro derecho parpadea continuamente Elemento de fijación atascado Saque la batería extraiga el clavo atascado empuje hacia atrás la hoja de guía utilizando la pa...

Page 53: ...os Use sólo elementos de fijación recomendados Residuos en la boquilla Limpie la boquilla Residuos en el depósito Limpie el depósito Depósito desgastado Reemplace el depósito consulte al centro de mantenimiento autorizado Hoja del impulsor dañada o desgastada Reemplace el conjunto de retorno impulsor consulte al centro de mantenimiento autorizado Resorte del impulsor dañado Reemplace el resorte co...

Page 54: ...Español 52 ...

Page 55: ...Español 53 ...

Page 56: ... 40 40 X X X 40 X X X X X X X X X 40 DCB120 12 X X X X 30 30 30 60 45 35 X 20 X X X 45 X DCB127 12 X X X X 35 35 35 90 60 50 X 30 X X X 60 X DCB080 8 X X X 60 X X X X X X X X X X X X X BT Bluetooth NOTE The Bluetooth word mark and logos are registered trademarks owned by the Bluetooth SIG Inc and any use of such marks by DeWALT is under license Other trademarks and trade names are those of their r...
Reviews: