


35
EnGLIsh
Store the no-mark tip at the holder
12
whenever it is not to
be used.
WARNING:
Make sure the trigger lock-off
2
is engaged
and the battery pack is removed before installing or
removing the no-mark tip.
OPERATION
Instructions for Use
WARNING:
Always observe the safety instructions and
applicable regulations.
WARNING:
if the tool has been dropped or you suspect
tool damage perform tool operation check as defined
in the mode selection section of the manual. If it doesn’t
perform according to the manual, stop using the tool and
have it serviced at an authorised
D
e
WALT
service centre.
WARNING: To reduce the risk of serious personal
injury, turn tool off and disconnect battery pack
before making any adjustments or removing/
installing attachments or accessories.
An accidental
start-up can cause injury.
Proper Hand Position (Fig. I)
WARNING:
To reduce the risk of serious personal injury,
ALWAYS
use proper hand position as shown.
WARNING:
To reduce the risk of serious personal
injury,
ALWAYS
hold securely in anticipation of a
sudden reaction.
Proper hand position requires one hand the main handle.
Actuating the Tool (Fig. A)
The DCN650 can be operated using one of two modes:
sequential action mode or bump action mode.
Sequential Action Mode ( )
The sequential action mode is used for intermittent nailing
when very careful and accurate placement is desired.
1. Use the mode selector switch
9
, select the sequential
action mode.
2. Release the trigger lock-off
2
.
3. Push the contact trip
11
against the work surface.
4. Pull the trigger switch
1
to actuate the tool.
5. Release trigger and remove contact trip from work piece.
6. Repeat steps 3 - 5 to fire subsequent nails.
Bump Action (
)
The bump action mode is used for rapid nailing on flat,
stationary surfaces.
1. Use the mode selector switch
9
to select the bump
action mode.
2. Release the trigger lock-off
2
.
a. To drive a single nail, operate the tool as described for
sequential action:
Push the contact trip
6
against the work surface.
b. Pull the trigger switch
1
to actuate the tool.
3. To drive several nails, depress and hold the trigger switch
1
,
and then push the contact trip
6
repeatedly against the
work surface. Each time the contact trip
2
is depressed
whilst the trigger
1
is held, a nail will fire.
WARNING:
Do not keep the trigger depressed when the
tool is not in use. Keep the trigger lock-off
2
in the locked
position to prevent accidental actuation when the tool is
not in use.
Preparing the Tool (Fig. A)
1. Remove battery pack and all nails from the magazine.
2. Check if the contact trip and nail pusher can move freely.
3. Reload the nails to the magazine.
WARNING:
Do not use the tool if the contact trip or nail
pusher cannot move freely.
CAUTION: NEVER
spray or in any other way apply
lubricants or cleaning solvents inside the tool. This can
seriously affect the life and performance of the tool.
Trigger Lock-off (Fig. F)
This tool is equipped with a trigger lock-off
2
which prevents
the tool from firing a nail.
To engage the trigger lock-off, push the switch downward.
To release the trigger lock-off
2
, pull the switch upward.
WARNING:
Make sure the trigger lock-off
2
is engaged
and the battery pack is removed before making any
adjustments or when tool is not in immediate use.
Loading the Tool (Fig. A, D)
1. Insert fasteners into the rear of the magazine
7
.
2. Pull pusher
8
back until the nail follower falls behind
the nails.
3. Release the pusher.
Unloading the Tool
1. Pull and hold the pusher to the bottom of the magazine.
2. Tip the tool up until the nails slide freely out the back of the
magazine. Release the pusher.
3. Open the jam clear door on the nosepiece to verify there are
no nails remaining.
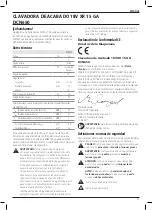
Adjusting the Driving Depth (Fig. A)
Using the depth adjustment wheel, the nail driving depth can
be adjusted to the type of fastener used.
1. To drive the nail shallower, rotate the depth adjustment
wheel
3
towards the rear of the tool. Refer to gauge
15
to
understand where the tool is set within the available range.
2. To sink a nail deeper, rotate the depth adjustment wheel
3
towards the front of the tool.
Worklights (Fig. H)
This tool has worklights
4
located on each side. The worklights
will light upon activating the trigger or releasing the contact
trip. The lights will automatically go off after 10 seconds of
non-operation. The worklights also function as a low battery
Summary of Contents for DCN650
Page 1: ...DCN650 Final page size A5 148mm x 210mm ...
Page 3: ...1 Fig A Fig B 14 16 14 16 18 15 3 12 4 7 14 10 13 5 8 6 11 1 2 16 9 ...
Page 4: ...2 Fig E Fig F Fig G Fig C Fig D 8 10 19 9 2 5 17 ...
Page 5: ...3 Fig I Fig H 4 ...
Page 153: ......
Page 154: ......
Page 155: ......


