English
8
6. Do not freeze or immerse the charger in water or any
other liquid.
Storage Recommendations
1. The best storage place is one that is cool and dry, away
from direct sunlight and excess heat or cold.
2. For long storage, it is recommended to store a fully
charged battery pack in a cool dry place out of the
charger for optimal results.
nOTE:
Battery packs should not be stored completely
depleted of charge. The battery pack will need to be
recharged before use.
SAVE THESE INSTRUCTIONS FOR
FUTURE USE
COMPONENTS (FIG. A)
WARNING:
Never modify the power tool or any part
of it. Damage or personal injury could result.
Refer to Figure A at the beginning of this manual for a
complete list of components.
INTENDED USE
Your heavy-duty cordless rotary hammers are designed for
professional concrete drilling and chiseling applications.
DO nOT
use under wet conditions or in presence of
flammable liquids or gases.
Your heavy-duty cordless rotary hammers are professional
power tools.
DO nOT
let children come into contact with the tool.
Supervision is required when inexperienced operators use
this tool.
ASSEMBLY AND ADJUSTMENTS
WARNING: To reduce the risk of serious personal
injury, turn unit off and remove the battery pack
before making any adjustments or removing/
installing attachments or accessories.
An
accidental start-up can cause injury.
Side Handle and Depth Rod (Fig. A, D)
WARNING:
To reduce the risk of personal injury,
ALWAYS
operate the tool with the side handle
properly installed. Failure to do so may result in
the side handle slipping during tool operation and
subsequent loss of control. Hold tool with both hands
to maximize control.
The side handle
3
clamps to the front of the gear case
and may be rotated 360˚ to permit right- or left-hand use.
The side handle must be tightened sufficiently to resist the
twisting action of the tool if the accessory binds or stalls. Be
sure to grip the side handle at the far end to control the tool
during a stall.
To loosen side handle, rotate counterclockwise.
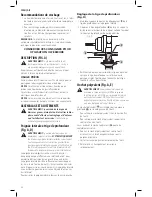
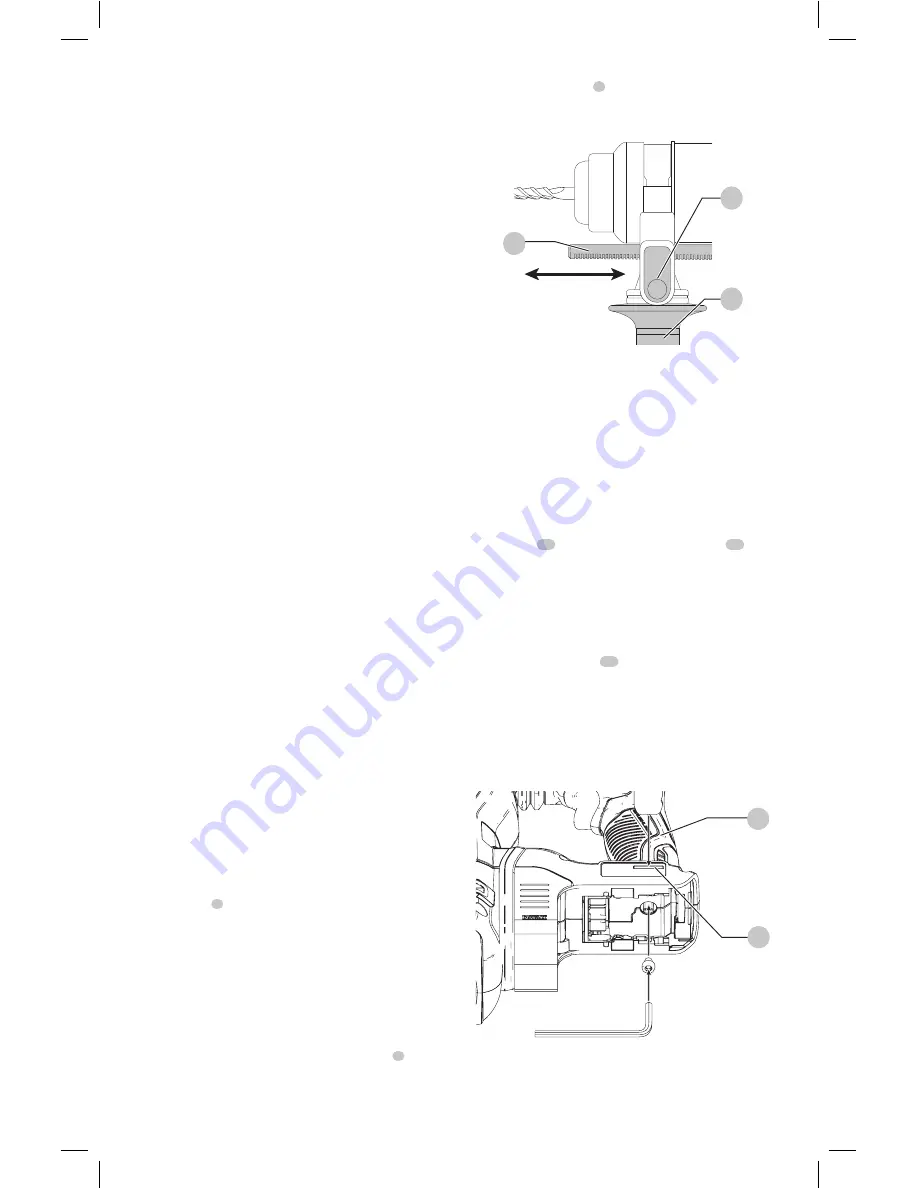
To Adjust the Depth Rod (Fig. D)
1. Push in and hold the depth rod release button
9
on the
side handle.
2. Move the depth rod
8
so the distance between the
end of the rod and the end of the bit equals the desired
drilling depth.
Fig. D
3
8
9
3. Release the button to lock rod into position. When
drilling with the depth rod, stop when end of rod
reaches surface of material.
Utility Hook (Fig. A, E)
WARNING:
To reduce the risk of serious personal
injury, DO NOT suspend tool overhead or suspend
objects from the utility hook. DO NOT use the utility
hook for tethering or securing the tool to a person or
object during use.
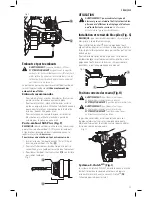
A utility hook
13
is fitted below the main handle
10
on the
left side of the tool.
• To extend the utility hook pull it out from the side of
the tool.
• To store the utility hook push it back flush with the side
of the tool.
If desired, the utility hook
13
can be removed completely.
1. Push the utility hook into the flush position and remove
the hex head screw located on the underside of the
main handle.
2. Pull out the utility hook until it is free from the unit.
3. Re-insert the hex screw and tighten securely.
Fig. E
13
10


