background image

6

 • 

Pull by the plug rather than the cord when disconnecting the charger.

 This will 

reduce the risk of damage to the electric plug and cord.

 • 

Make sure that the cord is located so that it will not be stepped on, tripped 

over or otherwise subjected to damage or stress.

 • 

Do not use an extension cord unless it is absolutely necessary.

 Use 

of improper extension cord could result in risk of fire, electric shock or 

electrocution.

 • 

When operating a charger outdoors, always provide a dry location and use an 

extension cord suitable for outdoor use. 

Use of a cord suitable for outdoor use 

reduces the risk of electric shock. 

 • 

Do not place any object on top of the charger or place the charger on a soft 

surface that might block the ventilation slots and result in excessive internal 

heat. 

Place the charger in a position away from any heat source. The charger is 

ventilated through slots in the top and the bottom of the housing.

 • 

Do not operate the charger with a damaged cord or plug.

 • 

Do not operate the charger if it has received a sharp blow, been dropped or 

otherwise damaged in any way.

 Take it to an authorized service center.

 • 

Do not disassemble the charger; take it to an authorized service center when 

service or repair is required.

 Incorrect reassembly may result in a risk of electric 

shock, electrocution or fire.

 • 

Disconnect the charger from the outlet before attempting any cleaning. This 

will reduce the risk of electric shock.

 Removing the battery pack will not reduce 

this risk.

 • 

NEVER

 attempt to connect 2 chargers together.

 • 

The charger is designed to operate on standard 230 V household electrical 

power. Do not attempt to use it on any other voltage.

 This does not apply to the 

vehicular charger.

Chargers 

Your tool uses a D

E

WALT charger. Be sure to read all safety instructions before using 

your charger. Consult the chart at the end of this manual for compatibility of chargers 

and battery packs.

Charging Procedure (Fig. 1) 

FIG. 1

F

  1. Plug the charger into an appropriate outlet before 

inserting the battery pack. 

  2. Insert the battery pack (F) into the charger, as 

shown in Figure 1, making sure the pack is fully 

seated in charger. The red (charging) light will 

blink continuously, indicating that the charging 

process has started. 

  3. The completion of charge will be indicated by the 

red light remaining ON continuously. The pack is 

fully charged and may be used at this time or left 

in the charger.

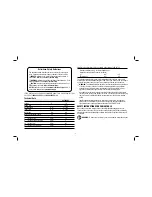
Indicator Light Operation

PACK CHARGING

PACK CHARGED

x

HOT/COLD DELAY

PROBLEM PACK OR CHARGER

PROBLEM POWERLINE

Charge Indicators 

This charger is designed to detect certain problems that can arise. Problems are indicated 

by the red light flashing at a fast rate. If this occurs, re-insert the battery pack into the 

charger. If the problem persists, try a different battery pack to determine if the charger 

is working properly. If the new pack charges correctly, then the original pack is defective 

and should be returned to a service center or other collection site for recycling. If the new 

battery pack elicits the same trouble indication as the original, have the charger and the 

battery pack tested at an authorized service center. 

Summary of Contents for DCF889-XE

Page 1: ...DCF889 XE 18 V CORDLESS 13 mm 1 2 CORDLESS IMPACT WRENCH INSTRUCTION MANUAL ...

Page 2: ......

Page 3: ... s 3 6 The vibration emission level given in this information sheet has been measured in accordance with a standardised test given in EN 60745 and may be used to compare one tool with another It may be used for a preliminary assessment of exposure WARNING The declared vibration emission level represents the main applications of the tool However if the tool is used for different applications with d...

Page 4: ...e use a residual current device RCD protected supply Use of an RCD reduces the risk of electric shock 3 PERSONAL SAFETY a Stay alert watch what you are doing and use common sense when operating a power tool Do not use a power tool while you are tired or under the influence of drugs alcohol or medication A moment of inattention while operating power tools may result in serious personal injury b Use...

Page 5: ...ation or burns 6 SERVICE a Have your power tool serviced by a qualified repair person using only identical replacement parts This will ensure that the safety of the power tool is maintained Electrical Safety The electric motor has been designed for one voltage range only Always check that the power supply corresponds to the voltage on the rating plate 220 240 V AC means your tool will operate on a...

Page 6: ...gloves to provide extra cushion and limit exposure by taking frequent rest periods WARNING We recommend the use of a residual current device with a residual current rating of 30mA or less WARNING ALWAYS wear approved protective safety equipment complying with the following standards Eye protection AS NZS1337 Eye Protectors for Industrial Applications Hearing protection AS NZS1270 Acoustics Hearing...

Page 7: ...C SAFETY INSTRUCTIONS FOR LITHIUM ION Li Ion Do not incinerate the battery pack even if it is severely damaged or is completely worn out The battery pack can explode in a fire Toxic fumes and materials are created when lithium ion battery packs are burned If battery contents come into contact with the skin immediately wash area with mild soap and water If battery liquid gets into the eye rinse wat...

Page 8: ...educe this risk NEVER attempt to connect 2 chargers together The charger is designed to operate on standard 230 V household electrical power Do not attempt to use it on any other voltage This does not apply to the vehicular charger Chargers Your tool uses a DEWALT charger Be sure to read all safety instructions before using your charger Consult the chart at the end of this manual for compatibility...

Page 9: ...a warm battery pack The battery pack will charge at that slower rate throughout the entire charging cycle and will not return to maximum charge rate even if the battery pack warms 4 If the battery pack does not charge properly a Check operation of receptacle by plugging in a lamp or other appliance b Check to see if receptacle is connected to a light switch which turns power off when you turn out ...

Page 10: ...accessories Installing and Removing the Battery Pack Fig 3 NOTE For best results make sure your battery pack is fully charged To install the battery pack F into the tool handle align the battery pack with the rails inside the tool s handle and slide it into the handle until the battery pack is firmly seated in the tool and ensure that it does not disengage To remove the battery pack from the tool ...

Page 11: ...l button on the right side of the tool To select reverse release the trigger switch and depress the forward reverse control button on the left side of the tool The center position of the control button locks the tool in the OFF position When changing the position of the control button be sure the trigger is released NOTE The first time the tool is run after changing the direction of rotation you m...

Page 12: ...olvents or other harsh chemicals for cleaning the non metallic parts of the tool These chemicals may weaken the plastic materials used in these parts Use a cloth dampened only with water and mild soap Never let any liquid get inside the tool never immerse any part of the tool into a liquid CHARGER CLEANING INSTRUCTIONS WARNING Shock hazard Disconnect the charger from the AC outlet before cleaning ...

Page 13: ......

Page 14: ......

Page 15: ......

Page 16: ...X X 90 90 117 X X DW9096 18 2 4 X X X X 60 X 60 20 X 60 X 60 60 X X X 60 X 60 X X 60 60 DE9095 XJ 18 2 0 X X X X 60 X 60 20 X 60 X 60 60 X X X 60 X 60 X X 60 60 DC9091 14 4 2 4 60 60 60 60 60 15 60 15 60 60 60 60 60 X X X 60 X 60 X X 60 60 DC9144 14 4 2 0 X X X X X X X X X X X X X X X X 60 X 60 X X X 60 DCB141 14 4 1 5 X X X X X X X X X X X X X X X X X X 30 30 40 X X DCB142 14 4 4 0 X X X X X X X ...

Reviews: