background image

English

8

aluminum foil or any buildup of metallic particles 
should be kept away from the charger cavities and 
ventilation slots.


• 

Always unplug the charger from the power supply 
when there is no battery pack in the cavity.

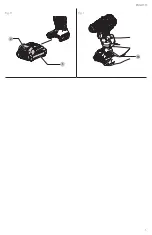
Charging a Battery (Fig. C)

1.  Plug the charger into an appropriate outlet. 
2.  Insert and fully seat battery pack.  The red charging 

light(s) will continuously blink while charging.

3.  Charging is complete when the red  charging light(s) 

remain(s) continuously ON. Battery pack can be left in 
charger or removed. 


WARNING:

 Only charge batteries in air temperature 

over 40 ° F (4.5 ° C)  and below 104 ° F (+40 ° C).

4.  Charger will not charge a faulty battery pack, which may 

be indicated by the charging light(s) staying OFF. Take 
charger and battery pack to an authorized service center 
if light(s) stay(s) OFF. 

nOTE: 

Refer to label near charging light(s) on charger 

for blink patterns. Older chargers may have additional 
information and/or may not have a yellow indicator light. 

nOTE: 

To remove the battery pack, some chargers 

require the battery pack release button to be pressed.

hot/Cold Pack Delay

When the charger detects a battery pack that is too hot 
or too cold, it automatically starts a Hot/Cold Pack Delay, 
suspending charging until the battery pack has reached an 
appropriate temperature. The charger then automatically 
switches to the pack charging mode. This feature ensures 
maximum battery pack life.
A cold battery pack may charge at a slower rate than a warm 
battery pack.
The hot/cold pack delay will be indicated by the red  light(s) 
continuing to blink but with the yellow  light continuously 
ON. Once the battery pack has reached an appropriate 
temperature, the yellow  light will turn OFF and the charger 
will resume the charging procedure.

Electronic Protection System

Li‑Ion tools are designed with an Electronic Protection 
System that will protect the battery pack against overloading, 
overheating or deep discharge. The tool will automatically 
turn off and the battery pack will need to be recharged.

Important Charging Notes

1.  The charger and battery pack may become warm to the 

touch while charging. This is a normal condition, and 
does not indicate a problem. To facilitate the cooling of 
the battery pack after use, avoid placing the charger or 
battery pack in a warm environment such as in a metal 
shed or an uninsulated trailer.

2.  If the battery pack does not charge properly:

a.  Check operation of receptacle by plugging in a lamp 

or other appliance;

b.  Check to see if receptacle is connected to a light 

switch which turns power off when you turn out  
the lights;

overheat and burst, resulting in personal injury, property 
damage, fire, electric shock or electrocution.

• 

Do not expose the charger to rain or snow.

• 

Do not allow water or any liquid to enter charger.

• 

Pull by the plug rather than the cord when 
disconnecting the charger.

 This will reduce the risk of 

damage to the electric plug and cord.

• 

Make sure that the cord is located so that it will not 
be stepped on, tripped over or otherwise subjected to 
damage or stress.

• 

Do not use an extension cord unless it is absolutely 
necessary.

 Use of improper extension cord could result in 

risk of fire, electric shock or electrocution.

• 

When operating a charger outdoors, always provide 
a dry location and use an extension cord suitable 
for outdoor use. 

Use of a cord suitable for outdoor use 

reduces the risk of electric shock.

• 

An extension cord must have adequate wire size 
(AWG or American Wire Gauge) for safety. 

The smaller 

the gauge number of the wire, the heavier the cord and 
thus the greater its capacity.  An undersized cord will 
cause a drop in line voltage resulting in loss of power and 
overheating.  The following table shows the correct size 
to use depending on total length of all extension cords 
plugged together, and nameplate ampere rating. If in 
doubt, use the next heavier gauge.

Minimum gauge for Cord sets

Volts

Total length of Cord in Feet 

(meters)

120V

25 (7.6)

50 (15.2) 100 (30.5) 150 (45.7)

Ampere Rating

American Wire gauge

More Than Not More 

Than

0

6

18

16

16

14

6

10

18

16

14

12

10

12

16

16

14

12

12

16

14

12

Not Recommended

• 

Do not place any object on top of the charger or place 
the charger on a soft surface that might block the 
ventilation slots and result in excessive internal heat. 

Place the charger in a position away from any heat source. 
The charger is ventilated through slots in the top and the 
bottom of the housing.

• 

Do not operate the charger with a damaged cord 
or plug. 

Have them replaced immediately.

• 

Do not operate the charger if it has received a sharp 
blow, been dropped or otherwise damaged in any 
way.

 Take it to an authorized service center.

• 

Do not disassemble the charger; take it to an 
authorized service center when service or repair 
is required.

 Incorrect reassembly may result in a risk of 

electric shock, electrocution or fire.

• 

The charger is designed to operate on standard 
120V household electrical power. Do not attempt to 
use it on any other voltage.

 This does not apply to the 

vehicular charger.

• 

Foreign materials of a conductive nature, such as, but 
not limited to, grinding dust, metal chips, steel wool, 

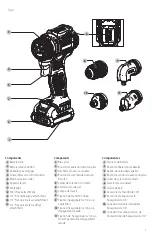
Summary of Contents for DCD703

Page 1: ...t commentaire nous contacter Si tiene dudas o comentarios contáctenos 1 800 4 DeWALT DCD703 12V Max 5 in 1 Drill Driver Kit Kit perceuse visseuse 5 en 1 12 V max Juego de Taladro destornillador 5 en 1 12 V Máx Instruction Manual Guide D utilisation Manual de instrucciones ...

Page 2: ...English original instructions 4 Français traduction de la notice d instructions originale 13 Español traducido de las instrucciones originales 23 ...

Page 3: ...e 6 Sélecteur de vitesses 7 Lampe de travail 8 Fixation de mandrin 3 8 po 9 Fixation hexagonale de 1 4 po à angle droit 10 Fixation hexagonale de 1 4 po à dégagement rapide 11 Fixation de hexagonale de 1 4 po de compensation à dégagement rapide Componentes 1 Paquete de batería 2 Botón de liberación de batería 3 Gatillo de velocidad variable 4 Botón de control de avance reversa 5 Collar de selecció...

Page 4: ...a 50 charged Chargé de 50 50 cargada Pack needs to be charged Le bloc piles doit être rechargé La batería tiene que cargarse Indicators Témoin Indicador Charging Bloc piles en Cours de Chargement Unidad en Proceso de Carga Fully Charged Bloc piles Chargé Unidad Cargada Hot Cold Pack Delay Suspension de Charge Contre le Chaud Froid Restraso por Unidad Caliente Fría ...

Page 5: ...English 3 Fig H Fig I 1 2 15 ...

Page 6: ...se clothing or jewelry Keep your hair clothing and gloves away from moving parts Loose clothes jewelry or long hair can be caught in moving parts g If devices are provided for the connection of dust extraction and collection facilities ensure these are connected and properly used Use of dust collection can reduce dust related hazards GENERAL POWER TOOL SAFETY WARNINGS WARNING Read all safety warni...

Page 7: ...rmed by the manufacturer or authorized service providers h Do not let familiarity gained from frequent use of tools allow you to become complacent and ignore tool safety principles A careless action can cause severe injury within a fraction of a second 4 Power Tool Use and Care a Do not force the power tool Use the correct power tool for your application The correct power tool will do the job bett...

Page 8: ... of it Damage or personal injury could result WARNING ALWAYS use safety glasses Everyday eyeglasses are NOT safety glasses Also use face or dust mask if cutting operation is dusty ALWAYS WEAR CERTIFIED SAFETY EQUIPMENT ANSI Z87 1 eye protection CAN CSA Z94 3 ANSI S12 6 S3 19 hearing protection NIOSH OSHA MSHA respiratory protection WARNING Some dust created by power sanding sawing grinding drillin...

Page 9: ...nings and instructions may result in electric shock fire and or serious injury Do not charge or use the battery pack in explosive atmospheres such as in the presence of flammable liquids gases or dust Inserting or removing the battery pack from the charger may ignite the dust or fumes NEVER force the battery pack into the charger DO NOT modify the battery pack in any way to fit into a non compatib...

Page 10: ...other appliance b Check to see if receptacle is connected to a light switch which turns power off when you turn out the lights overheat and burst resulting in personal injury property damage fire electric shock or electrocution Do not expose the charger to rain or snow Do not allow water or any liquid to enter charger Pull by the plug rather than the cord when disconnecting the charger This will r...

Page 11: ...to install additional attachments NOTE The locking sleeve 16 of the 3 8 chuck attachment will rotate along with the chuck while the tool is operating while the sleeves of the other attachments do not Installing and Removing Attachments Fig A E WARNING Burn hazard Moving parts within the power unit become hot during use Avoid contact with Belt Hook Fig D Optional Accessory WARNING To reduce the ris...

Page 12: ...ous personal injury turn unit off and remove the battery pack before making any adjustments or removing installing attachments or accessories An accidental start up can cause injury Mode Selection Fig A The mode selection collar 5 can be used to select the correct operating mode depending upon the planned application To select rotate the collar until the desired symbol aligns with the arrow WARNIN...

Page 13: ...ed first If drilling thin material or material that is prone to splinter use a wood back up block to prevent damage to the workpiece Performing an Application Fig A WARNING To reduce the risk of personal injury ALWAYS ensure workpiece is anchored or clamped firmly WARNING Always wait until the motor has come to a complete standstill before changing the direction of rotation Prior to Performing Wor...

Page 14: ...ll help you obtain more efficient warranty service in case there is a problem with your product CONFIRMATION OF OWNERSHIP In case of an insurance loss such as fire flood or theft your registration of ownership will serve as your proof of purchase FOR YOUR SAFETY Registering your product will allow us to contact you in the unlikely event a safety notification is required under the Federal Consumer ...

Page 15: ...s d alcool ou de médicaments Un simple moment d inattention en utilisant un outil électrique peut entraîner des blessures corporelles graves b Utiliser des équipements de protection individuelle Toujours porter une protection oculaire L utilisation d équipements de protection comme un masque antipoussière des chaussures AVERTISSEMENTS GÉNÉRAUX SUR LA SÉCURITÉ DES OUTILS AVERTISSEMENT lisez tous le...

Page 16: ...pératures excessives L exposition aux flammes ou à une température au dessus de 130 C 265 F pourrait causer une explosion antidérapantes un casque de sécurité ou des protecteurs auditifs lorsque la situation le requiert réduira les risques de blessures corporelles c Empêcher les démarrages intempestifs S assurer que l interrupteur se trouve à la position d arrêt avant de relier l outil à une sourc...

Page 17: ...cessoires Lorsque vous fixez des accessoires dans le mandrin du marteau il est important de bien serrer le mandrin en utilisant les trois trous afin de prévenir le glissement Lorsque vous utilisez un mandrin sans clé serrez solidement à la main Consignes de sécurité pour toutes les utilisations Tenez l outil électrique par les surfaces de prise isolées lorsque vous effectuez une tâche où l accesso...

Page 18: ...ent assurez vous d inclure le numéro du catalogue et la tension protection auditive lire toute la documentation L étiquette apposée sur votre outil peut inclure les symboles suivants Les symboles et leur définition sont indiqués ci après V volts Hz hertz min minutes or DC courant continu fabrication classe I mis à la terre min par minute BPM battements par minute IPM impacts par minute RPM révolut...

Page 19: ...ro sans frais dans le sceau SRPRCMD SRPRCMD est une marque de commerce déposée de Call 2 Recycle Inc courante durant 15 minutes ou jusqu à ce que l irritation cesse en gardant les yeux ouverts Pour information de consultation médicale l électrolyte des piles est composé d un mélange organique liquide et de sels de lithium Le contenu des piles peut causer une irritation respiratoire Faites circuler...

Page 20: ...vant de nettoyer La saleté et la graisse peuvent être retirées des surfaces extérieures du chargeur à l aide d un linge ou d une brosse souple non métallique Ne pas utiliser d eau ou de solution nettoyante bonne taille à utiliser selon longueur totale des de toutes les rallonges branchées ensemble et l intensité nominale de la plaque signalétique En cas de doute utilisez le calibre le plus lourd s...

Page 21: ... fixation du mandrin de 3 8 po tourne avec le mandrin pendant le fonctionnement de l outil alors que ce n est pas le cas de celle des autres fixations Installer et retirer les fixations Fig A E AVERTISSEMENT Danger de brûlure Les pièces en mouvement à l intérieur du groupe moteur deviennent chaudes durant l utilisation Évitez le contact avec les pièces en mouvement du groupe moteur lorsque vous re...

Page 22: ...si elle est surchargée causant une torsion soudaine Symbole Mode Perçage 1 15 Vissage numéro élevé couple plus grand Sélection de la vitesse Fig A L outil a deux réglages de vitesses pour une plus grande polyvalence REMARQUE ne pas changer de vitesse alors que l outil fonctionne Laisser la perceuse s arrêter complètement avant de changer de vitesse 1 Pour sélectionner la vitesse 1 réglage du coupl...

Page 23: ...au mince ou un matériau qui a tendance à se fendre utilisez un bloc de soutien afin d éviter d endommager la pièce de travail Exécuter une application Fig A AVERTISSEMENT afin de réduire le risque de blessure corporelle assurez vous TOUJOURS que la pièce de travail est solidement fixée ou serrée AVERTISSEMENT attendez toujours jusqu à ce que le moteur s arrête complètement avant de changer le sens...

Page 24: ...arations l entretien et les réglages doivent être réalisés cela comprend l inspection et le remplacement du balai le cas échéant par un centre de réparation en usine DeWALT ou un centre de réparation agréé DeWALT Toujours utiliser des pièces de rechange identiques CAPACITÉS MAXIMALES RECOMMANDÉES Plage basse 1 Plage élevée 2 Perçage du métal 1 4 po 6 35 mm 1 8 po 3 2 mm Bois perçage plat 3 4 po 19...

Page 25: ...lcohol o medicamentos Un momento de descuido mientras se opera una herramienta eléctrica puede provocar lesiones personales graves b Utilice equipos de protección personal Siempre utilice protección para los ojos En las condiciones adecuadas el uso de equipos de protección ADVERTENCIAS GENERALES DE SEGURIDAD PARA HERRAMIENTAS ELÉCTRICAS ADVERTENCIA Lea todas las advertencias de seguridad instrucci...

Page 26: ... la batería puede provocar irritación o quemaduras e No use un paquete de batería o herramienta que estén dañados o modificados Las baterías dañadas como máscaras para polvo calzado de seguridad antideslizante cascos o protección auditiva reducirá las lesiones personales c Evite el encendido por accidente Asegúrese de que el interruptor esté en la posición de apagado antes de conectarlo a la fuent...

Page 27: ...de volver a comenzar Siempre retire el paquete de batería cuando conecte o retire accesorios Al colocar los accesorios en el mandril es importante apretar firmemente el mandril utilizando los tres orificios para evitar el deslizamiento Cuando use un mandril sin llave apriete con la mano firmemente Instrucciones de Seguridad para Todas las Operaciones Sostenga la herramienta eléctrica por las super...

Page 28: ...entes símbolos A continuación se indican los símbolos y sus definiciones V voltios Hz hertz min minutos or DC direct current Construcción de Clase I tierra min por minuto BPM golpes por minuto IPM impactos por minuto RPM revoluciones por minuto sfpm pies de superficie por minuto SPM pasadas por minuto A amperios W vatios Wh watt horas Ah amperios hora or AC corriente alterna Protección auditiva AN...

Page 29: ... en el equipaje registrado No incinere el paquete de batería incluso si está dañado severamente o está completamente agotada El paquete de batería pueden explotar en el fuego Se crean humos y materiales tóxicos cuando se queman los paquetes de baterías de ion de litio No exponga un paquete de batería o una herramienta a fuego o temperatura excesiva La exposición a fuego o temperaturas mayores a 13...

Page 30: ...condición normal y no indica un problema Para facilitar el enfriamiento de la batería después de su uso evite colocar el cargador o la Asegúrese que el cable esté ubicado de forma que no se pueda pisar provoque tropiezos o de otra forma esté sujeto a daño o esfuerzo No use un cable de extensión a menos que sea absolutamente necesario El uso de un cable de extensión inadecuado podría resultar en ri...

Page 31: ...urón o el gancho para brocas quite el tornillo que lo sostiene en su lugar luego vuelva a ensamblarlo en el otro lado de la herramienta Asegúrese de ajustar bien el tornillo Gancho para Cinturón Fig D Accesorio Opcional ADVERTENCIA Para reducir el riesgo de lesiones graves SOLO use el gancho para cinturón de la herramienta para colgar la herramienta de un cinturón de trabajo NO use el gancho para ...

Page 32: ...n accesorio Inserte una broca hexagonal de 1 4 directamente en el husillo 17 Se mantiene en su lugar de forma magnética Mandril de Liberación Rápida Fig A G La conexión de liberación rápida hexagonal de 1 4 10 y la conexión de compensación de liberación rápida hexagonal de 1 4 11 usan un mandril de liberación rápida NOTA El mandril acepta accesorios hexagonales de 1 4 6 35 mm y brocas de 1 25 4 mm...

Page 33: ...ETIENE Realización de Aplicación Fig A ADVERTENCIA Para reducir el riesgo de lesiones personales SIEMPRE asegúrese que la pieza de trabajo esté anclada o asegurada firmemente ADVERTENCIA Siempre espere hasta que el motor se detenga por completo antes de cambiar la dirección de rotación Luz de Trabajo Fig A La luz de trabajo 7 se activa cuando se presiona el interruptor de gatillo y se apagará auto...

Page 34: ...orios que se recomiendan para utilizar con la herramienta están disponibles a un costo adicional en su distribuidor local o en un centro de mantenimiento autorizado Si necesita ayuda para localizar algún accesorio póngase en contacto com DeWALT llame al 1 800 4 DeWALT 1 800 433 9258 o visite nuestro sitio web www dewalt com Limpieza ADVERTENCIA Sople la suciedad y el polvo de todos los conductos d...

Page 35: ...ibuidor Nombre del producto ___________________________ Mod Cat ____________________________________ Marca ______________________________________ Núm de serie _________________________________ Datos para ser llenados por el distribuidor Fecha de compra y o entrega del producto ___________________________________________ Nombre y domicilio del distribuidor donde se adquirió el producto ____________...

Page 36: ...as DCB120 DCB122 DCB124 DCB124G DCB126 DCB126G DCB127 DCB127G Chargers Chargeurs Cargadores DCB103 DCB104 DCB107 DCB112 DCB113 DCB115 Maximum initial battery voltage measured without a workload is 12 volts Nominal voltage is 10 8 La tension initiale maximum du bloc piles mesurée à vide est de 12 volts La tension nominale est de 10 8 El máximo voltaje inicial de la batería medido sin carga de traba...

Reviews: