14
10.2) Operating the Device
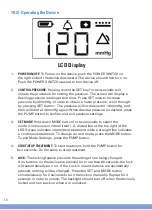
LCD Display
1.
POWER ON/OFF:
To Power on the device, push the POWER SWITCH on
the right side of the device downward. The device should then turn on.
Push the POWER SWITCH upward to turn device off.
2.
CONTROL PRESSURE:
Holding down the SET key for two seconds will
initiate the procedure for setting the pressure. The screen will display a
flashing pressure reading at this time. Press SET once to increase
pressure by 20mmHg. In order to obtain a lower pressure, scroll through
by pressing SET button. The pressure will increase until 140mmHg, and
then will start at 40mmHg again. When desired pressure is reached, press
the PUMP button to confirm and exit pressure settings.
3.
SET MODE:
Hold down MODE button for two seconds to select the
mode (continuous or intermittent). A dotted line at the top right of the
LCD Screen indicates intermittent treatment while a straight line indicates
a continuous treatment. To change current mode, press the MODE button.
To exit Mode Settings, press the PUMP button.
4.
START/STOP TREATMENT:
To start treatment, hold the PUMP button for
two seconds. Do the same to stop treatment.
5.
LOCK:
The locking feature prevents the settings from being changed.
If no buttons on the device are pressed for more than 60 seconds, the lock
will automatically turn on. If the Lock is on and buttons are accidentally
pressed, nothing will be changed. Press the SET and MODE button
simultaneously for 2 seconds to turn the lock on manually. Repeat for 3
seconds in order to unlock. The backlight should turn off when the device is
locked and turn back on when it is unlocked.


