background image

Chapter 5 - Page 16

300200043-en-00.fm

© 0103

Maintenance

TBD 616 OEM

x

x

x

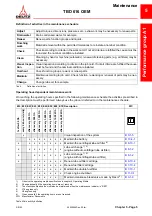
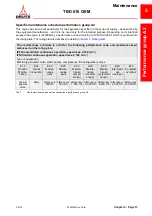
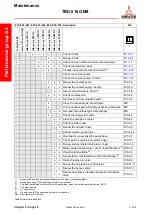
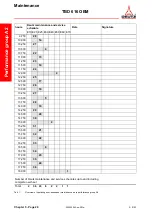
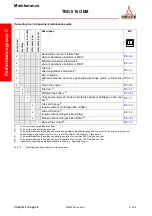
Check V-belts

B 12-2-1

x

x

x

Renew V-belt

B 12-2-1

x

x

x

x

Check and set inlet and outlet valve clearance

B 1-1-1

x

x

x

x

x

Check the injection valves

B 7-7-3

x

x

Visually inspect arched denture clutch

 4)

B 7-4-16

x

Check the coolant pump

B 9-7-11

x

Check the coolant pump, circuit 2

B 9-7-12

x

x

x

Renew the coolant pump

W 9-7-8

x

x

x

Renew the coolant pump, circuit 2

W 9-7-9

x

x

Renew arched denture clutch

 4)

W 7-4-6

x

x

x

Check compression

W 0-2-6

x

x

Overhaul or renew cylinder heads

W 1-4-2

x

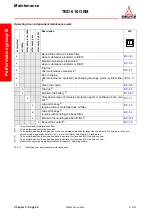
Clean the exhaust gas turbocharger

ME

x

Check exhaust gas turbocharger bearing clearance

ME

x

x

Overhaul the exhaust gas turbocharger

ME

x

Check the charge air cooler

W 6-4-5

x

x

Clean the charge air cooler

W 6-4-3

x

Check cylinder liners

W 0-2-7

x

Renew the cylinder liners

W 3-3-3

x

Check injection pump drive

W 7-4-12

x

Overhaul or renew injection pump drive

W 7-4-7

x

Check pistons (piston bolt, piston rings)

W 2-9-3

x

Renew pistons (piston bolt, piston rings)

W 2-9-3

x

x

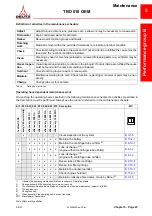
Water-cooled exhaust pipe, check liquid chambers

 5)

W 6-1-3

x

x

Check solid insulation

 5)

W 6-1-4

x

x

Renew fabric mat insulation of the turbocharger

 5)

W 6-6-3

x

x

Clean the lube oil cooler

W 8-8-2

x

x

Renew the oil pressure control valve

W 8-11-3

x

x

Renew the bypass valve

W 8-11-5

x

x

Renew hose pipes, vibration dampers and flexible 
lines

W 0-3-4

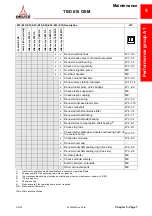
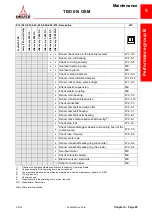
E10 E20 E23 E25 E30 E40 E50 E60 E70 Description

WC

1

x

 af

te

r 50 Oh

ev

e

ry 24

 h

o

u

rs (da

il

y

)

af

te

r ev

e

ry 25

0

 O

h

af

te

r ev

e

ry 50

0

 O

h

af

te

r ev

e

ry 1,

50

0

 O

h

af

te

r ev

e

ry 3,

00

0

 O

h

af

te

r ev

e

ry 6,

00

0

 O

h

af

te

r ev

e

ry 9,

00

0

 O

h

a

fter

 e

very

 1

8

,000 

Oh

1)

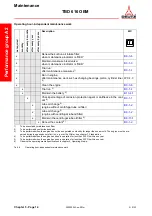
Observe the operating media specifications in chapter 4, Operating Media


.

2)

Change annually if the operating hours are not reached.

3)

The crankcase bleed valve must also be maintained  when the maintenance indicator is ”RED”.

4)

V16 engines only

5)

V8 engines only

6)

Clean annually if the operating hours are not reached.

MD:

Manufacturer Documents

Table 4Note activity definition

Performance group A2

Summary of Contents for TBD 616 OEM

Page 1: ...Operating Instructions TBD 616 OEM Operating Instructions TBD 616 OEM ...

Page 2: ......

Page 3: ... of repairs spare parts and after sales ser vice generally We reserve the right to make technical alterations to the drawings and particulars in this documentation package if this should become necessary to improve the engines Reprints and duplica tion of any kind either in whole or in part require our written per mission Engine Number ...

Page 4: ...sales service in general This documentation package is to be presented to the Service Partner responsible every time a ser vice job is carried out Imprint DEUTZ AG Service Information Systems Deutz Mülheimer Straße 147 149 D 51063 Cologne Tel 02 21 8 22 0 Fax 02 21 8 22 53 58 http www deutz de Printed in Germany All rights reseved 1 0304 Ordering No 0299 8561 en Engine type Application System name...

Page 5: ...that these operating instructions are available to everyone involved in operating maintaining and repairing the engine and that they have all understood the contents Non compliance with these operating instructions may result in engine malfunctions and even damage or injury to persons the manufacturer will accept no liability in such cases Proper maintenance and repair work depends on the availabi...

Page 6: ... engine while it is running Safety You will find this symbol next to all safety instructions Follow these meticulously Pass on all safety instructions to your operating staff as well In addition comply with the statutory general safety and accident prevention regulations applying in your country Instruction You will find this symbol next to instructions of a general nature Follow these instruction...

Page 7: ... sincerely DEUTZ AG DEUTZ engines are the culmination of long years filled with research and development work The in depth know how thus acquired in conjunction with high standards of quality is your guarantee for engines manufactured for long lifetime high reli ability and low fuel consumption And of course stringent criteria of environ ment friendliness are met as well Care and maintenance are c...

Page 8: ...Chapter 0 Page 8 300200002 en 00 fm 0303 Introduction Medium sized and large engines This page intentionally left blank ...

Page 9: ...n the engine 2 1 Figure rating plate 2 2 Designation of the engine sides cylinder and direction of rotation 2 3 Direction of rotation 2 3 Engine figures 2 4 Left side 2 4 Right side 2 5 Drive side 2 6 Structure and function 2 7 Crankcase 2 7 Crankcase bleeding Racor 2 8 Crank drive and valve drive 2 10 Wheel drive 2 12 Mass compensation shaft V8 engines only 2 13 Cylinder head 2 14 Structure 2 14 ...

Page 10: ...tructure 2 37 Function 2 38 System functions 2 39 Configuration and parameterization 2 41 Diagnostic possibilities 2 41 3 Operation Work prior to commissioning 3 1 General 3 1 Operating media 3 2 Coolant 3 2 Coolant level 3 3 Fuel 3 3 Lubricant 3 5 Monitoring 3 6 Starter system 3 6 Room ventilation 3 6 Commissioning 3 7 Starting the engine 3 7 Monitoring operation 3 7 Shutting down 3 7 4 Expendabl...

Page 11: ...work copy form 5 19 Specific maintenance schedule performance group B 5 21 Operating hour independent maintenance work 5 22 Definition of activities in the maintenance schedule 5 23 Operating hour dependent maintenance work 5 23 Overview of operating hour independent maintenance work copy form 5 26 Overview of operating hour dependent maintenance work copy form 5 27 Specific maintenance schedule p...

Page 12: ... 8 3 Start of pumping 8 3 Tightening specifications for maintenance work up to E40 8 5 Tightening specifications for maintenance work from E50 8 1 9 Job Cards Explanation of symbols 9 1 Overviews 9 2 Arranged alphabetically 9 2 Arranged by Job Card Numbers 9 3 10 Other instructions Index Service We move your world Service 1 DEUTZ AG at your service Service 1 Sales Service Index Service 1 DEPIC Ser...

Page 13: ...e depend on the installation site the mode of operation and the operating and auxiliary media being used Special safety measures dependent on the respective work are speci fied and highlighted in the work description It generally applies among other things for personnel Only instructed personnel may operate or maintain the engine Unauthorised persons may not enter the engine room Wear tight fittin...

Page 14: ...l and its supervision are governed by regional national and international laws and decrees which the plant owner is responsible for observing Operating Instruc tions and Workshop Manual The service documentation is divided into the operating instructions and the workshop manual for a user oriented organisation of the information content The Operating Instructions contain a general description as w...

Page 15: ...repairs and emergency measures on components are described which require a greater effort and appropriately qualified personnel It contains the chapters 0 Introduction Contents 1 User guide 2 4 See operating instructions 5 Tools for service 6 7 See operating instructions 8 Technical particulars 9 Job cards in order of job card numbers 10 Sundry other instructions if not in the appendix or separate...

Page 16: ... engines The letter at the front signifies the type of documentation involved B Operating Instructions W Workshop Manual The subsystems are distinguished by maintenance groups Generally valid 0 Cross subsystem or Safety Regulations 1 System parameters or general checks Counting per subsystem component Various jobs per subsystem component Version differences 0 General remarks cross category jobs 1 ...

Page 17: ...11 the date of issue 13 or alternatively the identification number of the job card 1 2 3 4 7 5 6 9 10 8 11 12 13 80300 5 1 DEUTZ Service publisher of the service documen tation 8 Figures 2 Engine type or system 9 General notes 3 Number of the job card 10 Work sequence 4 Title of the job card 11 Page number 5 Tools aids spares and references 12 Identification number of the job card 6 Safety instruc...

Page 18: ...uide Engines and systems Spares Spares are available from DEUTZ Service You will find a list of spares in the spare parts list of the engine or the system You will find further information in Chapter Service at the end of the operating instructions ...

Page 19: ...or various powertrains Type designation Rating plate Position on the engine The rating plate is fixed to the engine The engine number is punched addi tionally See also rating plate Fig ure 2 2 item 1 T B D 616 V _ Turbocharger T Charge air cooler B Diesel engine D Series 616 V engine V No of cylinders 8 12 or 16 Figure 2 1 Position of the rating plate and the engine number on the engine example ...

Page 20: ... to special manufacturer specifications see 13 14 7 8 9 Numeric value of the performance in kW 10 11 12 Engine speed in rpm 13 14 Time limiting of the available performance in hours h 15 Height above sea level conditions at installation site 16 Air pressure px in mbar conditions at installation site 17 Charge air coolant temperature tcx in C conditions at installa tion site 18 Relative humidity Fx...

Page 21: ...s highlighted respectively in bold print and corresponds with DIN ISO 1204 Engine sides Cylinder numbering counted and labelled from the drive side Direction of rotation Looking towards the drive side in anticlockwise direction left hand rotation Figure 2 3 Designation of the engine sides and cylinders 1 3 2 4 A1 B1 A2 B2 A3 B3 A4 B4 1 Drive side Flywheel clutch side 2 Left side Cylinder side A 3 ...

Page 22: ...n air intake filter 8 Rotary current alternator 3 Crankcase bleed valve 9 Coolant pump of the charge air cooler 4 Exhaust gas turbocharger cylinder side A 10 Rotary vibration damper 5 Heat insulation cladding PEARL exhaust pipe 11 Coolant pump engine cooling circuit 6 Starter 12 Holder for attaching the engine second holder on the diagonally opposite side ...

Page 23: ...cription TBD 616 OEM Right side Figure 2 5 Engine right side 1 Lube oil nozzle 5 Lube oil filter 2 Fuel filter 6 Fuel hand pump 3 Lube oil cooler 7 Heat insulation cladding PEARL exhaust pipe 4 Oil dipstick 8 Exhaust gas turbocharger cylinder side B ...

Page 24: ...r 2 Page 6 300200040 en 00 fm 0103 Description TBD 616 OEM Drive side Figure 2 6 Engine drive side 1 Flywheel 2 Flywheel housing 3 Holder for attaching the engine second holder on the diagonally opposite side ...

Page 25: ...ngth breaking strength and casting tightness which enable low weight and compactness distinguish this manufacturing method The side walls of the crankcase are pulled down below the center of the crankshaft and therefore guarantee additional tor sional strength The cylinder angle of 60 enables a narrow design which is demanded in many applications Figure 2 7 Crankcase ...

Page 26: ...ile at the same time vacuum pressures from the suction intake system settle at an upper limit Pulsating pressure peaks are limited as a result An optical indicator signals it is time to change the filter element The exchangeable and recyclable filter element consists of a micro glass fibre structure with a filter effect up to 0 3 µm This can be changed without tools due to quick change catches The...

Page 27: ...ty is reduced environmental pollution is reduced charge air cooler turbocharger and inlet valves are better protected against soiling 1 Sucked in air 2 Suction air intake filter 3 Turbocharger 4 Exhaust gas 5 Charge air cooler 6 Engine 7 Line for fumes to the filter system 8 Line for filtered fumes into the suction line 9 Filter 10 Return to the oil pan Figure 2 9 Schematic of the crankcase bleedi...

Page 28: ...vided at an angle This allows removal of the piston with con rod up through the cylinder liner 3 The con rods run on the crankshaft in sputter bearings A liner is pressed into the upper con rod eye in which the piston bolt 4 is mounted on a floating bearing The pistons 6 are cast from a lightweight metal The piston rings 5 trapeze ring minute ring and a narrow land drain oil control ring are in ca...

Page 29: ... Chapter 2 Page 11 2 Description TBD 616 OEM Figure 2 10 Crank and valve drive 1 Crankshaft 6 Piston 2 Con rod 7 Crankcase 3 Cylinder liner 8 Oil injection nozzle 4 Piston bolt 9 Counterweights of the crankshaft 5 Piston rings ...

Page 30: ...or 10 these are driven by toothed wheel 1 The lube oil pump 7 is driven by toothed wheel 6 on the crankshaft If a compressor is installed on the engine toothed wheel 4 it is driven by the intermediate wheel 5 driven by toothed wheel 6 on the crankshaft The coolant pump toothed wheel 9 is driven by the intermediate wheel 8 driven by toothed wheel 6 on the crankshaft Figure 2 11 Wheel drive on the f...

Page 31: ...ers a mass compensation shaft must run as well in order to be able to achieve low vibration running of the engine The mass compensation shaft is driven by a separate wheel drive on the drive side Figure 2 12 Wheel drive of the mass compensation shaft on the drive side 1 Crankshaft 2 Mass compensation shaft 3 Intermediate wheel 3 1 2 84132 0 ...

Page 32: ... principle The cylinder heads are supplied with charge air from the V chamber via the charge air pipe The two inlet channels 2 and 3 have different manifolds in the cylinder heads They are divided into a filling channel 2 and a twist channel 3 The shape of these ensures a change air flow into the combustion chamber which considerably improves the mix formation The outlet channels 1 end on the resp...

Page 33: ... exhaust gas discharge The high heat proof valves are fit in the pressed in and thus easily replaceable valve seat rings The valves are controlled by a proven valve bridge technique The valve bridge control operates with very low wear and is extremely maintenance friendly Figure 2 14 Valve control 1 Camshaft 5 Toggle lever block 2 Pilz tappet 6 Valve bridges 3 Tappet rods 7 Outlet valves 4 Rocker ...

Page 34: ...ll exhaust turbocharger builds up the necessary charge air pressure in a short time On the one hand the whole engine output is available on the other hand the typical black smoke is virtually eliminated Figure 2 15 Suction intake charge air path liquid cooled charge air cooler 1 Charge air cooler 5 Exhaust gas turbine of the turbocharger 2 Air filter 6 Heat insulation cladding 3 Air suction intake...

Page 35: ...cooling 1 Charge air housing 5 Exhaust gas turbine of the turbocharger 2 Air filter 6 Heat insulation cladding 3 Air suction intake pipe 7 Exhaust pipe DEUTZ PEARL System 4 Turbocharger compressor 8 Charge air line Charge air heated by the turbocharger Cool intake air and charge air cooled by the charge air cooler Hot exhaust gases ...

Page 36: ...ipe cylinder side A 5 DEUTZ PEARL exhaust pipe cylinder side A 6 Charge air pipe cylinder side A 7 Cylinder heads cylinder side A 8 Charge air cooler 9 Cylinder heads cylinder side B 10 Charge air pipe cylinder side B 11 DEUTZ PEARL exhaust pipe cylinder side B 12 Charge air pipe cylinder side B 13 Suction intake air cylinder side B 14 Compressor turbine of the turbocharger cylinder side B 15 Exha...

Page 37: ...r pipe cylinder side A 5 DEUTZ PEARL exhaust pipe cylinder side A 6 Charge air pipe cylinder side A 7 Cylinder heads cylinder side A 8 Cylinder heads cylinder side B 9 Charge air pipe cylinder side B 10 DEUTZ PEARL exhaust pipe cylinder side B 11 Charge air pipe cylinder side B 12 Suction intake air cylinder side B 13 Compressor turbine of the turbocharger cylinder side B 14 Exhaust gas turbine of...

Page 38: ...ance The PEARL exhaust pipe elements 1 are connected to compensators 2 They take care of not only the sim ple connection between the PEARL exhaust pipe elements but also compensate the heat stresses which occur during the warm up phase operation and after shutting down the engine The PEARL exhaust gas elements are surrounded by a heatproof housing Surge charging The V8 engine is equipped with a su...

Page 39: ...tion The engines are equipped with a high pressure injection system The eight and twelve cylinder engine oper ates with one the sixteen cylinder engine with two high pressure series injection pumps which are installed in the combustion chamber protected by the cylinder banks The injection pump drive consists of a mainte nance free laminar clutch The connection between the two series injection pump...

Page 40: ...ngine The layout of the fuel pipes is shown in the following figures Figure 2 22 Fuel pipes V8 engine 1 Leak fuel pipe 4 Fuel hand pump 2 Solenoid valve engine shutdown 5 Series injection pump 3 Fuel pump 6 Fuel filter Fuel pipe supply to series injection pump Fuel pipe return from series injection pump ...

Page 41: ...EM Fuel pipe system V12 engine Figure 2 23 Fuel pipes V12 engine 1 Leak fuel pipe 4 Fuel hand pump 2 Solenoid valve engine shutdown 5 Series injection pump 3 Fuel pump 6 Fuel filter Fuel pipe supply to series injection pump Fuel pipe return from series injection pump ...

Page 42: ...tem V 16 engine Figure 2 24 Fuel pipes V16 engine 1 Leak fuel pipe 4 Fuel hand pump 2 Solenoid valve engine shutdown 5 Series injection pump 3 Fuel pump 6 Fuel filter Fuel pipe of fuel hand pump Fuel pipe supply to series injection pump Fuel pipe return from series injection pump ...

Page 43: ... magnetic frequency pick up records the actual value of the speed on the ring gear of the flywheel and passes it on to the control device In the control device which can be an analog or digital design the actual value is com pared to the setpoint In the case of deviations the control device sends the command to the actuator to adjust the injection pump control bar The actua tor sends a return sign...

Page 44: ...m By this means the rotary motion of the internal shaft is transferred directly as a linear movement to the control rod The setting of the control output shaft is detected using a non contact method by a return system mounted firmly on the shaft and then passed to the control device On reaching the stop current limitation is implemented after approx 20 seconds which reduces the actuator current to...

Page 45: ...e is constantly increased or reduced depending on the load requirement at constant speed The actuator is mounted directly on the injection pump The actuator operates linearly the feedback of the control bar position takes place without contact Emergency stop is possible with an additional stop lever Figure 2 26 GAC actuator 1 Injection pump 6 Connector plug in GAC digital 2 Stop lever 7 Fastening ...

Page 46: ...oportional to the speed of the ring gear on the flywheel by sampling the teeth of the ring gear which move past the frequency pick up and transmits these pulses to the control device The number of installed frequency pick ups depends on the speed governing system used Figure 2 27 Frequency pick up installation example for EMR2 1 Frequency pick up 2 Starter ring gear on flywheel ...

Page 47: ... According to the control system used various control devices are available Electronic engine controller DEUTZ EMR2 Control device for GAC speed governing system analog Electronic engine controller EMR2 The electronic engine controller EMR2 is equipped with an efficient microprocessor and an internal controller program Changes to the settings are made by a PC laptop with a special connecting cable...

Page 48: ...n 4 TEST Overspeed test button reduces the switching point by 10 5 OVERSPEED Setting of overspeed 6 STABILITY Setting the strength 7 GAIN Setting the sensitivity 8 SPEED Setting the rated speed 9 Bridge or capacitor for improving stability 10 IDLE Setting the low idling speed 11 DROOP Setting the P factor 12 STARTING FUEL Setting the fuel starting volume 13 SPEED RAMPING Setting the start ramp to ...

Page 49: ...hemical energy in the fuel is converted into heat energy during combustion The engine can only partly convert this into mechanical energy The remaining heat is dissipated mainly with the exhaust gas and the coolant The engine operates with a dual circuit cooling i e a high temperature circuit and a low temperature circuit The combustion chamber walls are cooled by the high temperature circuit The ...

Page 50: ...to the charge air cooler 3 Coolant pump and inlet of the coolant in cylin der side B 9 Coolant pump cooling circuit charge air cooler 4 Suction intake of cooled coolant to the engine 10 Charge air cooler 5 Inlet of coolant to cylinder side A 11 Discharge of hot coolant after charge air cooler 6 Coolant overflow of cylinder heads Coolant circuit for cooling the cylinders and cylinder heads Coolant ...

Page 51: ... of hot coolant to the cooler 5 Inlet of coolant to cylinder side A 2 Thermostat housing 6 Coolant overflow of cylinder heads 3 Coolant pump and inlet of the coolant in cylin der side B 7 Temperature sensor 4 Suction intake of cooled coolant to the engine Coolant circuit for cooling the cylinders and cylinder heads ...

Page 52: ...l circuit cooling The dual circuit cooling system is shown in the air water version in the figure In the air air version the items 6 10 and 11 are omitted The charge air cooler then precedes in the air air version Figure 2 31 Cooling system schematic air water 8 1 12 10 9 2 3 4 5 6 7 3 16 15 5 13 14 11 ...

Page 53: ...ow temperature circuit 8 Engine interface 9 Pipes to the cooler engine cooling 10 Pipes from the cooler charge air cooling 11 Pipes to the cooler charge air cooling 12 Pipes from the cooler engine cooling 13 Coolant pump high temperature circuit 14 Short circuit line 15 Lube oil cooler 16 Pipe from lube oil cooler to the engine Labeling of coolant cold warm cold and warm mixed warm and warm cold m...

Page 54: ...r pneumatic starter depending on the version The starter 1 has the job of accelerating the engine crankshaft to ignition speed On reaching this speed the compression temperature in the cylinders has heated up to ignition temperature of the injected fuel Figure 2 32 Electrical starter Figure 2 33 Pneumatic starter ...

Page 55: ...ation on the engine side and the system side are connected to the EMR2 control device by separate cable harnesses Engine side installations Figure 2 34 EMR2 engine side installations example TBD 616 V12 1 Engine 6 Sensor lube oil level 2 Cable harness engine EMR2 control device 7 Sensor coolant temperature 3 Actuator and connection for cable harness 8 Frequency pick up 4 Stop magnet 9 Sensor lube ...

Page 56: ...ion about the momentary condition of the engine and the presets setpoint genera tor for speed etc the EMR2 drives the actuator which adjusts the injection pump control rod and thus adapts the fuel volume according to the power requirement The actuator sends a return signal of the injec tion pump control rod position to the control device The EMR2 is equipped with safety devices and measures in har...

Page 57: ...ons and communication and diagnostic interfaces Figure 2 36 System functions overview Sensor inputs control bar path speed coolant temperature charge air pressure oil pressure 2 speed coolant level charge air temperature fuel temperature tachometer signal actuator functions actuator stop magnet Display functions outputs Fault lamp warning signals multifunction displays Interfaces ISO 9141 CAN bus ...

Page 58: ...ut down the engine The actuator then pulls the injection pump control bar to the stop position Additionally and independently of this the fuel supply is interrupted by shutoff magnets The engine may also be shut down by an error in the EMR2 e g exceeding or dropping below fixed meas ured value limits Displays outputs monitoring function Different signals can be displayed and output through the con...

Page 59: ...o active fault if the fault lamp goes out after 2 s When the fault lamp flashes after 2 s there is at least one serious fault the engine cannot be started If the fault lamp lights steadily there is at least one fault the engine may possibly be operable with restrictions in emergency mode If other warning lamps are configured e g oil pressure coolant temperature these are switched on with the key o...

Page 60: ...es stored in the control device fault memory 2 and delete fault message of eliminated or non current faults Activate function test outputs and actuator with engine at a standstill Show assignment of inputs and outputs Show measured values graphically Handling SERDIA is described in a separate operating manual Figure 2 37 Diagnosis with SERDIA illustrated Installation in the DEUTZ Training Center i...

Page 61: ... lines and tanks for fuel coolant and lube oil before filling All lines screw fittings and connecting elements must be checked for a tight fit perfect condition and leaks and repaired if necessary Check the alignment of the engine and proper anchoring to the founda tion Clean the engine and remove objects which have been placed on the engine Fit all protective coverings to the engine Check the ele...

Page 62: ...engine s cooling system with prepared coolant through the fill ing nozzle on the cooler until the coolant emerges from the engine bleed valve without bubbles Seal the engine bleed screw arrow with a new sealing ring The filled cooling system does not bleed automatically depending on the structure of the external cooling system It may be necessary to remove the highest coolant hose until the coolan...

Page 63: ...sary Make a test run see job card B 0 1 4 Test run Check the coolant after shutting off the engine and refill if necessary Fuel Fill the supply tank and daily supply tank with fuel Bleed the fuel system and check for leaks Loosen the bleeding screw 4 The cooling system is under pressure danger of scalding Ensure cleanliness Do not spill fuel Only fill up with fuel with an approved filling device w...

Page 64: ...41 en 00 fm 0103 Operation TBD 616 OEM Operate the hand pump 1 until fuel emerges free of air bubbles Tighten the bleeding screw whilst continuing pumping Figure 3 2 Hand pump fuel system installation site is access dependent ...

Page 65: ...delivered without lube oil filling Fill the engine with lube oil up to the top dipstick mark through the lube oil nozzle arrow Figure 3 3 Lube oil nozzle depending on the installation position of the engine the lube oil nozzle is on the side with the better access Figure 3 4 Oil level dipstick ...

Page 66: ...gine monitoring system Starter system Compressed air starter system Fill starter air tank with starter air compressor or carbon dioxide CO2 from pressurised vessel to 30 bar and drain water Electric starter system Check the power supply to the monitor battery Check the connecting cable for correct polarity tight fit and good contact Room ventilation Switch on the room ventilation to evacuate radia...

Page 67: ...eed and load after building up the lube oil pressure Monitoring operation During engine operation check whether the data displayed by the engine monitoring system are within the specified parameters Shutting down Avoid shutting down from full load Let the engine run for about another 5 minutes at increased idle speed without gears before shutting down to avoid heat building up at cylinder liners a...

Page 68: ...Chapter 3 Page 8 300200041 en 00 fm 0103 Operation TBD 616 OEM This page intentionally left blank ...

Page 69: ...lity This shall also apply in the event that the producer concerned improves the products named here The expendables named here reference products are only a selection from certain producers and their products Other expendables not listed here may also be used provided they conform to the requirements involved i e are at least equivalent in terms of all criteria The expendables named in this speci...

Page 70: ...Chapter 4 Page 2 300200007 en 00 fm 0303 Expendables Diesel Engines This page intentionally left blank ...

Page 71: ...l resin permanently elastic and vibration free temperature range 30 C to 150 C Sealing of surfaces DEUTZ DW 55 Securing agent FV 0160 9605 Anaerobic solvent free single component substance hardening upon metal contact when excluding oxygen high strength fluid temperature range 55 C to 150 C Securing and sealing of threads up to M12 joints up to max gap width of 0 15 mm DEUTZ DW 56 Securing agent F...

Page 72: ... solvent free single component upon metal contact when excluding oxygen high strength thick flowing thixotrope tem perature range 55 C to 150 C Sealing of surfaces up to a gap width of max 0 50 mm DEUTZ DW 68 Sealant FV 0160 0039 Anaerobic solvent free single component upon metal contact when excluding oxygen low strength thick flowing thixotrope tem perature range 55 C to 150 C Sealing of surface...

Page 73: ...iction and wear for surfaces difficult to access Gener ates an emergency lubrication and avoids sliding back DEUTZ S3 LV 0161 9733 FV 0160 9505 35 C to 450 C Spray for reducing friction and wear Generates an emergency lubrication and avoids sliding back DEUTZ S4 LV 0161 9735 40 C to 450 C Preferably used for pre treating components with a high application tem perature After the evaporation of the ...

Page 74: ...ials with which the best results have been achieved Equivalent products can also be used in this case the supplier must assure the suitability of the product for the application When using the products indicated below the following references of the manufacturer must abso lutely be observed Safety references Personal protection equipment Use as directed Disposal as directed ...

Page 75: ... raw water circuit P3 T1166 P3 croni neutraliser Messrs Henkel KGAA 40191 Düsseldorf SAF Acidonly calcium solutizer Concentration 5 Temperature 55 C 75 C Messrs Drew Ameroid Deutschland GmbH 21107 Hamburg Porodox Concentration 2 10 Temperatuer 20 C 60 C Treatment time max 16 hours Messrs Collardi GmbH 50825 Köln for intercooler air side ACC 9 Messrs Drew Ameroid Deutschland GmbH 21107 Hamburg Veco...

Page 76: ... 80 0 fresh water for de preservation Eskapon S 255 Messrs Haug Chemie GmbH 74889 Sinsheim Water treatment agent Hardness determination for cooling water Aquamerk Art Nr 11129 DEUTZ ordering no 1215 8292 Messrs E Merck KGAA 64293 Darmstadt Cooling water hardening Vecom CN powder Messrs Vecom GmbH 21107 Hamburg Cooling water softening Trisodiumphosphate german Trinatriumphosphat powder Messrs Benck...

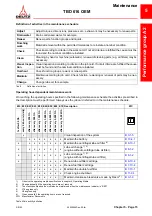
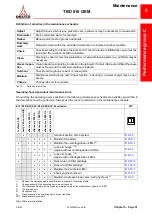
Page 77: ...st be performed by technically skilled persons or authorised specialists The competencies are listed in Table 1 Deutz maintenance and service schedules Selection and structure An appropriate maintenance schedule applies depending on the performance group to which the engine is assigned according to the performance abbrevi ation and maximum speed Every maintenance schedule for a performance group c...

Page 78: ...any irregularities of your engine see operating check log when you arrange the appointment Sign a service contract with DEUTZ SERVICE if necessary All the due maintenance work including repairs if agreed is then planned and expertly performed by DEUTZ SERVICE according to the contract Your responsible DEUTZ SERVICE partner will be glad to give you the details Deutz maintenance and service schedule...

Page 79: ...nce schedule is valid for the following performance code and maximum speed embossed on the rating plate ICXN ICN continuous operation speed max 1 800 min 1 IN variable operation speed max 1 500 min 1 ICFN unrestricted continuous operation speed max 1 800 min 1 Type of application Electricity generator units depending on design as double frequency systems water pumps compressors E10 Routine Mainte ...

Page 80: ...f corrosion protection agent or antifreeze in the cool ant 6 B 9 1 1 x Lube oil change 4 engine without centrifugal lube oil filter B 8 1 2 x Lube oil change 5 engine with centrifugal lube oil filter B 8 1 2 x Maintain the centrifugal lube oil filter 4 B 8 13 1 x Renew the coolant 6 B 9 1 2 1 To be executed by maintenance officer 2 To be performed by authorized experts 3 To be performed when the e...

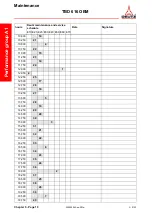
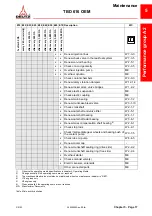
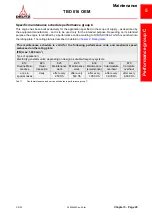
Page 81: ...s Maintain Maintain according to job card Check function reworking or renewal of parts may be nec essary Change Change lube oil for example E10 E20 E23 E25 E30 E40 E50 E60 E70 Description WC 1x after 50 Oh every 24 hours daily after every 250 Oh after every 500 Oh after every 1 500 Oh after every 3 000 Oh after every 6 000 Oh after every 12 000 Oh after every 24 000 Oh x Visual inspection of the s...

Page 82: ...w injection pump drive W 7 4 7 x Check pistons piston bolt piston rings W 2 9 3 x Renew pistons piston bolt piston rings W 2 9 3 x x Water cooled exhaust pipe check liquid chambers 5 W 6 1 3 x x Check solid insulation 5 W 6 1 4 x x Renew fabric mat insulation of the turbocharger 5 W 6 6 3 x x Clean the lube oil cooler W 8 8 2 x x Renew the oil pressure control valve W 8 11 3 x x Renew the bypass v...

Page 83: ...ntermediate gear wheels and bearing bush of the coolant pump W 9 7 5 x Check lube oil pump W 8 4 5 x Renew cooler cap x Renew crankshaft sealing ring drive side W 2 2 2 x Renew crankshaft sealing ring free side W 2 2 4 x Overhaul starter ME x Check solenoid valve s ME x Electric sensors solenoids ME Other connected parts ME E10 E20 E23 E25 E30 E40 E50 E60 E70 Description WC 1x after 50 Oh every 24...

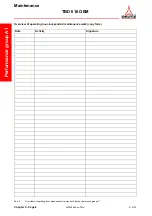
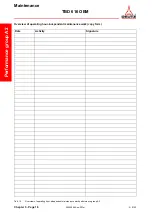
Page 84: ...n 00 fm 0103 Maintenance TBD 616 OEM Overview of operating hour independent maintenance work copy form Tab 5 Overview of operating hour independent maintenance work performance group A1 Date Activity Signature Performance group A1 ...

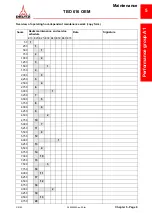
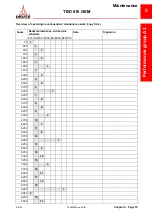
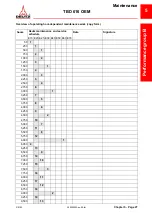
Page 85: ...gnature E10 E23 E25 E30 E40 E50 E60 E70 50 1 250 1 500 1 750 2 1 000 2 1 250 3 1 500 1 1 750 4 2 000 3 2 250 5 2 500 4 2 750 6 3 000 1 3 250 7 3 500 5 3 750 8 4 000 6 4 250 9 4 500 2 4 750 10 5 000 7 5 250 11 5 500 8 5 750 12 6 000 1 6 250 13 6 500 9 6 750 14 7 000 10 7 250 15 7 500 3 7 750 16 8 000 11 8 250 17 8 500 12 8 750 18 9 000 2 9 250 19 9 500 13 9 750 20 Performance group A1 ...

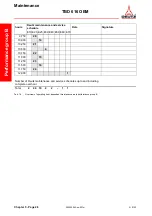
Page 86: ... 26 13 000 18 13 250 27 13 500 5 13 750 28 14 000 19 14 250 29 14 500 20 14 750 30 15 000 3 15 250 31 15 500 21 15 750 32 16 000 22 16 250 33 16 500 6 16 750 34 17 000 23 17 250 35 17 500 24 17 750 36 18 000 2 18 250 37 18 500 25 18 750 38 19 000 26 19 250 39 19 500 7 19 750 40 hours Deutz maintenance and service schedule Date Signature E10 E23 E25 E30 E40 E50 E60 E70 Performance group A1 ...

Page 87: ...20 500 28 20 750 42 21 000 4 21 250 43 21 500 29 21 750 44 22 000 30 22 250 45 22 500 8 22 750 46 23 000 31 23 250 47 23 500 32 23 750 48 24 000 1 Number of Deutz maintenance and service schedules up to and including complete overhaul Total 2 48 32 8 4 2 1 1 hours Deutz maintenance and service schedule Date Signature E10 E23 E25 E30 E40 E50 E60 E70 Performance group A1 ...

Page 88: ...Chapter 5 Page 12 300200043 en 00 fm 0103 Maintenance TBD 616 OEM This page intentionally left blank Performance group A1 ...

Page 89: ...performance group A2 This maintenance schedule is valid for the following performance code and maximum speed embossed on the rating plate ICFN unrestricted continuous operation speed max 2 100 min 1 IFN limited continuous operation speed max 2 100 min 1 Type of application Electricity generator units water pumps compressors fire extinguisher pumps E10 Routine Mainte nance E20 Visual inspection E23...

Page 90: ...of corrosion protection agent or antifreeze in the cool ant 6 B 9 1 1 x Lube oil change 4 engine without centrifugal lube oil filter B 8 1 2 x Lube oil change 5 engine with centrifugal lube oil filter B 8 1 2 x Maintain the centrifugal lube oil filter 4 B 8 13 1 x Renew the coolant 6 B 9 1 2 1 To be executed by maintenance officer 2 To be performed by authorized experts 3 To be performed when the ...

Page 91: ...ts Maintain Maintain according to job card Check function reworking or renewal of parts may be nec essary Change Change lube oil for example E10 E20 E23 E25 E30 E40 E50 E60 E70 Description WC 1x after 50 Oh every 24 hours daily after every 250 Oh after every 500 Oh after every 1 500 Oh after every 3 000 Oh after every 6 000 Oh after every 9 000 Oh after every 18 000 Oh x Visual inspection of the s...

Page 92: ...enew injection pump drive W 7 4 7 x Check pistons piston bolt piston rings W 2 9 3 x Renew pistons piston bolt piston rings W 2 9 3 x x Water cooled exhaust pipe check liquid chambers 5 W 6 1 3 x x Check solid insulation 5 W 6 1 4 x x Renew fabric mat insulation of the turbocharger 5 W 6 6 3 x x Clean the lube oil cooler W 8 8 2 x x Renew the oil pressure control valve W 8 11 3 x x Renew the bypas...

Page 93: ...intermediate gear wheels and bearing bush of the coolant pump W 9 7 5 x Check lube oil pump W 8 4 5 x Renew cooler cap x Renew crankshaft sealing ring drive side W 2 2 2 x Renew crankshaft sealing ring free side W 2 2 4 x Overhaul starter ME x Check solenoid valve s ME x Electric sensors solenoids ME Other connected parts ME E10 E20 E23 E25 E30 E40 E50 E60 E70 Description WC 1x after 50 Oh every 2...

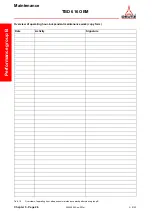
Page 94: ...n 00 fm 0103 Maintenance TBD 616 OEM Overview of operating hour independent maintenance work copy form Tab 10 Overview of operating hour independent maintenance work performance group A2 Date Activity Signature Performance group A2 ...

Page 95: ...ignature E10 E23 E25 E30 E40 E50 E60 E70 50 1 250 1 500 1 750 2 1 000 2 1 250 3 1 500 1 1 750 4 2 000 3 2 250 5 2 500 4 2 750 6 3 000 1 3 250 7 3 500 5 3 750 8 4 000 6 4 250 9 4 500 2 4 750 10 5 000 7 5 250 11 5 500 8 5 750 12 6 000 1 6 250 13 6 500 9 6 750 14 7 000 10 7 250 15 7 500 3 7 750 16 8 000 11 8 250 17 8 500 12 8 750 18 9 000 1 9 050 2 9 250 19 9 500 13 Performance group A2 ...

Page 96: ...25 12 500 17 12 750 26 13 000 18 13 250 27 13 500 5 13 750 28 14 000 19 14 250 29 14 500 20 14 750 30 15 000 2 15 250 31 15 500 21 15 750 32 16 000 22 16 250 33 16 500 6 16 750 34 17 000 23 17 250 35 17 500 24 17 750 36 18 000 1 Number of Deutz maintenance and service schedules up to and including complete overhaul Total 2 36 24 6 2 2 1 1 hours Deutz maintenance and service schedule Date Signature...

Page 97: ...ate Tab 12 Deutz maintenance and service schedules in performance group B This maintenance schedule is valid for the following performance code and maximum speed embossed on the rating plate IFN max 1 500 min 1 IN variable operation max 1 800 min 1 Type of application Electricity generator units depending on design as double frequency systems E10 Routine Mainte nance E20 Visual inspection E23 Main...

Page 98: ...of corrosion protection agent or antifreeze in the cool ant 6 B 9 1 1 x Lube oil change 4 engine without centrifugal lube oil filter B 8 1 2 x Lube oil change 5 engine with centrifugal lube oil filter B 8 1 2 x Maintain the centrifugal lube oil filter 4 B 8 13 1 x Renew the coolant 6 B 9 1 2 1 To be executed by maintenance officer 2 To be performed by authorized experts 3 To be performed when the ...

Page 99: ...ps rework or renew parts Maintain Maintain according to job card Check function reworking or renewal of parts may be nec essary Change Change lube oil for example E10 E20 E23 E25 E30 E40 E60 E70 Description WC 1x after 50 Oh every 24 hours daily after every 250 Oh after every 500 Oh after every 1 500 Oh after every 3 000 Oh after every 6 000 Oh after every 12 000 Oh x Visual inspection of the syst...

Page 100: ... pump drive W 7 4 7 x Check pistons piston bolt piston rings W 2 9 3 x Renew pistons piston bolt piston rings W 2 9 3 x x Water cooled exhaust pipe check liquid chambers 5 W 6 1 3 x x Check solid insulation 5 W 6 1 4 x x Renew fabric mat insulation of the turbocharger 5 W 6 6 3 x x Clean the lube oil cooler W 8 8 2 x x Renew the oil pressure control valve W 8 11 3 x x Renew the bypass valve W 8 11...

Page 101: ...rmediate gear wheels and bearing bush of the coolant pump W 9 7 5 x Check lube oil pump W 8 4 5 x Renew cooler cap x Renew crankshaft sealing ring drive side W 2 2 2 x Renew crankshaft sealing ring free side W 2 2 4 x Overhaul starter ME x Check solenoid valve s ME x Electric sensors solenoids ME Other connected parts ME E10 E20 E23 E25 E30 E40 E60 E70 Description WC 1x after 50 Oh every 24 hours ...

Page 102: ...en 00 fm 0103 Maintenance TBD 616 OEM Overview of operating hour independent maintenance work copy form Tab 15 Overview of operating hour independent maintenance work performance group B Date Activity Signature Performance group B ...

Page 103: ...ignature E10 E23 E25 E30 E40 E50 E60 E70 50 1 250 1 500 1 750 2 1 000 2 1 250 3 1 500 1 1 750 4 2 000 3 2 250 5 2 500 4 2 750 6 3 000 1 3 250 7 3 500 5 3 750 8 4 000 6 4 250 9 4 500 2 4 750 10 5 000 7 5 250 11 5 500 8 5 750 12 6 000 1 6 050 2 6 250 13 6 500 9 6 750 14 7 000 10 7 250 15 7 500 3 7 750 16 8 000 11 8 250 17 8 500 12 8 750 18 9 000 2 9 250 19 9 500 13 Performance group B ...

Page 104: ...rmance group B 9 750 20 10 000 14 10 250 21 10 500 4 10 750 22 11 000 15 11 250 23 11 500 16 11 750 24 12 000 1 Number of Deutz maintenance and service schedules up to and including complete overhaul Total 2 24 16 4 2 1 1 hours Deutz maintenance and service schedule Date Signature E10 E23 E25 E30 E40 E50 E60 E70 Performance group B ...

Page 105: ...e is described in detail in Chapter 2 Rating plate Tab 17 Deutz maintenance and service schedules in performance group C This maintenance schedule is valid for the following performance code and maximum speed embossed on the rating plate IFN max 1 800 min 1 Type of application Electricity generator units depending on design as double frequency systems E10 Routine Main tenance E20 Visual inspection...

Page 106: ... of corrosion protection agent or antifreeze in the cool ant 6 B 9 1 1 x Lube oil change 4 engine without centrifugal lube oil filter B 8 1 2 x Lube oil change 5 engine with centrifugal lube oil filter B 8 1 2 x Maintain the centrifugal lube oil filter 4 B 8 13 1 x Renew the coolant 6 B 9 1 2 1 To be executed by maintenance officer 2 To be performed by authorized experts 3 To be performed when the...

Page 107: ...ul Check function groups rework or renew parts Maintain Maintain according to job card Check function reworking or renewal of parts may be nec essary Change Change lube oil for example E10 E20 E23 E25 E30 E60 E70 Description WC 1x after 50 Oh every 24 hours daily after every 250 Oh after every 500 Oh after every 1 000 Oh after every 3 000 Oh after every 6 000 Oh x Visual inspection of the system B...

Page 108: ...il cooler W 8 8 2 x x Renew the oil pressure control valve W 8 11 3 x x Renew the bypass valve W 8 11 5 x x Renew hose pipes vibration dampers and flexible lines W 0 3 4 x x Renew injection lines W 7 3 3 x x Renew check valve in the leak fuel system W 7 3 5 x x Renew con rod bearing W 2 5 1 x x Check con rod geometry W 2 3 5 x x Overhaul injection pump ME x x Overhaul dynamo ME x x Check coolant c...

Page 109: ...t sealing ring drive side W 2 2 2 x Renew crankshaft sealing ring free side W 2 2 4 x Overhaul starter ME x Check solenoid valve s ME x Electric sensors solenoids ME Other connected parts ME E10 E20 E23 E25 E30 E60 E70 Description WC 1x after 50 Oh every 24 hours daily after every 250 Oh after every 500 Oh after every 1 000 Oh after every 3 000 Oh after every 6 000 Oh 1 Observe the operating media...

Page 110: ...en 00 fm 0103 Maintenance TBD 616 OEM Overview of operating hour independent maintenance work copy form Tab 20 Overview of operating hour independent maintenance work performance group C Date Activity Signature Performance group C ...

Page 111: ...urs Deutz maintenance and service schedule Date Signature E10 E23 E25 E30 E40 E50 E60 E70 50 1 250 1 500 1 750 2 1 000 1 1 250 3 1 500 2 1 750 4 2 000 2 2 250 5 2 500 3 2 750 6 3 000 1 3 050 2 3 250 7 3 500 4 3 750 8 4 000 3 4 250 9 4 500 5 4 750 10 5 000 4 5 250 11 5 500 6 5 750 12 6 000 1 Number of Deutz maintenance and service schedules up to and including complete overhaul Total 2 12 6 4 1 1 P...

Page 112: ...Chapter 5 Page 36 300200043 en 00 fm 0103 Maintenance TBD 616 OEM This page intentionally left blank Performance group C ...

Page 113: ...er 10 x 12 DIN 3110 01154251 3 Spanner 13 x 17 DIN 3110 01154252 4 Spanner 14 x 15 DIN 3110 01154254 5 Spanner 19 x 22 DIN 3110 01151243 6 Socket 13 x 12 5 DIN 3124 01152880 7 Socket 15 x 12 5 DIN 3124 01151245 8 Socket 17 x 12 5 DIN 3124 01151246 9 Socket 19 x 12 5 DIN 3124 07109772 10 Socket 22 x 12 5 DIN 3124 07109773 11 Socket 24 x 12 5 DIN 3124 01152882 12 Socket 27 x 12 5 DIN 3124 01152906 1...

Page 114: ...IN 3124 01151246 10 Socket 19 x 12 5 DIN 3124 07109772 11 Socket 22 x 12 5 DIN 3124 07109773 12 Socket 24 x 12 5 DIN 3124 01152882 13 Socket 27 x 12 5 DIN 3124 01152905 14 T handle A 12 5 DIN 3122 01104327 15 Extension B 12 5 x 125 DIN 3123 01102415 16 Extension B 12 5 x 250 DIN 3123 01154232 17 Universal joint C 12 5 DIN 3123 12030362 18 Ratchet head square 2 5 0 400 Nm 12158146 19 Tubular handle...

Page 115: ...supplement I Order no Description 12044577 Nozzle tester Containing Illustration Tool kit supplement II Order no Description 12163078 Tool case complete 12311004 1 Tool case empty 12157944 2 Acid tester for battery 12158292 3 Lab case for coolant 12158153 4 Strip key for filter cartridges 01153425 5 Square key double filter switching ...

Page 116: ...M Containing Illustration Turning device Order no Description 12276678 Turning gear complete 12276679 1 Bolts 12276680 2 Guide 12212624 3 Pressure spring 12212379 4 Rack 01154439 5 Washer 01112416 6 Hexagon head screw 12276700 7 Screw clamp 01009670 8 Locking agent ...

Page 117: ...EM Containing Illustration V belt tension measuring instrument Description Tension measuring instrument measuring range 150 600 N Wilbär article number 8115 The V belt tension measuring instrument should be ordered directly from Wilbär Postfach 140580 42826 Remscheid ...

Page 118: ...Chapter 5 Page 42 300200043 en 00 fm 0103 Maintenance TBD 616 OEM This page intentionally left blank ...

Page 119: ...ling the groove nut in the cylinder head protective tube 12158242 12 Pliers for installing the piston in the cylinder liner 12158170 13 Pliers for assembling the piston rings on the piston 01153018 14 Pliers for removing and installing the piston bolt circlips 12153474 15 Compression gauge complete 12313141 16 Connection adapter for the compression gauge 12153475 17 Writing discs for the compressi...

Page 120: ...Chapter 5 Page 2 300200042 en 00 fm 0103 Maintenance TBD 616 OEM This page intentionally left blank ...

Page 121: ...re listed The causes of the faults are listed in ascending order of effort required to localise them The specified job cards contain troubleshooting instructions Please note that the work described in the workshop manual assumes a higher level of qualifi cation of personnel and appropriate training and knowledge Please contact your DEUTZ Service if in doubt Fault table ...

Page 122: ...h Possible causes Start switch of monitor defective Monitor has responded Battery discharged Control current missing at starter Air in fuel system Dirty fuel filter Fuel pump worn defective Controller system defective Start of pumping not right Fuel tap closed no fuel Charge pressure too low Deviation in exhaust gas temperature or ignition pres sure Injection pump defective Defect in valve drive D...

Page 123: ...UTZ Service B 7 10 4 Renewing the fuel filter cartridge B 7 10 1 Maintaining the fuel double filter Workshop Manual DEUTZ Service DEUTZ Service Workshop Manual DEUTZ Service Workshop Manual DEUTZ Service Workshop Manual DEUTZ Service B 7 7 3 Checking the injection valve B 6 3 6 Renewing the suction air intake filter Chapter 4 Expendables Workshop Manual DEUTZ Service Workshop Manual DEUTZ Service ...

Page 124: ...Chapter 6 Page 4 300200044 en 00 fm 0103 Troubleshooting TBD 616 OEM This page intentionally left blank ...

Page 125: ... 0303 300200057 en 00 fm Chapter 7 Page 1 7 Conservation Medium sized and large engines 7 Conservation Conservation see Technical Circular TR 0199 99 2116 ...

Page 126: ...Chapter 7 Page 2 300200057 en 00 fm 0303 Conservation Medium sized and large engines This page intentionally left blank ...

Page 127: ...nders 8 12 16 Bore mm 132 132 132 Stroke mm 160 160 160 Capacity per cylinder dm3 2 19 2 19 2 19 Total displacement dm3 17 52 26 28 35 04 Direction of rotation viewing from the drive side counterclockwise Compression ratio 15 1 15 1 15 1 Speed governing system electronic GAC analog or EMR2 Injection valve 8 jet multi hole nozzle V8 V12 V16 Valve clearance with cold engine Inlet Outlet mm mm 0 3 0 ...

Page 128: ...lever block kg 1 2 1 2 1 2 Piston with ring and bolt kg 4 1 4 1 4 1 Connecting rod kg 3 8 3 8 3 8 Camshaft with gear wheel kg 20 33 46 Crankshaft with counterweights and gear wheels kg 126 5 190 228 Oil pan kg 32 7 42 5 55 Front face cover kg 48 2 48 2 48 2 Read face cover kg 31 9 31 9 31 9 Flywheel housing kg 75 7 75 7 75 7 Charge air cooler housing kg 4 8 4 8 4 8 Injection pump drive assembled k...

Page 129: ...ng dm3 52 54 75 Coolant content in the engine without cooling system dm3 60 80 110 V8 V12 V16 Coolant temperature inlet charge air cooler C 25 25 25 Coolant temperature outlet engine C 70 to 95 70 to 95 70 to 95 Max lube oil temperature C 120 120 120 Max aspiration air temperature without reduction in performance at relative humidity of 30 C 25 25 25 V8 V12 V16 Lube oil pressure after lube oil fil...

Page 130: ...Chapter 8 Page 4 300200046 en 00 fm 0103 Technical particulars TBD 616 OEM This page intentionally left blank ...

Page 131: ...he sealing disc Tighten the fastening screws in three stages 21 1 Injection lines to injection pump Sleeve nut M14 x 1 5 20 5 Nm 21 2 Injection lines to injection valve Sleeve nut M14 x 1 5 20 5 Nm 37 1 V belt tension arm on the carrier Cylinder head screw M14 x 65 10 9 110 10 Nm Note when using a new screw or tension arm all contact surfaces including the thread and the head rest of the clamping ...

Page 132: ...Chapter 8 Page 6 300200069 en 00 fm 0103 Technische Angaben TBD 616 OEM This page intentionally left blank ...

Page 133: ...M6 x 16 10 9 10 Nm Insert and tighten fasten ing screws with Deutz DW 62 Loctite 640 Mark the screws with oil resistant paint after tightening 02 1 Oil pan on crankcase and wheel housing Hexagon head screw M8 x 55 Hexagon head screw M8 x 130 10 9 8 8 20 5 Nm 20 5 Nm Tighten fastening screws after six operating hours or test stand run with 20 5 Nm 05 1 Counterweight on crank shaft Cylinder head scr...

Page 134: ... 110 Cylinder head screw M10 x 75 12 9 12 9 140 5 Nm 80 5 Nm Wet head rests and screw thread drip free with lube oil Mark the screws with oil resistant paint after tightening 08 3 Valve hood on cylinder head Cylinder head screw M8 x 85 12 9 20 5 Nm Insert all cylinder screws with copper ring A8 x 14 08 4 Protective tube with groove nut of the injection nozzle holder on the cylinder head Slotted nu...

Page 135: ...al run check the lube oil filter for leaks and tighten if necessary 16 1 Lube oil suction pipe on lube oil pump Hexagon head screw M10 x 25 Hexagon head screw M8 x 20 8 8 8 8 16 2 Lube oil line on exhaust turbocharger Cylinder head screw M8 x 20 Cylinder head screw M8 x 30 Cylinder head screw M10 x 25 Cylinder head screw M10 x 35 10 9 10 9 10 9 10 9 17 1 Injection pump on crank case Cylinder head ...

Page 136: ...5 Nm Align the end face of the charge air pipe before mounting the charge air cooler 34 1 Vibration damper on the crankshaft Cylinder head screw M16 x 120 surface treated 10 9 250 10 Nm Wet head rests and screw thread with lube oil Mark the screws with oil resist ant paint after tightening Cylinder head screw M16 x 120 surface treated and oil blackened 10 9 310 10 Nm Cylinder head screw M16 x 100 ...

Page 137: ... screw M12 x 55 Cylinder head screw M12 x 60 Cylinder head screw M12 x 85 Hexagon head screw M12 x 125 Cylinder head screw M8 x 50 Cylinder head screw M8 x 85 12 9 12 9 12 9 10 9 12 9 12 9 140 5 Nm 140 5 Nm 140 5 Nm 115 5 Nm 40 5 Nm 40 5 Nm Code no Screw connection Type and dimension Strength Tightening value Important notes ...

Page 138: ...Chapter 8 Page 6 300200137 en 00 fm 0103 Technische Angaben TBD 616 OEM ...

Page 139: ...rds in order to designate information not relating directly to the actual work sequence involved Tools The tools normally required are listed against this symbol Equipment Things like pressure gauges lube oil and hydraulic oil Spare parts Seals locking parts etc Cross references Documents reports or Job Cards to which reference is made in the Job Card concerned ...

Page 140: ... 16 Removing and installing the injection valve B 7 7 1 Checking the injection valve B 7 7 3 Maintaining the fuel double filter B 7 10 1 Renewing the fuel filter cartridge B 7 10 4 Changing the lube oil B 8 1 2 Renew the lube oil filter cartridge B 8 10 4 Maintaining the centrifugal lube oil filter B 8 13 1 Emptying and filling the cooling system B 9 0 4 Checking corrosion protection agent or anti...

Page 141: ...ch B 7 7 1 Removing and installing the injection valve B 7 7 3 Checking the injection valve B 7 10 1 Maintaining the fuel double filter B 7 10 4 Renewing the fuel filter cartridge B 8 1 2 Changing the lube oil B 8 10 4 Renew the lube oil filter cartridge B 8 13 1 Maintaining the centrifugal lube oil filter B 9 0 4 Emptying and filling the cooling system B 9 1 1 Checking corrosion protection agent ...

Page 142: ...Chapter 9 Page 4 300200038 en 00EAL fm 0303 Job Cards TBD 616 OEM This page intentionally left blank ...

Page 143: ...by an engine fire the material decomposes and forms caustic acids The residue is tacky and black in appearance Proceed as follows if high temperatures have caused damage to gaskets or round sealing rings Check all gaskets which have suffered from the heat visually Wear gloves neoprene Remove all residue material and dispose of it see also Chapter 1 Rules for disposal Destroy clothing which has bee...

Page 144: ...Page 2 300200014 en 00 fm 0303 B 0 0 3 Medium sized and large engines This page intentionally left blank ...

Page 145: ... Disconnect the battery ground and remove and stow away the battery safely if necessary Pull out the plugs of electrical and electronic components e g TEM switch cabinet MKS junction box EMR 2 control unit ignition system sensors Sensitive parts in the immediate vicinity of the welding point e g control units ignition system sensors cables must be removed after unplugging Always connect the ground...

Page 146: ...rial Seal openings in the engine Seal off and cover openings to other work areas Keep a sufficient number of fire extinguishers close by Danger of explosion Shut off gas pipes and fuel pipes Work which could lead to a strong development of heat on gas or fuel pipes and vessels may only be carried out when these have been com pletely emptied and bled or flushed Health hazard Air well suck off fumes...

Page 147: ...erwise switch on manually Pre lubrication time Pre lubricate for at least 10 minutes after changing the lube oil Pre lubricate for at least 10 minutes after an engine standstill of 3 hours Pre lubricate for at least 2 minutes after an engine standstill of 3 hours Check the lube oil level again fill up to the top mark if necessary Wait until the pre lubrication is complete Mechanical pre lubricatio...

Page 148: ...unning for about another five minutes at increased idling speed Switch off engine Switch off the engine Check over the system visually see job card B 0 1 5 Visual inspection of the system During the entire engine run the operating values should be tracked via the engine control system and compared with the values in the acceptance test report or commissioning log If values are outside the permissi...

Page 149: ... damage and renew if necessary Close the coolant cap Coolant circuit Check for leaks hoses hose clips pipe unions flanges compensators and other components connected with the cooling system If leaks are discovered during the inspection these must be eliminated imme diately Tools Normal tools References Commissioning log Chapter 4 Expendables B 3 1 9 Racor Crankcase Ventilation System Service B 6 3...

Page 150: ...Lube oil system Check the lube oil level in the oil pan Pull out the dipstick and check the lube oil level If the bottom limit is reached Min top up lube oil according to Chapter 4 Expendables up to the upper limit Max Figure 1 Dipstick Danger of burst ...

Page 151: ... discovered during the inspection these must be eliminated imme diately All other operating values of the lube oil system must be checked by the MKS in connection with the values in the acceptance test report or com missioning log Start system If the engine is equipped with a compressed air starter the compressed air bottle must be drained of water and filled see work card B 10 7 1 Draining water ...

Page 152: ...onded the suction air intake filter must be renewed see work card B 6 3 6 Renewing the suction air intake filter Crankcase bleed valve Check the maintenance indicator 1 of the crankcase bleed valve visually If this has responded the crankcase bleed valve must be serviced see work card B 3 1 9 Racor Crankcase Ventilation System Service Figure 3 Maintenance indicator suction air intake filter 25885 ...

Page 153: ... documents Engine Check the engine for smooth running and noise If the engine is not run ning smoothly or abnormal noise can be heard the causes must be elimi nated immediately Engine Monitoring System The operating values should be taken from the engine monitoring system and compared with the values in the acceptance test report or commis sioning log If values are out of tolerance find the cause ...

Page 154: ...Page 6 300200048 en 00 fm 0303 B 0 1 5 TBD 616 OEM This page intentionally left blank ...

Page 155: ...t pipes Cover the air filter water tight If the air filters are removed seal the inlets water tight Cover electric components such as three phase current generators and starter Auxiliary equipment Cleaning agents Compressed air Stoppers Covers Cross references Chapter 4 Auxiliary materials Carry out this work only when the engine has been shut down Wear protective goggles and gloves Care for suffi...

Page 156: ...covers from the sensitive batteries Dry the exhaust pipe heat shields and remove Fit protective covers after cleaning separately Install filters if they were removed Connect the battery When working with high pressure cleaning systems sensitive parts such as filters rubber bushes sealing rings and cables could be damaged These should therefore never be cleaned with high pressure cleaning systems J...

Page 157: ...heck the valve clearance of cylinder A1 with a feeler gauge The feeler gauge must slip between the valve bridge and the toggle lever 8 with low resistance The valve clearance must be reset in case of deviations If a large valve clearance was determined this is due to wear in the valve drive Depending on the difference between the actual value and the nominal value the valve clearance curve of the ...

Page 158: ...30 3 Nm Hold with a size 17 open ended wrench at pos 10 Check the clearance compensation again Loosen lock nut 3 Set the setting screw 4 with a screwdriver until correct valve clearance is reached the feeler gauge must be movable against the suction Tighten lock nut 3 tightening torque 30 3 Nm Check the valve clearance again Check the gasket of the cylinder head hood and renew if necessary Fit the...

Page 159: ...art of first crankshaft rotation 3 Start of 2nd crankshaft rotation Bring valves to overlap one after another according to the ignition order Start with cylinder A4 Ignition dead point A1 B2 A3 B1 A4 B3 A2 B4 Overlapping A4 B3 A2 B4 A1 B2 A3 B1 Figure 2 8 cylinder engine B1 B2 A2 B3 A3 B4 A4 B1 A1 B2 A2 B3 A3 B4 A1 A4 1 3 2 ...

Page 160: ...rotation 3 Start of 2nd crankshaft rotation Bring valves to overlap one after another according to the ignition order Start with cylinder A6 Ignition dead point A1 B5 A5 B3 A3 B6 A6 B2 A2 B4 A4 B1 Overlapping A6 B2 A2 B4 A4 B1 A1 B5 A5 B3 A3 B6 Figure 3 12 cylinder engine B1 B2 A2 B3 A3 B4 A4 B5 A5 B6 A6 B1 A1 B2 A2 B3 A3 B4 A4 B5 A5 B6 A1 A6 1 3 2 ...

Page 161: ... crankshaft rotation Bring valves to overlap one after another according to the ignition order Start with cylinder A8 Ignition dead point A1 B3 A3 B7 A7 B5 A5 B8 A8 B6 A6 B2 A2 B4 A4 B1 Overlapping A8 B6 A6 B2 A2 B4 A4 B1 A1 B3 A3 B7 A7 B5 A5 B8 Figure 4 16 cylinder engine B1 B2 A2 B3 A3 B4 A4 B5 A5 B6 A6 B7 A7 B8 A8 B1 A1 B2 A2 B3 A3 B4 A4 B5 A5 B6 A6 B7 A7 B8 1 2 3 A1 A8 ...

Page 162: ...ce actual values table of cylinder series B The total adjustment time can be determined by the actual value data This can tell you something about the previous wear in the valve drive Cylinder A1 A2 A3 A4 A5 A6 A7 A8 A9 A10 Valve I A I A I A I A I A I A I A I A I A I A OH Date Cylinder B1 B2 B3 B4 B5 B6 B7 B8 B9 B10 Valve I A I A I A I A I A I A I A I A I A I A OH Date ...

Page 163: ...e currently used on the 632 model series Washing out and re using the filter element is not permitted Service filter Release the four locks 2 of the filter Carefully remove container 4 down wards Pull filter element 5 from upper section of filter 3 Remove base insert 8 from container 4 do a visual check and replace it if necessary If a base insert is not fitted this must be retrofitted Check the b...

Page 164: ...r element 5 together with new O ring 6 into the opening of the upper section of the filter 3 Insert base 8 into container 4 ensuring that it matches the shape of the container Wet the new filter element with lub oil Put container 4 back in position and fasten with the four locks 2 Check the position of the flexible drain hose This must not chafe on other components and must be a sufficient distanc...

Page 165: ...let that ends below the oil level submerged pipe Before operating for the first time the siphon trap must be filled with oil Where there are separate collectors with submerged pipes a check must be made to ensure that the pipe is actually below the oil level If necessary top up the oil in the collector until there is a sufficient amount Resetting the main tenance indicator Unscrew cap of maintenan...

Page 166: ...Page 4 300200019 en 00 fm 0303 B 3 1 9 Medium sized and large engines This page intentionally left blank ...

Page 167: ...take filters Renewing the suc tion air intake filter Loosen wing nuts 1 and remove the cover from the housing Unscrew the suction air intake filter fastening screw 2 and remove the suc tion air intake filter Clean the housing Insert and fasten the new suction air intake filter in the housing Place the cover on the housing and tighten the wing nuts 1 Tools Normal tools Spares Suction air intake fil...

Page 168: ...Page Page 2 300200050 en 00 fm 0303 B 6 3 6 TBD 616 OEM Figure 2 Fastening suction air intake filter ...

Page 169: ...es Loosen the hose clip 1 Tools Normal tools Key wrench for injection lines order no 0704 1395 Auxiliary material Cleaning cloth Carry out this work only when the engine has been shut down Before dismantling shut off the fuel feed and secure engine against start up Figure 1 Connection air filter housing to air intake manifold ...

Page 170: ...m 0303 B 7 3 1 TBD 616 OEM Remove the fastening screws 2 of the air filter housing and remove the air filter housing Remove V belt clip 4 of the charge air pipe Figure 2 Fastening air filter housing Figure 3 Charge air pipe removal ...

Page 171: ...e 3 B 7 3 1 Remove fastening screws 5 and pull out the charge air pipe in the direc tion of the arrow Remove the fastening screws 6 and remove the air filter housing carrier Figure 4 Holders charge air pipe Figure 5 Charge air pipe plug in system ...

Page 172: ...mplete line bundle 1 Install injection lines Fit new rubber seals to the injection lines 2 Fit new line bundle 1 as described above Turn the locknuts of the line bundles hand tight and tighten with wrench with 20 5 Nm Mount the injection lines additional holder Check all screw connections of the injection lines on the injection pump and injection valves for leaks with the engine running adjust the...

Page 173: ...en the fastening screws 6 Coat the new sealing rings of the charge air pipe with vaseline Insert the charge air pipe in the direction of the arrow When installing make sure that the sealing rings are not damaged Tighten fastening screws 5 Figure 7 Holders charge air pipe Figure 8 Charge air pipe plug in system ...

Page 174: ...00051 en 00 fm 0303 B 7 3 1 TBD 616 OEM Install V belt clip 4 of the charge air pipe Fit air filter housing and tighten the fastening screws 2 Figure 9 Charge air pipe installation Figure 10 Fastening air filter housing ...

Page 175: ...TBD 616 OEM 0303 300200051 en 00 fm Seite Page 7 B 7 3 1 Mount the hose clip 1 Figure 11 Connection air filter housing to air intake manifold ...

Page 176: ...Seite Page 8 300200051 en 00 fm 0303 B 7 3 1 TBD 616 OEM This page intentionally left blank ...

Page 177: ...e arched denture clutch 1 It should be noted that grease will be flung aside by the centrifugal force If grease has leaked from the arched denture clutch check this see job card W 7 4 9 Auxiliary material Lamp References W 7 4 9 Check arched denture clutch and change grease filling Carry out this work only when the engine has been shut down Figure 1 Arched denture clutch ...

Page 178: ...Seite Page 2 300200052 en 00 fm 0303 B 7 4 16 TBD 616 OEM This page intentionally left blank ...

Page 179: ...socket head screw 2 and remove sleeve 1 with injec tion valve Tools Normal tools Turning gear order no 12276678 Socket wrench order no 07041395 Spares Sealing rings References B 7 3 1 Removing and installing injection lines Particles of dirt can cause injury when cleaning with compressed air Wear goggles and tight fitting clothing The engine may only be turned in the direction of rotation Turning ...

Page 180: ...Page Page 2 300200142 en 00 fm 0303 B 7 7 1 TBD 616 OEM Pull the injection valve out of the sleeve Figure 1 Removal of the injection valve sleeve ...

Page 181: ... rings with DEUTZ S4 lubricant Install the injection valve carefully in the sleeve Do not damage round sealing ring Renew the lower sealing ring Install sleeve 1 with injection valve Tighten fastening screws 2 Tightening torque 1st step hand tight 2nd step 15 Nm 3rd step 20 Nm Figure 2 Round sealing rings Pay attention to the toggle lever and valve bridges 6 so that the round sealing rings of the ...

Page 182: ...state again Attach cylinder head cover Check the sealing rings of the fastening screws renew if necessary Tighten the fastening screws Tightening torque 20 5 Nm Connect the injection lines see job card B 7 3 1 Removing and installing injection lines Figure 3 Installation of the injection valve sleeve ...

Page 183: ...the removed state Determine the injection pressure during slow pumping If the pressure deviates from the setpoint the nozzle must be adjusted see job card W 7 7 4 Removing installing renewing the injection nozzle Removing the nozzle tester Connect the injection lines see job card B 7 3 1 Removing and installing injection lines Tools Normal tools Nozzle tester order no 12044577 Auxiliary material T...

Page 184: ...shape A buzz must be audible during injec tion The nozzle must be renewed if the injection is not perfect see job card W 7 7 4 Removing installing renewing the injection nozzle Determine the injection pressure during slow pumping If the pressure deviates from the setpoint the nozzle must be adjusted see job card W 7 7 4 Removing installing renewing the injection nozzle Install injection valves see...

Page 185: ...e filter housing 2 Clean filter housing 2 with fuel Clean any dirt from the filter carrier sealing surface Wet new gaskets slightly with fuel Insert filter cartridge in the filter housing 2 Mount the filter housing 2 on the filter carrier and tighten the fastening screws 2 Bleed the fuel system through the bleed valve arrow Check the fuel double filter for leaks Tools Normal tools Auxiliary materi...

Page 186: ... closed Tap adjustment 2 both filters open Tap adjustment 3 right filter closed Unscrew wing nuts 1 and remove cover 2 be careful with the gasket Turn the filter circuit to the desired setting Loosen the middle screws 3 and remove the cover 4 Drain fuel from the side of the filter Only switch off the appropriate filter when renewing it Leave both filters switched on in normal operation Figure 2 Ta...

Page 187: ...in the housing and replace the covers in reverse order be careful with the gaskets Open the bleeding screws 8 and run the hand pump until fuel emerges without air bubbles Close the bleeding screws 8 again whilst continuing pumping Drain surplus fuel from the side Set the tap on both filters to open Check the filters for leaks during operation Figure 4 Middle screws and cover Figure 5 Filter cartri...

Page 188: ...Page Page 4 300200054 en 00 fm 0303 B 7 10 1 TBD 616 OEM Fit cover 2 be careful with the gasket Screw in wing nuts 1 Figure 6 Fuel filter cap 1 2 ...

Page 189: ...r sealing surface Wet the sealing ring of the new fuel filter cartridge 2 slightly with fuel Manually screw in the fuel filter cartridge 2 until the gasket is flush Tighten the fuel filter cartridge by hand Bleed the fuel system through bleed valve 1 and the fuel hand pump Check the fuel filter cartridge 2 for leaks Tools Normal tools Strip key order no 12158153 Auxiliary material Fuel collector t...

Page 190: ...Page Page 2 300200060 en 00 fm 0303 B 7 10 4 TBD 616 OEM This page intentionally left blank ...

Page 191: ...ste oil Spares lube oil Sealing rings References B 8 10 4 Renew the lube oil filter cartridge Chapter 4 Expendables Carry out this work only when the engine has been shut down When draining off hot lube oil Risk of scalding Collect the used oil do not allow it to seep into the soil Dispose of in accordance with the relevant regulations ...

Page 192: ...prox 80 C Switch off the engine Place lube oil tray under the engine Unscrew all the lube oil drain screws Drain lube oil Replace lube oil filter cartridge see job card B 8 10 4 Renew the lube oil filter cartridge Fit lube oil drain screws with new sealing ring Figure 1 Lube oil temperature Figure 2 Lube oil drain ...

Page 193: ...r in lube oil Pour in lube oil according to the filling system For grade viscosity see Chapter 4 Expendables Start the engine and run at low speed Switch off engine Check the lube oil level Refill lube oil up to the top mark if necessary Figure 3 Dipstick ...

Page 194: ...Page 4 300200055 en 00 fm 0303 B 8 1 2 TBD 616 OEM This page intentionally left blank ...

Page 195: ...ip key unscrew and drain oil Catch any escaping lube oil Tools Strip key order no 12158153 Auxiliary material Lube oil collecting tray Spares Lube oil filter cartridge When draining off hot lube oil Risk of scalding Collect the used oil do not allow it to seep into the soil Dispose of in accordance with the relevant regulations 80684 Figure 1 Lube oil filter cartridge 3 4 ...

Page 196: ...0 4 TBD 616 OEM When unscrewing the lube oil filter cartridge 4 fine plastic chips are produced when the catch is released These chips do not get into the lube oil system and pose no danger Figure 2 Removing the lube oil filter cartridge ...

Page 197: ...gasket of the new lube oil filter cartridge Manually screw in the new cartridge until the gasket is flush Tighten the lube oil filter cartridge tightening torque 25 2 Nm Check the lube oil level Check the lube oil pressure Check the lube oil filter cartridge for leaks Figure 3 Removing the lube oil filter cartridge Figure 4 Removing the lube oil filter cartridge ...

Page 198: ...Page 4 300200056 en 00 fm 0303 B 8 10 4 TBD 616 OEM This page intentionally left blank ...

Page 199: ...rifugal lube oil filter Clean individual parts with compressed air or a hard brush Assemble the centrifugal lube oil filter Insert the new paper sleeve 4 in the bottom part of the rotor Assemble the rotor 3 Insert rotor 3 and mount housing cover 2 Fit V belt clip 1 Check for leaks Tools Normal tools Hard brush Wooden scraper Ensure absolute cleanliness Carry out this work only when the engine has ...

Page 200: ...Page 2 300200133 en 00 fm 0303 B 8 13 1 TBD 616 OEM Figure 1 Centrifugal lube oil filter lock with V belt clip ...

Page 201: ...t floor height of the rotor bottom part 7 Remove the paper sleeve 4 with layer of dirt Clean the centrifugal lube oil filter Clean sieves 5 stand pipe 6 and nozzles 8 with compressed air or hard brush Assemble the centrifugal lube oil filter Insert new paper sleeve 4 in the bottom rotor part 7 Assembly the rotor Insert the rotor and housing cover and tighten with the hinged screws Check for leaks ...

Page 202: ...Page 4 300200133 en 00 fm 0303 B 8 13 1 TBD 616 OEM Figure 2 Centrifugal lube oil filter lock with hinged screws ...

Page 203: ...t The engine must also be pre served see Chapter 7 Conservation For engine side designations see Chapter 2 Designation of the engine sides cylinder and direction of rotation Tools Normal tools Auxiliary material Collecting vessel for cooling fluid Spares Seals References Chapter 4 Expendables Chapter 7 Conservation B 0 1 4 Test run Carry out this work only when the engine has been shut down Secure...

Page 204: ...e cooling system marked by arrows in the figures A collecting vessel must be placed underneath the appropriate points Loosen the pre heater drain screw if installed Open the drain screw on the coolant pipe arrow Open the drain screw on the coolant pump arrow Figure 1 Coolant pipe on the damper side free side Figure 2 Coolant pump on the damper side free side ...

Page 205: ...0036 en 00 fm Page 3 B 9 0 4 Open the drain screw on the coolant pump arrow Open the drain tap on the crankcase arrow Figure 3 Coolant pump on the damper side free side Figure 4 Crankcase on the cylinder row A left hand side ...

Page 206: ...616 OEM Open the drain tap on the crankcase arrow 8 and 12 cylinder engines only Open the drain screw on the charge air cooler arrow Figure 5 Crankcase on the cylinder row B right hand side Figure 6 Charge air cooler on the damper side free side ...

Page 207: ... charge air cooler arrow Open the drain screw on the lube oil heat exchanger arrow Then close all open drain points Use new sealing rings for screw caps Figure 7 Charge air cooler on the damper side free side Figure 8 Lube oil heat exchanger on the cylinder row B right hand side ...

Page 208: ...e bleed ing valve without bubbles Seal the engine bleeding screw arrow with a new sealing ring The filled cooling system does not bleed automatically depending on the structure of the external cooling system It may be necessary to remove the highest coolant hose until the coolant emerges without bubbles Col lect the emerging coolant Observe the necessary quality of the operating media according to...

Page 209: ...system structure Pipes connecting elements and engine must be checked for leaks after filling and repaired if necessary Make a test run see job card B 0 1 4 Test run Check the coolant after shutting off the engine and refill if necessary The cooling system is under pressure danger of scalding Figure 10 Coolant level in the compensation tank cooler example ...

Page 210: ...Page 8 300200036 en 00 fm 0303 B 9 0 4 TBD 616 OEM This page intentionally left blank ...

Page 211: ...ection agent in the coolant must be measured Then the coolant should be corrected according to the following description Check the corrosion protection agent and antifreeze percent age Remove the coolant sample from the cooler compensation tank or drain ing tap Check the percentage additive with the measuring instrument Setpoint according to Chapter 4 Expendables Correct the corro sion protection ...

Page 212: ...Page 2 300200029 en 00 fm 0303 B 9 1 1 Diesel Engines This page intentionally left blank ...

Page 213: ...must be prepared before pouring it in see Chapter 4 Expendables and job card B 9 1 1 Checking corrosion protection agent or antifreeze in coolant For emptying and filling the cooling system see job card B 9 0 4 Emptying and filling the cooling system Tools Normal tools Auxiliary material Collecting vessel for cooling fluid Spares Seals References Chapter 4 Expendables B 9 0 4 Emptying and filling ...

Page 214: ...Page Page 2 300200059 en 00 fm 0303 B 9 1 2 TBD 616 OEM This page intentionally left blank ...

Page 215: ...D 616 OEM 0303 300200125 en 00 fm Page 1 B 9 7 11 B 9 7 11 Check coolant pump Check The coolant pump must be repaired or renewed when coolant leaks from the inspection hole arrow Figure 1 Inspection hole ...

Page 216: ...Page 2 300200125 en 00 fm 0303 B 9 7 11 TBD 616 OEM This page intentionally left blank ...

Page 217: ...e 1 B 9 7 12 B 9 7 12 Checking the coolant pump 2nd cooling circuit Check The coolant pump must be renewed when shaft 8 of the coolant pump has a tangible bearing clearance or coolant leaks from the inspection hole 9 Figure 1 Inspection hole ...

Page 218: ...Page 2 300200126 en 00 fm 0303 B 9 7 12 TBD 616 OEM This page intentionally left blank ...

Page 219: ...le to 30 bar every time before switching off the engine Tools Standard tools Do not open the drain cock too far because water is displaced if the flow speed is too great and only air escapes A riser 2 is installed on vertically erected air bottles The air pressure in the air bottle presses the water through out through the riser into the open If no water emerges for several maintenance periods hav...

Page 220: ...Page 2 300201033 en 00 fm 0503 B 10 7 1 Medium sized and large engines This page intentionally left blank ...

Page 221: ...nterrupts the fuel flow to the injection pump as soon as it is triggered Check the solenoid valve Check the solenoid valve Switch off the engine Press the emergency stop switch The solenoid valve 1 must be released when the emergency stop switch is pressed A clicking must be audible If the solenoid valve 1 has not released the cause must be found and eliminated Carry out this work only when the en...

Page 222: ...Page 2 300200061 en 00 fm 0303 B 11 0 1 TBD 616 OEM This page intentionally left blank ...

Page 223: ...ction in the control devices The control devices may be damaged by reverse polarity Sensors and actuators may not be connected to or between external power sources neither for inspection or test purposes alone but only in connection with the EMR2 otherwise there is a danger of damage or destruction The connections of the control devices are only dustproof and waterproof when the mating plug is plu...

Page 224: ...Page 2 300201137 en 00 fm 0303 B 11 0 2 Dieselmotoren This page intentionally left blank ...

Page 225: ...rror i e it flashes or lights steadily Press the diagnosis key for the time period from 1 s to 3 s The EMR2 detects the read request and starts to display the fault see Flash ing code overview It is only possible to read out the fault flashing code after the fault lamp goes out or after the initialization phase of the operating program This means that the fault lamp may also light steadily after s...

Page 226: ...etection of the EMR2 2x short flash Output of the flashing sequence of the first saved fault Example fault number 01 speed sensor 1 c After 2 s 1x long d After 2 s 1x short After fault code output e 5 s pause then display of flashing or steady light a The fault lamp signals an error i e it flashes or lights steadily Press diagnosis key 1 to 3 s Flashing light or steady light of the fault lamp goes...

Page 227: ...n only be deleted with SERDIA Below the steps for deleting the fault memory 1 Figure 2 Delete fault memory 1 a Press and hold diagnosis key b Switch on the ignition c Release the diagnosis key while the fault lamp is alight duration 2 s d All passive faults are deleted in the fault memory 1 e The deletion process is confirmed by three short flashing pulses On Off Time b On Off Time Diagnosis key F...

Page 228: ...r in emergency mode see system description EMR2 chapter 4 15 Check cable connection and tachometer replaceif necessary 04 Overspeed Shutdown 2 1 4 Speed was is above the over speed limit Engine stop see system description EMR2 chapter 4 3 3 Check parameter 21 Check speed setting Check PID setting Check linkage Check actuator change if necessary Check cable to the actuator Check speed sensor pulses...

Page 229: ...function is active See system description of EMR2 chapter 4 3 3 Overspeed protection Check parameter 21 Check speed setting Check PID setting Check linkage Check actuator change if necessary Check cable to the actuator Check speed sensor pulses for wrong speed Check number of teeth Check vehicles for possible linear drive 36 Fuel temperature warning 2 3 7 Fuel temperature has exceeded the warning ...

Page 230: ...n actuator reference values Engine stop start block Controller cannot be started EDC actuator calibration necessary see system description EMR2 chapter 8 4 Check actuator replace if necessary check feedback cable Check power supply cable Check fault limits and reference values of the feedback Program fault limits for feedback save values switch ignition off and back on Check again Inform DEUTZ Ser...

Page 231: ...ch ignition off and back on Check again Inform DEUTZ Service in case of error Hardwa re control device 80 Power supply actuator 2 9 1 Power supply for controller not in permissible range Fault message disappears when current is back in normal range Switch ignition off and back on Check again Inform DEUTZ Service in case of error 83 Reference voltage 1 2 8 2 Reference voltage for controller not in ...

Page 232: ...Save parameter switch ignition off and back on Check again Inform DEUTZ Service in case of error 93 Stack overflow Internal computing error so called Stack Overflow error Emergency shut off Engine cannot be started Note the values of theparameters 3897 and 3898 Switch ignition off and back on Check again Inform DEUTZ Service in case of error 94 Internal error Fault group Fault no in SERDIA Fault l...

Page 233: ...d if available Check the whole length of the V belts for damage Criteria for assessment Tears on the toothed inside Teeth missing Wear on the belt edges Oily Porous Renew the V belt if one or more of these criteria apply All V belts must be renewed in the case of parallel running V belts Check V belt pulley for wear Worn V belt pulleys must be renewed Tools Normal tools V belt tension measuring in...

Page 234: ...d 1500 rpm 1 V belt tension value of the single V belt in initial installation new V belt 390 N in worn state 1 1 The run in state is not reached until after a few operating hours 300 N Max engine speed 1800 rpm 1 V belt tension value of the single V belt in initial installation new V belt 570 N in worn state 1 440 N Fan drive TBD 616 V16 V belt profile XPB edge open inside toothing Number of V be...

Page 235: ...alue in initial installation new V belt 195 N in worn state 1 1 The run in state is not reached until after a few operating hours 150 N A three phase current generator with 28 V 140 A V belt profile XPA edge open inside toothing Number of V belts 2 Max engine speed 2100 rpm 1 V belt tension value in initial installation new V belt 240 N in worn state 1 1 The run in state is not reached until after...

Page 236: ...ts and calculate the average Place the V belt tension measuring instrument B loosely on the V belt D to be measured Press slowly on the pressing surface with one finger in loop C until a click ing is clearly audible or tangible Then relieve the pressure immediately The display arm comes to rest in the measured position Lift the V belt tension measuring instrument carefully without moving the displ...

Page 237: ...ve V belt guard if installed Loosen lock nut 1 and unscrew nut 2 of the V belt tensioning device until it is possible to remove the V belt Fit the V belt and turn the nut 2 of the V belt tensioning device until the V belt has the appropriate tension Figure 2 V belt tension measuring instrument ...

Page 238: ...03 B 12 2 1 TBD 616 OEM Check the V belt tension with the V belt tension measuring instrument Tighten lock nut 1 After a trial run check the V belt tension again and correct it if necessary Figure 3 V belt tension measuring instrument ...

Page 239: ...the V belt of the three phase current generator see above Remove the fastening screws of the fan 3 and remove the fan Loosen the fastening screw 4 of the tension arm and press the tension arm inwards Place the fan on a soft base The fan may never be placed on its blades Figure 4 Fan Figure 5 V belt tension arm ...

Page 240: ... instrument Install the fan and tighten the fastening screws 3 diagonally 45 Nm Install the V belt of the three phase current generator see above After a trial run check the V belt tension again and correct it if necessary All V belts must always be renewed Exchanging individual V belts is not per mitted Figure 6 V belt tension measuring instrument Tighten carefully because the fan flange is made ...

Page 241: ...e Remove the V belt of the three phase current generator see above Remove the fastening screws of the fan 3 and remove the fan Loosen the fastening screws 10 of the V belt clamping device Place the fan on a soft base The fan may never be placed on its blades Figure 7 Fan Figure 8 V belt clamping device ...

Page 242: ...sen the lock nut 11 and turn up Press spindle down until the V belts can be removed Remove the V belt Fit new V belts Figure 9 Lock nut on the spindle of the V belt clamping device All V belts must always be renewed Exchanging individual V belts is not per mitted ...

Page 243: ... the fastening screws 10 of the V belt clamping device Counter lock nuts 11 and tighten Install the fan and tighten the fastening screws 3 diagonally 45 Nm Install the V belt of the three phase current generator see above After a trial run check the V belt tension again and correct it if necessary Figure 10 V belt tension measuring instrument Tighten carefully because the fan flange is made of alu...

Page 244: ...Page Page 12 300200062 en 00 fm 0303 B 12 2 1 TBD 616 OEM This page intentionally left blank ...

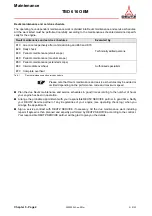
Page 245: ...assembling ensure that clamps make good contact Tighten clamp bolts hand tight Tools Standard tools Acid tester order no 12157944 Equipment Distilled water Acid protection grease Cloths Carry out this work only when the engine has been shut down The gases emitted by the battery are explosive Avoid sparks and open flames in the vicinity of the battery Do not allow any acid to get on your skin or cl...

Page 246: ...vel Remove sealing caps 1 If testers 2 are present Electrolyte level should reach the base of these Without testers Electrolyte level should reach 10 15 mm above top edge of plate If necessary top up with distilled water Screw sealing caps back in Figure 2 Battery sealing caps 24232 5 ...

Page 247: ...ith a commercial hydrometer Figure 3 Check acid density Hydrometer reading see table below indicates battery s state of charge During measurement temperature of electrolyte should preferably be 20 C Acid density in kg l Charge status Normal Tropical 1 28 1 23 well charged 1 20 1 12 semi charged re charge 1 12 1 08 discharged charge immediately ...

Page 248: ...Page 4 300200034 en 00 fm 0303 B 13 4 1 Medium sized and large engines This page intentionally left blank ...
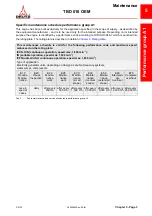
Page 249: ... 0103 300200064 en 00 fm Chapter 10 Page 1 10 Sundry other instructions TBD 616 OEM 10 Other instructions ...

Page 250: ...Chapter 10 Page 2 300200064 en 00 fm 0103 Sundry other instructions TBD 616 OEM This page intentionally left blank ...
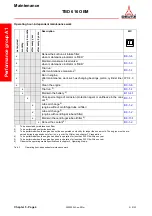
Page 251: ...l 3 5 Monitoring 3 6 Operating media 3 2 Preparation work 3 1 Room ventilation 3 6 Shutting down 3 7 Starter system 3 6 Starting the engine 3 7 Compressed air system Draining water from and filling the air bottle B 10 7 1 Conservation 7 1 Control data 8 1 Control devices 2 29 Coolant circuit B 0 1 5 Coolant level 3 3 Coolant pump 2nd cooling circuit B 9 7 12 Cooling system 2 31 B 9 7 12 Antifreeze...

Page 252: ...ault memory B 11 6 1 Regulations for working on the electronic engine control B 11 0 2 System functions 2 39 Engine 2 1 Charging 2 16 Checking and setting valve clearance B 1 1 1 Checking shutdown B 11 0 1 Cleaning B 0 3 6 Crank drive and valve drive 2 10 Crankcase 2 7 Crankcase bleeding 2 8 Cylinder head 2 14 Daily inspections B 0 1 5 Direction of rotation 2 3 Exhaust system 2 20 Figures 2 4 Mass...

Page 253: ... for engine 2 4 Filling volumes 8 3 Forword 0 7 Frequency pick up 2 28 Fuel 3 3 4 1 Fuel double filter B 7 10 1 Fuel system B 7 10 1 Fuel filter cartridge B 7 10 4 Fuel pipe system 2 22 Fuel system 2 21 Fuel filter cartridge B 7 10 4 G GAC 2 29 Gluing agents 4 5 I Ignition sequence 8 1 Injection 2 21 Injection lines B 7 3 1 Injection valve B 7 7 3 J Job cards Structure 1 4 L Lube oil 3 5 Lube oil ...

Page 254: ... Overview of operating hour dependent maintenance work 5 19 Overview of operating hour independent maintenance work 5 18 Specific maintenance schedule 5 13 Performance group B Definition of the activities 5 23 Independent of operating hours 5 22 Overview of operating hour dependent maintenance work 5 27 Overview of operating hour independent maintenance work 5 26 Specific maintenance schedule 5 21...

Page 255: ...vernor Control devices 2 29 Frequency pick up 2 28 Speed regulation 2 25 Start of injection pump s 8 3 Start system B 0 1 5 Starter 2 36 Suction air intake system B 0 1 5 Suction intake air system Suction air intake filter B 6 3 6 Sundry other instructions 10 1 Surge charging 2 20 T Technical data 8 1 Basic data 8 1 Control data 8 1 Dimensions 8 2 Emission data 8 3 Engine data General 8 1 Filling ...

Page 256: ...e 6 300200038 en 00MIX fm 0303 Index TBD 616 Marine V Valve control 2 15 V belts Check B 12 2 1 Renew B 12 2 1 Setting values B 12 2 1 Viton safety regulations B 0 0 3 W Weights 8 2 Wheel drive 2 12 Workshop Manual 1 2 ...

Page 257: ...ucts for which they are responsible and the range of services provided But even when no direct product responsibility is mentioned your DEUTZ part ner will be happy to help you with expert advice The Index is constantly updated Please ask your DEUTZ service partner for the latest edition Order no 0312 0806 Printed version Order no 0312 0807 CD ROM DEPIC The DEutz Parts Identification for Customers...

Reviews: