background image

v.201016

  19

ENGLISH

ENGLISH

SAFE USE AND OPERATION RULES

SAFE USE AND OPERATION RULES

WHEELS AND TIRES


z

Check tire for wear, damage and proper inflation before each use and every 100 miles (160 km).


z

Tire pressure should be kept at 50 PSI (350 kPa).


z

Check and tighten lug nuts. Tighten to 

85-90 ft-lb. (115.24 - 122.02 Nm) 

of torque.


z

Retighten after first 25, 50 and 100 miles (40, 80, 160 km) and before towing each time 

thereafter.

OPERATION


z

Know how to properly control your towing vehicle-trailer combination on the highway under all 

conditions. It is important to remember that the loaded weight of the trailer will increase your 

braking and stopping distances appreciably.


z

When towing a trailer over long distances, stop and check tightness of all connections, lights and 

running gear every 100 miles.


z

Carry emergency flares, and fire extinguisher if required for operation in your state.


z

It is desirable to carry extra bulbs and fuses if you are towing the trailer at night.


z

Check safety chains and hooks for wear and do not allow safety chains to drag on ground.


z

To prevent bearing damage, disassemble and repack wheel bearing with a good grade of wheel 

bearing grease every 2000-3000 miles (3200 - 4800 km) or yearly.


z

If you do not know how to repack wheel bearing, take your trailer to a qualified technician.

IMPORTANT:  

The purpose of the following notices is to give you tips on safe use and 

operation of your utility trailer. 

1. 

PLEASE READ  

the instructions carefully and follow them step-by-step for easy assembly. Please 

keep this instruction.

2. 

PLEASE DOUBLE CHECK THE ASSEMBLY  

step-by-step to be sure each is followed.

3. 

BEFORE USING, PLEASE INSPECT  

your trailer.

4. 

DO NOT REMOVE THE VIN STICKER  

from the tow bar.

NOTICE: 


z

Re-pack wheel bearings after every 3000 miles (4800 km) of use.


z

Keep tire pressure at 50 PSI (350 kPa) with tires at ambient temperature.


z

Please insure you comply with the following before using your trailer.

1. Tighten U-bolts
2. Tighten wheel lug nuts.
3. Coupler is secured to the ball and is properly adjusted.
4. Cross and connect safety chains.
5. Trailer load must not exceed its 1900 lb. (861.8 kg) capacity and must be properly secured.
6. Trailer load size must not exceed trailers bed board size.

Summary of Contents for MMT6X10

Page 1: ...ez pas chez votre d taillant Veuillez appeler notre service la client le au 1 888 277 6960 Notre personnel du service la client le est pr t vous fournir une assistance Si une pi ce est endommag e ou m...

Page 2: ...recommend this trailer not be modified and or used for any application other than that for which it was designed If you have any questions relative to a particular application DO NOT use the trailer...

Page 3: ...be informed about potential hazards and must be well acquainted with this manual IMPORTANT WARNING It is critical that your DK2 Trailer is properly secured to the vehicle z Attaching it improperly co...

Page 4: ...use it or force it to do a job for which it was not designed 6 USE ONLY ORIGINAL EQUIPMENT PARTS AND ACCESSORIES Consult this owner s manual The use of incorrect accessories may produce unforeseen haz...

Page 5: ...h when towing the trailer Excess speed is a major cause of vehicle trailer accidents 7 DO NOT ATTEMPT TO POWER THE TRAILER LIGHTS WITH ANY OTHER THAN THE CORRECT TYPE OR VOLTAGE ELECTRICAL CURRENT The...

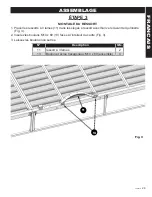
Page 6: ...sembly time is 1 hour You will need the following tools to assemble your trailer NOTE z The trailer parts are called out by standing at the rear of the trailer looking toward the hitch The trailer fra...

Page 7: ...se 1 Place the front 28 and rear 24 beds on the bench 2 Use three 3 M12 x 80 bolts and nuts to connect both sections together Do not tighten too much otherwise the upright rails 25 29 30 will be harde...

Page 8: ...and nuts provided for the double rail connections 2 Use the M10 x 50 4 bolts and nuts to connect the rest of the upright rails 3 Tighten the M12 x 80 27 bed nuts from Step 1 Item No Description Qty 2...

Page 9: ...1 Place 3 leaf slipper springs 11 into the spring seats with the eyes forward as shown Fig 3 2 Insert M14 x 80 13 bolts facing the inside of the frame Fig 3 3 Leave the bolts untightened Item No Desc...

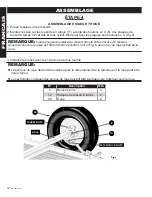
Page 10: ...the spring into the concave side on the axle Make sure that the axle is in the right position See Fig 5 for a closer view of the wheel 3 Install the wheels with the 10 wheel nuts provided NOTE z The...

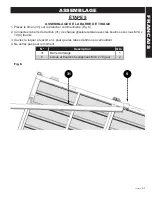
Page 11: ...ar 31 on the beds as shown Fig 6 2 Connect the drawbar 31 on each side runner with the M14 x 70 6 bolts and nuts provided 3 Draw the L Spring latch open for drawbar tubes to lock 4 Do not tighten for...

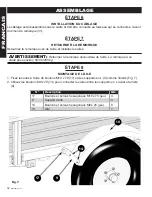
Page 12: ...elp and install the fenders WARNING Rolling the trailer over will require assistance The trailer at this point weighs approximately 583 lbs 265 kg STEP 8 STEP 8 FENDER ASSEMBLY 1 Attach the fenders us...

Page 13: ...the coupler 1 and safety chain 3 using two M12 x 70 2 bolts and nuts provided Fig 8 2 The front bolt passes through the end link of the safety chain 3 as it is inserted through the drawbar tubes Item...

Page 14: ...using the self tapping screws Fig 9 2 4 Plug light connector into the wire harness NOTE The driver s side light is the one with the clear lenses on the bottom the license plate bracket needs to be in...

Page 15: ...tes 21 and ramp to the rear of the trailer bed DO NOT over tighten until the lock nut grabs and bolt turns freely 2 Lift up the ramp and lock to the UP position NOTE Please check and tighten all bolts...

Page 16: ...16 MMT6X10 man ENGLISH ENGLISH SCHEMATIC DIAGRAM SCHEMATIC DIAGRAM...

Page 17: ...10 Fender 2 11 3 leaf spring 2 12 Leaf spring plate 2 13 Hex M14 x 80 bolts nuts set 4 14 Hex M8 x 25 bolts nuts set 8 15 License plate bracket 1 16 Left side light bracket 1 Item No Description Qty 1...

Page 18: ...me z Check that safety chains are attached to towing vehicle with the same length for each side z Do not allow chains to drag on ground LOADING z Never overload trailer Maximum load is 1900 pounds 861...

Page 19: ...r wear and do not allow safety chains to drag on ground z To prevent bearing damage disassemble and repack wheel bearing with a good grade of wheel bearing grease every 2000 3000 miles 3200 4800 km or...

Page 20: ...you require additional information or guidance on licensing or titling please consult your Provincial Department of Motor Vehicles U S A TRAILER LICENSING NOTICE Some states may consider that this tr...

Page 21: ...aillant Veuillez appeler notre service la client le au 1 888 277 6960 Notre personnel du service la client le est pr t vous fournir une assistance Si une pi ce est endommag e ou manquante une pi ce de...

Page 22: ...ne application autre que celle pour laquelle il a t con u Si vous avez des questions relatives une application n utilisez PAS la remorque avant d avoir contact le distributeur pour d terminer si cette...

Page 23: ...e inform es des dangers potentiels et bien familiaris s avec ce manuel AVERTISSEMENT IMPORTANT il est essentiel que votre remorque DK2 soit correctement fix e au v hicule z Une mauvaise fixation peut...

Page 24: ...DE CE MANUEL Ne pas en abuser ni la forcer faire un travail pour lequel elle n a pas t con ue 6 UTILISEZ UNIQUEMENT DES PI CES D QUIPEMENT ET DES ACCESSOIRES D ORIGINE Consultez ce manuel du propri ta...

Page 25: ...PASSER 45 MILLES PAR HEURE 72 km h lors du remorquage de la remorque L exc s de vitesse est une cause des accidents de v hicule remorque 7 N ESSAYEZ PAS D ALIMENTER LES FEUX DE REMORQUE AVEC UN AUTRE...

Page 26: ...en est de 1 heure Vous aurez besoin des outils suivants pour assembler votre remorque REMARQUE z Les pi ces de la remorque sont appel es en se tenant l arri re de la remorque en regardant vers l attel...

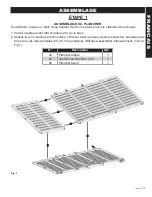
Page 27: ...rechange 1 Placez la partie avant 28 et arri re 24 sur le banc 2 Utilisez trois 3 boulons et crous M12 x 80 pour relier les deux sections ensemble Ne serrez pas trop sinon les rails verticales 25 29 3...

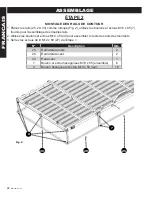
Page 28: ...5 7 fournis pour l assemblage des doubles rails 2 Utilisez les boulons et crous M10 x 50 4 pour assembler le reste des rails des montants 3 Serrez les crous de lit M12 x 80 27 de l tape 1 No Descripti...

Page 29: ...les ressorts 3 lames 11 dans les si ges ressort avec l il vers l avant tel qu illustr Fig 3 2 Ins rez les boulons M14 x 80 13 faces l int rieur du cadre Fig 3 3 Laissez les boulons non serr s No Desc...

Page 30: ...v du ressort dans le c t concave de l essieu Assurez vous que l essieu est dans la bonne position Voir la Fig 5 pour une vue rapproch e de la roue 3 Installez les roues avec les 10 crous de roue fourn...

Page 31: ...r comme illustr Fig 6 2 Connectez la barre de traction 31 de chaque glissi re lat rale avec les boulons et crous M14 x 70 6 fournis 3 Ouvrez le loquet ressort en L pour que les tubes de timon se verro...

Page 32: ...z les ailes AVERTISSEMENT Retourner la remorque n cessitera de l aide La remorque ce stade p se environ 583 lb 265 kg TAPE 8 TAPE 8 MONTAGE DE L AILE 1 Fixez les ailes l aide de boulons M10 x 70 17 et...

Page 33: ...t la cha ne de s curit 3 l aide de deux boulons et crous M12 x 70 2 fournis Fig 8 2 Le boulon avant passe travers le maillon d extr mit de la cha ne de s curit 3 lorsqu il est ins r dans le tube de ti...

Page 34: ...e des vis autotaraudeuses Fig 9 2 4 Branchez le connecteur d clairage dans le faisceau de c bles REMARQUE le feu du c t conducteur est celui avec les lentilles transparentes en bas la plaque d immatri...

Page 35: ...mpe l arri re de la plateforme de la remorque NE PAS trop serrer jusqu ce que le contre crou saisisse et le boulon tourne librement 2 Soulevez la rampe et verrouillez la en position HAUT REMARQUE veui...

Page 36: ...36 MMT6X10 man FRANCAIS FRANCAIS DIAGRAMME SCH MATIQUE DIAGRAMME SCH MATIQUE...

Page 37: ...ames 2 12 Plaque de ressort de lames 2 13 Boulons et crous hexagonaux M14 x 80 jeu 4 14 Boulons et crous hexagonaux M8 x 25 jeu 8 15 Support de plaque d immatriculation 1 No Description Qt 16 Support...

Page 38: ...nes de s curit sont attach es au v hicule tracteur avec la m me longueur de chaque c t z Ne laissez pas les cha nes tra ner sur le sol CHARGEMENT z Ne surchargez jamais la remorque La charge maximale...

Page 39: ...a nes de s curit glisser sur le sol z Pour viter d endommager les roulements d montez et remballez le roulement de roue avec une bonne graisse pour roulements tous les 2000 3000 miles 3200 4800 km ou...

Page 40: ...u de conseils sur l octroi de licences ou de titres veuillez consulter votre D partement des v hicules moteur AVIS D IMMATRICULATION DE REMORQUE AUX TATS UNIS Certains tats peuvent consid rer que la r...

Reviews: