TB-6534
Page 6 of 8
Revision 4/06
© 2006 DESCO INDUSTRIES INC.
Employee Owned
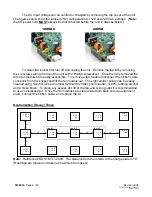
The AC input voltage can be verified or changed by removing the top cover of the unit.
The figures below show the jumper (JH2) configuration for 120 and 220 VAC settings. (
Note:
the AC power cord
MUST
always be disconnected before the unit is disassembled.)
To clean the ionizer first turn off and unplug the unit. Remove the top lid by removing
the six screws along the top of the unit with a Phillips screwdriver. Once the lid is removed the
three fan modules are easily accessible. To remove a fan module disconnect the ribbon cable
connector from the socket and lift the fan module out. The eight emitter points can be easily
cleaned using Semtronics part number S204-200 emitter point cleaner, or 99% rubbing alcohol
and a clean brush. To clean any excess dirt off of the fan and or fan guard it is recommended
to use compressed air. Once the fan modules are clean slide them back onto the alignment
posts, connect the ribbon cable, and replace the lid.
Neutralization (Decay) Times
+19.2
- 19.3
+ 32.7
- 28.6
+20.7
- 26.5
+ 1.8
- 2.4
+ 3.3
- 4.3
+ 3.5
- 4.2
+ 1.9
- 2.9
+ 4.0
- 5.9
+ 1.9
- 3.1
+ 10.2
- 12.1
+ 16.7
- 25.4
+ 14.3
- 16.4
+ 6.4
- 9.7
+ 9.9
- 17.0
+ 4.8
- 5.1
15” 15”
f an #3
f an #2
12”
12”
16”
16”
f an #1
Note:
Reference ESD STM 3.1-2000. The distance from the ionizer to the charge plate is 18”.
(Readings are typical and taken at maximum fan speed.)
120VAC
220VA


