background image

Shenzhen Dericam Technology Co.,LTD 


                                                          M501W User Manual 

www.dericam.net

           Copyright @ Shenzhen Dericam Technology Co., Limited                    

[email protected]


13

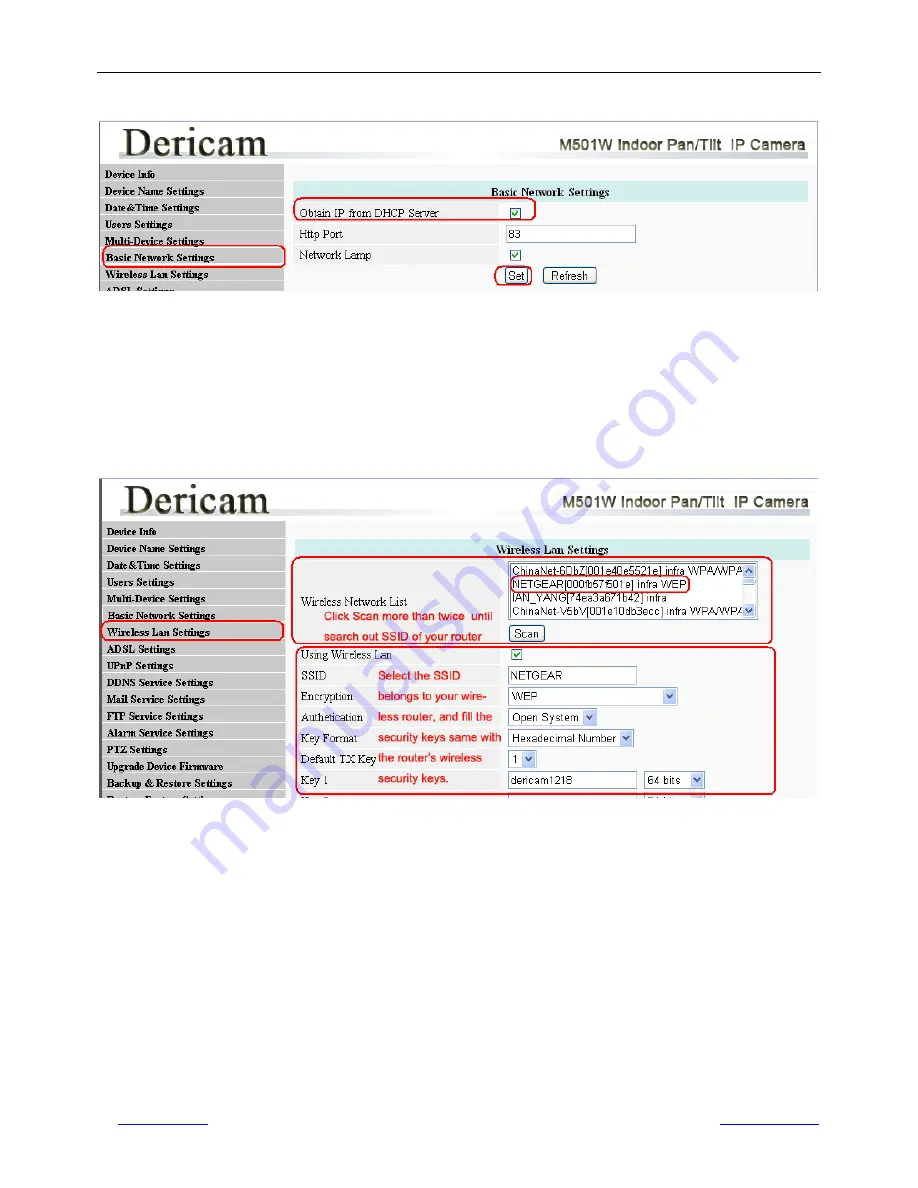
5.6 Basic Network Settings 


Fig5.7

 Basic Network Settings 

Go to option “Basic Network Settings “ 
1------Obtain IP from DHCP Server      Enable DHCP, if disable DHCP, you can assign IP address by yourself 
2------Http Port                       You can change port no. here by entering customized no. and click set 
3------Network Lamp                   Enable/Disable Network signal LED if there is one. 


5.7  Wireless LAN Settings 


Fig5.8

 Wireless LAN Settings 

Go to option “

Wireless LAN Settings

 “ 

Click Scan button more than twice to search the SSID of the wireless router. Please make sure you click scan to 
search for more than twice, all the SSID of routers nearby will be list on the small window showed as Fig5.8.   
 
Select the SSID belongs to your router, and enter wireless security key password, and click set to finish the wireless 
setup. The camera will restart after the setup is done, 

Please unplug the network cable once the camera gets 

restarted, let the camera make wireless connection by itself

. Do not shut down power during restart. 


The LAN IP address will disappear on the window of IP Camera Tool when the camera gets restarted. Just wait for 
around 1 minute, the camera will get wireless connection, and the LNA IP of the camera will be showed again on the 
window. 

Congratulations!

 You have done wireless connection of the camera successfully. 


Summary of Contents for M501W

Page 1: ...echnology Co Limited tech dericam com 1 User Manual Model M501W Indoor Pan Tilt IP Camera Contents Chapter 1 Introduction of Camera 2 Chapter 2 Package Contents 2 Chapter 3 Physical Descriptions 3 Chapter 4 Surveillance Software GUI 4 Chapter 5 Camera Advanced Settings 10 Chapter 6 Specification 20 ...

Page 2: ...o IR LED illumination 10 IR LEDs IR Night vision range up to 8 meters Bundled with 32 Channel Surveillance Software User friendly Multi lingual UI Giving alarm in cause of motion detection Wireless networks connection IEEE 802 11b g Support WEP WPA WPA2 encryption Control Panel add in i e snapshot image setup PT control Support Mac OS Safari browser Support iPhone through Safari browser Mobile Pho...

Page 3: ...Technology Co Limited tech dericam com 3 3 Physical Descriptions Fig3 1 Physical parts description 1 WIFI Antenna 2 light dependent resistor 3 IR LEDs 4 Built in Speaker 5 Network LED 6 Built in microphone Please never press reset button unless you have forget the password to login the camera Note ...

Page 4: ...nguage you need via click on the select language bar to switch 4 1 2 Section 2 Dericam Website Link There is an access link to Dericam website homepage if you need tech support you can contact Dericam directly 4 1 3 Section 3 IE ActiveX Mode If your pc is windows based OS such as Windows XP Windows7 Windows Vista and you are using IE based browsers like IE6 IE IE8 please choose IE ActiveX Mode log...

Page 5: ...cam com 5 4 2 Surveillance Window Fig4 2 Surveillance Window of Dericam M501W Please check the surveillance window above it was divided to 5 sections from no 1 to 8 4 2 1 Section 1 Multi windows Switch button You can select 1 window 4 windows 9 windows by clicking the switch button above Fig4 3 Switch to 4 surveillance windows ...

Page 6: ...HZ 60HZ and Outdoor It depends on the frequency of the electricity and surveillance model indoors outdoor Please choose outdoor mode when the camera was installed outside Frame Rate 1 Max Maximum frame rate 2 20fps 15fps 10fps 5fps 1fps customized frame rate You can choose option within the menu of Frame Rate to adjust the frame rate It is often used in LAN network when you want to lower the frame...

Page 7: ...llance market 2 Set Click Set to save the position you need the camera to remember 3 Go Click Go to make the camera move the preset position 4 Patrol Click Patrol to make the camera move from preset position from 1 to 8 5 Number button from 1 to 8 You can click the number button with preset position and the camera will go to the preset position How to do preset position We can start preset setting...

Page 8: ...Shenzhen Dericam Technology Co LTD M501W User Manual www dericam net Copyright Shenzhen Dericam Technology Co Limited tech dericam com 8 Fig4 4 Preset position 1 Fig4 5 Preset position 2 ...

Page 9: ...he camera 2 Stop Click it to stop the video of the camera 3 Talk Enable talk function and use microphone at PC end to talk to the camera 4 2 7 Section 7 Listen Buttons Enable Listen function and use speaker at PC end to listen to the camera 4 2 8 Section 8 Record Snapshot Full Screen Buttons 1 Record Click it to make recording 2 Snapshot Click it to make snapshot You can make snapshot and then sel...

Page 10: ...ce Information 1 Device ID MAC ID of the camera by wired connection 2 Device Firmware Version System Firmware version of the camera 3 Device Web UI Version Web UI firmware version of the camera 4 Alias Name of the camera 5 Alarm Status The status of Alarm Service Setting 6 DDNS Status The status of DDNS Setting 7 UPnP Status The status of UPnP Setting 5 2 Device Name Settings Fig5 2 Device Name Se...

Page 11: ...c with NTP Server Enable with Network Time Protocol 3 Sync with PC Time Enable to sync with your computer s time 5 4 User Settings Fig5 4 User Settings Go to option Users Settings The default user name is admin and there is no password There is three level of accessing right 1 Administrator 2 Operator 3 Visitor You can set users with different level of accessing right You need remember the new use...

Page 12: ...Go to option Multi Device Settings click refresh to list all the cameras within LAN and click the menu the 2nd Device to add the second camera Just select one of the camera give a name like Cam02 to identify from the first one Fill the LAN IP address http port no of the second camera and click Add button to take effect 5 5 2 Multi Camera Settings within WAN Wide Area Network Internet Fig5 6 Add Mu...

Page 13: ... the SSID of the wireless router Please make sure you click scan to search for more than twice all the SSID of routers nearby will be list on the small window showed as Fig5 8 Select the SSID belongs to your router and enter wireless security key password and click set to finish the wireless setup The camera will restart after the setup is done Please unplug the network cable once the camera gets ...

Page 14: ...or DIY WIFI Camera is designed to use with WIFI routers You can just leave this setting alone 5 9 UPnP Settings Fig5 10 UPnP Settings Go to option UPnP Settings You can enable UPnP if your router s UPnP option is enabled You can just leave this setting alone because you have done port forwarding within the router when doing remote access settings during quick installation procedure 5 10 DDNS Setti...

Page 15: ...t Internet IP Notification of WAN IP address change information Complete the settings with your email account and click set to take effect 1 Sender and Receiver can be the same email address It means that you can use one email as both sender and receiver 2 For Enterprise mail SMTP user you need to enter full email address on the column SMTP user Take SMTP server mail dericam com for example you mi...

Page 16: ...rt The Port number of the FTP server normally standard port is 21 3 FTP User The user account of the FTP server 4 FTP Password The password of the FTP user account 5 FTP Upload Folder Saving path of the FTP folder 6 FTP Mode Two modes standard POST mode and passive PASV mode 1 If your FTP server is set up within LAN you can set as Fig5 13 If you have a FTP server which you can access via internet ...

Page 17: ...s and more sensibility it is 3 Alarm Input Armed No use just leave this option alone 4 IO Linkage on Alarm No use just leave this option alone 5 Send Mail on Alarm Enable or disable sending snapshots by email 6 Upload Image on Alarm Enable or disable uploading snapshots to FTP server 7 Upload Interval The interval of uploading snapshots 8 Scheduler Enable or disable Schedule alarm service Normally...

Page 18: ...de the firmware if the existing firmware works ok It takes risk of making the camera dead if the upgrading operation is not right 3 Normally only Device WEB UI need to be upgrade please do not try to upgrade the Device Firmware 4 Please use wired connection method before you upgrading the files 5 Never shut down the power of the camera during upgrade until the IP camera restart and get connected 5...

Page 19: ... Factory Settings Fig5 19 Restore Factory Settings 5 18 Reboot Device Click option reboot device to get the camera restarted which is the same as unplug the power and re plug it 5 19 Log Fig5 20 Record of login in information Log record shows the date time user account IP address accessed 5 20 Back Click Back button to go back to surveillance window ...

Page 20: ...TTP FTP TCP IP UDP SMTP DHCP PPPoE DDNS UPnP GPRS Wireless Standard IEEE 802 11b g Data Rate 802 11b 11Mbps Max 802 11g 54Mbps Max Communication Wireless Security WEP WPA WPA2 Encryption Pan Tilt Angle Horizontal 240 Vertical 90 Infrared Light 10 Φ5 IR LEDs Night visibility up to 8 metres Dimension 110 L x100 W x108mm H Gross Weight 710g Color Box Size 200x124x189mm Physical Net Weight 418g access...

Reviews: