background image

Editing

Editing a DVD+RW or DVD+R
disc

Insert a recorded DVD+RW or DVD+R
disc on the disc tray.

Press

button to access the

disc editing menu.

DISC OPEN

P l a y

E r a s e o p t i c a l d i s c

R e n a m e d i s c

R e c o r d a n e w t i t l e

O v e r w r i t e d i s c

L o c k d i s c

P l a y

E r a s e o p t i c a l d i s c

R e n a m e d i s c

R e c o r d a n e w t i t l e

O v e r w r i t e d i s c

L o c k d i s c

PAL

DVD

EDIT

DVD+RW

Rename disc(DVD+RW/DVD+R)

Press

button after selecting

Rename disc

by using

or

button. The keyboard will show on the
screen.

ENTER

Space

Aa

Backspace

Clear

Exit

OK

Select a letter which you want to input
by using

,

,

,

button, and

press

button to confirm it.

ENTER

The control bars of the last line in
the keyboard is for edit command.

ENTER

If the inputting of letters is finished,
press

button after selecting

OK

.

The disc current informaion will be
displayed on background, you could
press

button here to get the whole

information screen. You could get know
the Disc Name, Record start time,
current recorded time, current NON-
EMPTY titles, the remain free space, the
DVD VIDEO format (NTSC/PAL), the
disc-locked state etc.

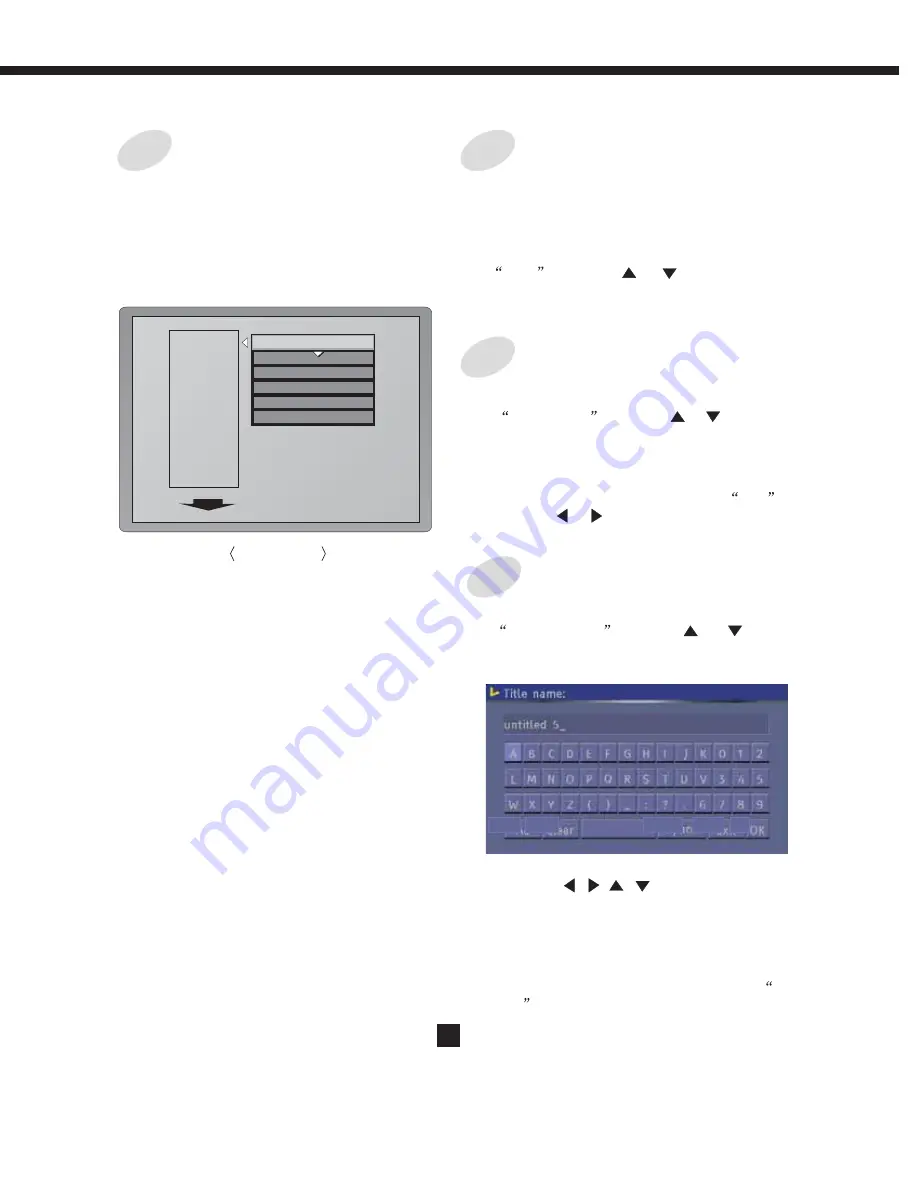
Enter the disc operation menu. With
each icon highlighted by pressing

, the corresponding

description of each operation will be
displayed on the screen, such as

LEFT

UP/DOWN

Play,

Erase disc, Rename disc, Record a
new title, overwrite disc, Lock disc,

Press

to run the operation.

ENTER

Press

button after selecting

Play

by using

or

button.

It starts to play back the beginning of
the Disc.

ENTER

You can play back the entire disc from the
beginning to the end.

Play Disc(DVD+RW or DVD+R)

Erase Disc(DVD+RW only )

Press

button to erase the

contents of a disc after selecting

Yes

by using

,

button.

It takes a few minutes to erase the disc.

ENTER

Press

button after selecting

Erase Disc

by using

or

button.

ENTER

22

Summary of Contents for DHD-160

Page 1: ...act an authorized service location or contact our company office Only qualified service personnel should remove the cover DO NOT STARE INTO B E A M FCC NOTICE This equipment has been tested and found to comply with the limits for a Class B digital device Pursuant with the FCC Rules Part 15 These limits are designed to provide reasonable protection against harmful interference in a residential inst...

Page 2: ...Slots and openings in the cabinet are provided for ventilation and to ensure reliable operation of the product and to protect it from overheating and these openings must not be blocked or covered The openings should never be blocked by placing the product on a bed sofa rug or other similar surface This product should not be placed in a built in installation such as a bookcase or rack unless proper...

Page 3: ...ire or electric shock Never spill liquid of any kind on the product Servicing Do not attempt to service this product yourself as opening or removing covers may expose you to dangerous voltage or other hazards Refer all servicing to qualified service personnel Damage Requiring Service Unplug this product from the wall outlet and refer servicing to qualified service personnel under the following con...

Page 4: ... Recording 19 One Touch Record 20 Timer Record 21 Clock Setup 21 Editing a DVD RW or DVD R disc 22 Play disc 22 Erase disc 22 Rename disc 22 Record a new title 23 Lock disc 23 Finalize disc 23 Editing a title of DVD RW or DVD R 24 Chapterediting 25 Chapterhide or Unhide 25 Title icon Index picture 25 Time Shift 26 Recording to DVD 27 Recording Quality 27 Recording Source 27 Chapter Markers 27 Time...

Page 5: ...ith each other Avoid using remotes for other equipment located close to this unit Replace the batteries when you notice a fall off in the operating range of the remote Incorrect use of batteries can result in hazards such as leakage and bursting Please observe the following Don t mix new and old batteries together Don t use different kinds of battery together although they may look similar differe...

Page 6: ...17 18 19 20 21 22 29 30 31 32 33 34 35 36 37 38 39 40 28 27 26 25 24 23 1 STANDBY 2 NUMERIC BUTTONS 3 GO TO 4 ADD CLEAR 5 6 PAUSE 7 8 ENTER 9 DIRECTION BUTTONS 10 SETUP 11 TITLE 12 MENU 13 SOURCE 14 USB 15 TIMER 16 EDIT 17 SLOW 18 RETURN 19 CHANNEL 20 PAL NTSC 21 CHANNEL 22 INTERLACE PROGRESSIVE SCAN 23 OPEN CLOSE 24 PREVIOUS 25 STOP 26 NEXT 27 PLAY 28 NAVIGAT 29 ANGLE 30 SUBTITLE 31 REC 32 DVD 33...

Page 7: ...ECORD Indicator 8 9 10 11 PBC Indicator PLAY Indicator ROTATION PAUSE Indicator Chapter Indicator 12 13 14 OPERATING Information DOLBY DIGITAL Indicator DTS Indicator Lighting when playing DVD Lighting when playing SVCD VCD CD Lighting when playing Mp3 Lighting when timer recording is on Indicates title chapter and track number and time Tvchanel Indicates DOLBY Digital 5 1CH playback Rotates when ...

Page 8: ......

Page 9: ......

Page 10: ......

Page 11: ......

Page 12: ...yback side down Use direction keys to UP DOWN RIGHT LEFT highlight the item you desired Press or to start playback of the title you selected ENTER PLAY Stop playback Note When top picture is highlighted press the previous index pictures will display on the screen When it reaches the first one if press again the Index Picture Screen can only be updated When bottom picture is highlighted press the n...

Page 13: ...52 DVD MODE Normal TRICK mode TITLE CHAPTER AUDIO SUBTITLE ANGLE T TIME Play 01 02 01 15 02 02 CHI Off 01 01 00 01 22 01 29 52 DVD Basic Playback GENERAL FEATURES MODE Set your preferable playback mode such as PROGRAM SHUFFLE and various repeat mode TITLE Select to choose an available title by inputting numbers TRICK mode Control playback by various setting such as FAST FORWARD FAST BACKWARD PAUSE...

Page 14: ...ng play mode The disc contents is played slowly forward SLOW Each time you press button playback speed changes as below SLOW Press button to resume normal playback PLAY Frame by Frame Playback DVD VCD 1 2 3 1 2 3 There is no sound when viewing Frame playback or Slow playback Mp3 CD and Audio CD do not have Frame Playback and Slow Playback feature Press during normal playback to pause playback and ...

Page 15: ...imum 5 seconds for smooth repeat play Note 1 2 3 Switching the Camera Angle When a DVD contains recorded multiple angles of a scene you can select the Angle function Press button during playing Available angles of the current scene will be displayed on the top of screen and the angle is changed Each time you press button the angle is changed ANGLE ANGLE 1 2 You can only change the angle for DVDs t...

Page 16: ...s It is possible to change the subtitle language to a different language from the one selected at the initial settings This operation works only with discs on which multiple subtitle languages are recorded If the loaded disc supports multiple subtitles you can select the subtitle language Press button during playing The subtitle is displayed on the bottom of screen SUBTITLE 1 2 Each time you press...

Page 17: ... Highlight and press to save your OK ENTER setting Press SETUP button to exit setup press PLAY button to start 1 Follow step 1 8 to select New 2 Enter new password 3 Re enter to confirm your new password 4 Highlight OK and press ENTER to save it 5 Press SETUP button to exit Enter Password OK OK Cancel Input your password by numbers highlight OK ENTER and press to confirm Press the sub menu of Set ...

Page 18: ...el Change Password Reset to Factory Screensaver Date Time Setup Date Time Setting Program Irelond United kingd Germany France 1 Press key to access the setup menu SETUP 2 Press direction keys to Highlight a item then press to confirm ENTER 3 Press or return key to exit setup menu SETUP RECORDING VIDEO AUDIO LANGUAGE DATE TIME PREFERENCES Modify Channel Program Table Timer Setting Menu Country Sele...

Page 19: ...e to highlight the option press you could modify the turns of each channel according you favorite UP DOWN Program Table ENTER Make connections illustrated as page 9 11 Insert a recordable DVD RW or DVD R disc into the recorder Press to access the Control Bar NAVIGATION DVD Normal A B Repeat Chapter Repeat MODE Press to highlight the MODE icon and press and to select the record way for the new reco...

Page 20: ...of record quality is worked according the RECORD MODE selection Note Press to select TRICK icon and press and to select UP DOWN ENTER UP DOWN RECORD If you want to stop recording press STOP If the DVD RW or DVD R is new it will take about three minutes to stop Note For a new DVD R RW it will take about 30 minutes to format it before recording Generally it takes more time and no more than 5 minutes...

Page 21: ...ord for up to 343 minutes up to 48 titles Put into DVD R or DVD RW disc Select OK to save your setting Mm dd yy Signal input source details see page 19 step 5 Record quality details see page 20 step 6 Record frequency once daily or weekly Start time for timer recording the set up time laterhan current time End time for timer recording VPS mode select ON this recorder can support under standby on P...

Page 22: ...ill be displayed on background you could press button here to get the whole information screen You could get know the Disc Name Record start time current recorded time current NON EMPTY titles the remain free space the DVD VIDEO format NTSC PAL the disc locked state etc Enter the disc operation menu With each icon highlighted by pressing the corresponding description of each operation will be disp...

Page 23: ...f a DVD R has been finalized you can not record or edit the DVD R any more If you want to make your disc compatible with the other DVD player you should go on FINALIZE operation Note Editing a title of a Disc 1 TITLE 01 01 2004 SP 00 00 20 12 03 07 2 TITLE 01 01 2004 SP 00 00 20 12 03 07 3 TITLE 01 01 2004 SP 00 00 20 12 03 07 SP 00 00 20 12 03 07 2 TITLE 01 01 2004 00 00 20 12 03 07 Insert a DVD ...

Page 24: ... EDIT MODE Press to highlight one icon and enter it press to select a sub item RIGHT LEFT UP DOWN Press to quit the menu EDIT EDIT MODE Title 04 14 Chapter 01 01 PLAY Chapter marker Hide chapter Index picture Split title T Elapsed 0 00 02 View current title total title View current chapter total chapter current operation status chapter editing select to add one chapter or delete the current all ch...

Page 25: ...ion The function is valid when a DVD RW disc is inserted It needs about 5 to 6 minutes Accord to different disc contents From the control bar select the Index picture icon press ENTER button it will be as following When you want to set the current frame as the icon of the current title which miniature picture will appear in the Index Picture Screen press ENTER with T ICON displayed Firstly Secondl...

Page 26: ...ss to view help and status information NAVIGAT While viewing a program press This will start saving the segment you are watching You can navigate forward During the saving operation by pressing you will increase the length of the program you are saving by 30 minutes up to a maximum of 3 hours Press to indicate the end of the saving operation The saved part of the time shifting buffer will be tagge...

Page 27: ...elect one of the above SOURCE If you are recording from a rear source make sure your audio connections are made to the rear audio inputs If you are recording from a front source make sure your audio connections are made to the front audio inputs Note Chapter Markers This feature will automatically insert chapters at 10 minutes intervals during recording The interval can be programmed in Setup menu...

Page 28: ...itle list screen press Use to navigate the list and press to select the highlighted program for Dubbing Once a program is selected the Dubbing Icon will appear next to it on the title list Press button can be pressed again if the Selection needs be removed cleared As you Select or de Select programs the disk capacity information will be updated on the top right corner of the screen If the program ...

Page 29: ... title list screen press Press on the button repeatedly for one of the following sorting options the most recent recording appears on top of the list Names in order A to Z programs with the same name will appear in ascending time order with the oldest one being higher than the more recent one Z to A programs with the same name will appear in ascending time order with the oldest one being higher th...

Page 30: ...continue Your options are During HDD Edit operation recording to HDD is on going Right ARROW Up or Down ARROW Select Delete Split Segment Change Index Pic and Rename This option brings up the Split screen You can navigate the program similar to Playback screen and mark a location at which the program will be cut into 2 separate programs and registered on the HDD title list See Figure HDD Edit If a...

Page 31: ...efault value is 3308 The user will be asked to Unlock the program before Play or any Edit or Dubbing operation In order to Unlock once you have highlighted the program on the HDD title list bring up the Popup menu by pressing the button Make sure Unlock is highlighted use button to navigate if needed and press You will be prompted to enter the password A Locked title will have a Lock icon next to ...

Page 32: ... 45W Mass 4 8Kg External dimensions 478 x 130 x 356 mm W D H Signal system AUTO NTSC PAL Laser Semiconductor laser wavelength 650 nm PERSONAL VIDEO RECORDER Audio cable red white yellow 1 pair Remote control 1 Batteries AAA 2 Package for the unit 1 User manual 1 SUPPLIED ACCESSORIES Specifications 32 ...

Page 33: ...up Place the disc on the disc tray correctly inside the guide Make sure the disc is free from scratches fingerprints Press the SETUP button to turn off the menu screen Cancel the parental lock function or change the parental lock level The Pre set password is 3308 to the appropriate source on the receiver Refer to your audio amplifier owners manual Damaged S connector bent pin Asmall amount of pic...

Reviews: