background image

2.1. Items to Be Prepared

(1)   Get "

AVR-X250BT_Update_Tool.zip

" from SDI.

(2)   Expand the zip file.

(3)   RS-232C cable (9P (Male), Straight).

(4)   8U-210100S : WRITING KIT (OLD JIG : SPK-581 WRITING KIT) 

606050028012P : 7P FFC (Straight)

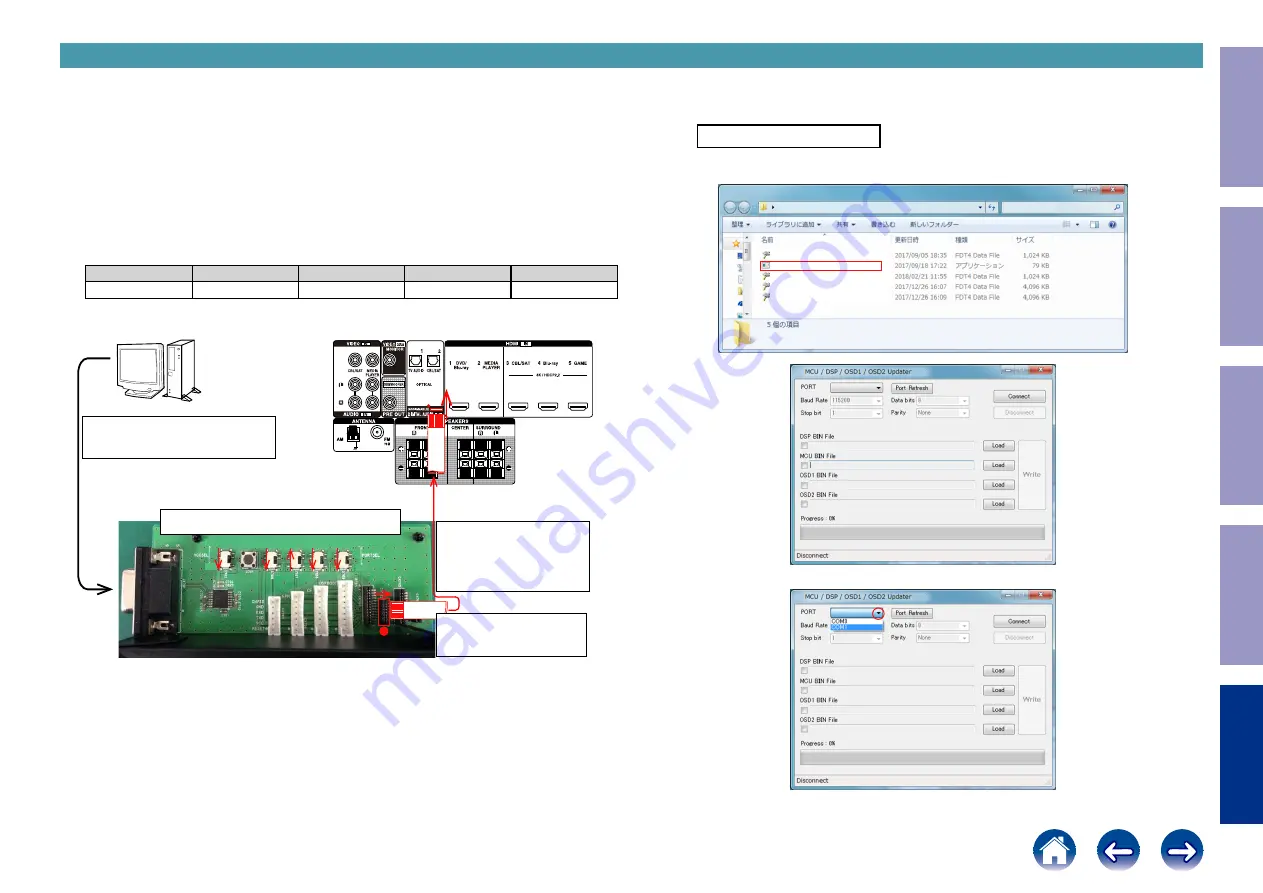
2.2. Connecting the WRITING KIT to This Unit

(1)   Check that the power of this unit is off.

(2)   Connect the RS-232C cable to the computer and WRITING KIT.

(3)   Connect the update terminal of this unit to the WRITING KIT.

(4)  Set the WRITING KIT switch.

VCCSEL

CNVSS

EPM

CE

DSPBOOT

3.3

H

L

H

H

RESET

5V

3.3V

LOW

HIGH

CNVSS

EPM

CE

DSPBOOT

① Connect the RS-232C cable.

  (Straight cable)

↑Top side is contacts of

 flexible card cable.

Using the 7P FFC(Straight).

● 

is 1PIN side.

→ This side is contacts of 

flexible card cable.

● 

is 1PIN side.

② Align the switch in the direction of the arrow.

2.3. Start the update.

(1)   While holding down buttons "

TUNER PRESET CH -

", "

TUNE +

" and "

DIMMER

" simultaneously, 

press the power button to turn on the power.

Firmware Update 

(2)  Launch the "

ModelName_FW_Update_Program.exe

" program file.

(3)  Select "

PORT

".

ModelName_DSP_vXXX.bin

ModelName

ModelName_MCU_vXX_XX.bin
ModelName_OSD1_vXX_XX.bin
ModelName_OSD2_vXXXXXXXX.bin

ModelName_FW_Update_Program.exe

2. How to Update

Before Servicing 

This Unit

Electrical

Mechanical

Repair Information

Updating

79

Summary of Contents for AVR-X250BT

Page 1: ...enon com AVRX250BT AP ZH index php Upload is planned for the time of a future press release BEFORE SERVICING THIS UNIT ELECTRICAL MECHANICAL REPAIR INFORMATION UPDATING Confidential For purposes of im...

Page 2: ...ND OPTICS ONLINE PARTS LIST Accessing the Parts List Searching Part Numbers or Ref Numbers NOTE FOR PARTS LIST SERIAL NUMBER Serial Number Organization SKU Code of this Unit POST SERVICE PRECAUTIONS I...

Page 3: ...c diagrams and parts lists be sure to use the designated parts Be sure to mount parts and arrange the wires as they were originally placed For safety seasons some parts use tapes tubes or other insula...

Page 4: ...PUT CONDITION 4 CIRCUIT AND PARTS ARE SUBJECT TO CHANGE WITHOUT PRIOR NOTICE Electrostatic breakdown of the semi conductors or optical pickup may occur due to a potential differ ence caused by electro...

Page 5: ...bers or Ref numbers 1 Enter the part number or Ref number in the search window of the Parts List and press the search button 2 The search results are displayed The name of the sheet in which the searc...

Page 6: ...t serial number that contains the code of the manufacturing plant and the manufacturing date SKU code 14 digits Factory code Cumulative serial number Manufactured Year month The last 2digit of year Mo...

Page 7: ...after confirming that the display flashes at 1 second intervals The unit is initialized NOTE If the unit fails to enter the service mode in step 3 repeat the procedure from step 1 Initializing the dev...

Page 8: ...BOARDS DIGITAL USB WIRE GUIDE VIDEO TUNER PHONE WIRE GUIDE FRONT CABLE GUIDE MAIN BT FRONT PHONE STANDBY REGULATOR SMPS LEVEL DIAGRAM FRONT ch CENTER ch SURROUND ch SUBWOOFER ch BLOCK DIAGRAM ANALOG...

Page 9: ...58 OPEN C7130 0 01uF R7159 120K R7164 100 R7156 47K C7129 0 01uF R7165 100 Q7107 2SC3052 Q7106 2SC3052 Q7105 2SC3052 R7157 47K R7160 47K 144 143 142 141 140 139 138 137 136 135 133 134 132 131 130 129...

Page 10: ...144 IC721 ADV7623BSTZ R7202 2K F R7201 1 6K F R7220 4 7K R7221 4 7K R7248 10K R7249 OPEN R7209 OPEN R7206 47K R7207 OPEN C7241 15pF C7240 15pF X721 28 636MHz R7252 1K F R7253 1K F C7201 0 1uF C7202 0...

Page 11: ...15 14 13 12 11 10 9 8 7 6 5 4 3 2 1 JK725 CJJ9H021Z T7305 R7315 47K R7316 0 C7302 0 1uF R7311 1k R7312 10K R7313 47K R7314 47K R7307 0 R7308 0 R7317 0 R7318 0 L7306 CB05YTYH221 L7304 CB05YTYH221 L730...

Page 12: ...7452 0 1uF C7453 100uF 63V C7450 0 1uF C7451 4 7uF 100V R7403 1M C7446 100uF 10V C7447 0 1uF C7458 0 1uF C7459 100uF 10V R7477 100 R7402 330 C7404 10pF C7403 10pF X741 24 576MHz C7436 0 1uF C7435 0 1u...

Page 13: ...uF C7785 0 01uF C7786 1uF C7787 0 01uF C7788 OPEN R7779 0 R7780 OPEN 6 5 4 3 2 1 CN751 YMW025 06R R7527 10K R7526 10K 6 5 4 3 2 1 Q7503 FDC608PZ C7597 0 1uF C7598 0 1uF R7450 0 C7519 OPEN L7504 CB03YT...

Page 14: ...00 C7617 2700P R7756 100 C7712 0 1uF C7705 0 1uF R7748 100 C7706 2700P R7745 100 C7708 OPEN R7611 4 7K C7704 220P R7744 4 7K 8 7 6 5 4 3 2 1 IC766 NJM2740V R7742 15K R7743 OPEN C7629 22uF 50V R7741 0...

Page 15: ...2W C5508 100 63V D5505 OPEN D5503 OPEN C5507 50V 47uF C5506 33P C5504 2200P M C5503 82P R5504 18K R5505 1 2K C5502 100V 470pF R5502 680 C5501 50V 47uF J5501 OPEN R5503 10K D5502 OPEN D5504 OPEN C5708...

Page 16: ...X 1 2 MEDIA PLAYER IN CBL SAT IN MONITOR OUT DSP PART PLAYER R7802 82 1 C7801 22pF C7807 0 1uF C7806 0 1uF C7804 10 50V C7802 OPEN C7805 10 50V R7804 75 1 C7803 OPEN 16 15 14 13 12 11 10 9 8 7 6 5 4 3...

Page 17: ...4 13 IC901 CVIPCM5100APWR C9012 10uF C9014 10uF C9013 0 1uF C9011 0 1uF C9005 0 1uF C9006 0 1uF C9007 2 2uF C9008 0 1uF C9009 2 2uF R9015 470 R9016 470 C9015 0 1uF C9016 10uF R9014 10K R9005 0 R9010 O...

Page 18: ...SED AVR X550BT AVR S640H AVR X550BT AVR S640H 4K7 1K R1027 AVR X250BT AVR X250BT AVR S640H STYLE PIN AVR X250BT NOT USED PRESET PRESET TUNE TUNE BAND MODE INFO SLEEP DIMMER STATUS PURE GAME MOVIE Q S_...

Page 19: ...EL AVR S740H X1500H AVR S540BT X550BT AVR S640H 25V 6800uF 25V 4700uF AVR X250BT X550BT AVR X250BT F3001 OPEN C3003 OPEN F3002 OPEN C3004 OPEN C3005 0 1uF M D3001 UF4004 D3002 UF4004 D3003 UF4004 D300...

Page 20: ...C6006 OPEN C6007 50V 0 1uF C6009 50V 0 22uF R6006 1M 1608 D6006 1N4007 D6005 1N4007 D6001 1N4007 D6002 1N4007 D6003 1N4007 D6004 1N4007 CX 602 OPEN R6013 22K 1608 R6014 1K 1608 R6012 270K R6010 1M 0 2...

Page 21: ...L7527 T7117 T7601 D7218 D7219 D7214 D7213 D7212 D7211 D7210 D7209 D7208 D7207 D7206 D7205 D7240 D7239 D 72 38 D7237 D7236 D7235 D7234 D7233 D7232 D7231 D7310 D7309 D7308 D7307 D7306 D7305 D7304 D7303...

Page 22: ...5220 R5219 R5122 R5121 R5120 R5119 R5727 R5726 R5725 R5724 R5723 R5722 R5721 R5516 R5515 R5416 R5415 R5316 R5315 R5216 R5215 R5116 R5115 R5518 R5517 R5418 R5417 R5318 R5317 R5218 R5217 R5118 R5117 R55...

Page 23: ...H PURE S540BT ADJUST S640H S740H GAME S640H S740H MOVIE S540BT ON OFF S540BT BASS TREBLE S640H S740H MUSIC S540BT S640H SLEEP S740H MODE X250BT X550BT X1500H Q S_2 S540BT S640H S740H DIMMER X250BT X55...

Page 24: ...ING L N LF602 CLZ9Z133Z E2 E1C CLZ9Z126Z E3 K MP_STAGE OPEN 1A629 1A834 1A834 BONDING BONDING AVR S730H X1400H 6 MAIN POWER V X C D F S S S S S S OPEN BONDING BONDING AVR S530BT X540BT T 2 5A L 250V A...

Page 25: ...P OUT 282mVrms CS42528 0dBFS 5 6Vpp DIFF INPUT 1 98Vrms 40dBFS CS42528 AD IN 145mV A D IN 22 78dBFS D A CS42528 0dBFS 5Vpp DIFF OUT 1 77Vrms 30dBFS 0dBFS 10dBFS 40dBFS 0dB 10dB 20dB 10dB 20dB 30dB 40...

Page 26: ...dBFS 0dBFS 10dBFS 40dBFS 1 77dB 20dBFS DIG IN 22 78dBFS A D IN FULL SCALE LEVEL 2Vrms DOLBY LIMIT LEVEL ALL ch 3dBFS GAIN setting of MASTER VOL 00dB DD Config2 DIG IN A D IN ANALOG 1dB 1dB CENTER ch D...

Page 27: ...30dBFS 0dBFS 10dBFS 40dBFS 1 77dB 20dBFS DIG IN 22 78dBFS A D IN FULL SCALE LEVEL 2Vrms DOLBY LIMIT LEVEL ALL ch 3dBFS SURROUND ch DSP OUT D A NJU72340AFH3 GAIN setting of MASTER VOL 00dB DD Config2 D...

Page 28: ...EVEL4 DIAGRAM SUBWOOFER 316mVrms VOL 00 15dB PREOUT SUBWOOFER D A CS42528 0dBFS 5Vpp DIFF OUT 1 77Vrms 30dBFS DIG IN 0dBFS 10dBFS 40dBFS 0dB 10dB 20dB 10dB 20dB 30dB 40dB 20dBFS FULL SCALE LEVEL 2Vrms...

Page 29: ...IN SW1 MUTE TUNER AD_FL AD_FR TO DIGITAL AUDIO BLOCK DA_FL DA_FR DA_CEN DA_SW DA_SL DA_SR FM AM SETUP MIC SW2 MIC USB BT_IN AVR S540BT X550BT TUNER AVR S540BT X550BT USED BT_IN AVR X250BT V 7 5V V 7 5...

Page 30: ...HDMI RX HDMI IN4 HDMI IN5 TMDS TMDS TMDS TMDS TMDS USB BX8804 DECORDER PCM5100A AUDIO DAC I2S USB IN USB D BT MODULE UART USB BT_IN SN74AHC157PWR TMDS 8M 16M HDMI_SDATA0 MCLK SPDIF SDATA3 FOR ARC TMDS...

Page 31: ...RANSCEIVER 28 6363MHz X7201 S FLASH 32M OSD Block P1 RX P0 RX HDMI OUT MONITOR OUT For GUI HDMI IN HDMI IN Blu ray HDMI IN3 P2 RX P2 RX S FLASH 32M For GUI CVDD DVDD D1V8H DVDDIO CEC3V3 TVDD CEC3V3 PV...

Page 32: ...BT X550BT BU33TD3WG 45mA DA 3 3V USB DAC PCM5100A MM1Z525V1B MM1Z525V1B TFZV7 5B 589 95mA INPUT CURRENT Ref Volage 5 2V CS497024 CS42528 M12L16161A5TG2Q EN25Q80B104HIP SN74AHC157PWR CEC1V1 HDMI TX MN8...

Page 33: ...AL MAIN DIGITAL 9P BN502 USB BT PCB BN914 REGULATOR PCB BN301 5P CN302 TRANS SMPS REGUL DIGITAL TRANS TRANS FRONT POWER LED FRONT TRANS MAIN TRANS REGUL 9P 9P USB BT DIGITAL BN101 BN101_1 5P CN771 5P...

Page 34: ...19 118 117 116 115 114 113 112 111 110 61 62 63 64 65 66 67 68 69 70 71 26 27 28 29 30 31 32 33 34 35 36 83 82 81 80 79 78 77 76 75 74 73 ai14667 Pin Pin Name Symbol I O Pullup STBY Pass Trough BT STB...

Page 35: ..._HAINT0 NC I CE C3VPu I I I I NC MN864788_HDMI AUDIO INTERRUPT0 105 PA13 DEBUG I JTMS SWDIO 106 PCAP_2 Not Connected 107 VSS_2 GND 108 VDD_2 3 3V 109 PA14 DEBUG I JTCK SWCLK 110 PA15 DEBUG I JTDI 111...

Page 36: ...DVDD ALSB CSB EP_SCK EP_CS EP_MOSI EP_MISO MCLK_IN SCLK_IN AP5_IN AP4_IN DGNDIO Figure 3 ADV7623 Pin Configuration Terminal Functions ADV7623 Hardware Manual Rev 0 March 2010 17 Confidential NDA requi...

Page 37: ...tput Differential Clock Output Differential clock output at the TMDS clock rate supports TMDS logic level ADV7623 Hardware Manual Rev 0 March 2010 19 Confidential NDA required Location Mnemonic Type D...

Page 38: ...VDDIO Power Digital I O supply voltage 3 3 V ADV7623 Hardware Manual Rev 0 March 2010 21 Confidential NDA required Location Mnemonic Type Description 87 AP0_OUT Digital Output Audio output port 0 88 A...

Page 39: ...plement of port B in the HDMI interface 132 RXB_C HDMI Input Digital input clock true of port B in the HDMI interface 133 TVDD Power Receiver terminator supply voltage 3 3 V 134 RXB_0 HDMI Input Digit...

Page 40: ...ial Data Input Data Input Output 0 1 DO DQ1 Serial Data Output Data Input Output 1 1 CS Chip Enable WP DQ2 Write Protect Data Input Output 2 2 NC DQ3 Not Connect Data Input Output 3 2 Vcc Supply Volta...

Page 41: ...the positive going edge of the CLK with RAS low Enables row access precharge CAS Column Address Strobe Latches column addresses on the positive going edge of the CLK with CAS low Enables column acces...

Page 42: ...e NFET gate drive circuit Connect a 0 1 F ca pacitor between VBST and SW pins Block diagram TC74VHC157F FN FT FK 2007 10 01 2 Pin Assignment IEC Logic Symbol Truth Table Inputs ST SELECT A B Output H...

Page 43: ...SN74CBT3251DBQR CU251 TSSOP PW Tube SN74CBT3251PW CU251 TSSOP PW Tape and reel SN74CBT3251PWR CU251 Package drawings standard packing quantities thermal data symbolization and PCB design guidelines a...

Page 44: ...C LEADING EDGE BLANKING 16 1 HYSTERETIC THERMAL SHUTDOWN SHUNT REGULATOR ERROR AMPLIFIER DRAIN D ON OFF DCMAX DCMAX 66k 132k 0 OV UV OVP V VI LIMIT CURRENT LIMIT ADJUST VBG VT LINE SENSE SOFT START OF...

Page 45: ...2 5 2 5 2 5 2 5 2 5 2 5 2 5 2 5 2 5 2 5 2 5 2 5 2 5 2 3f D10 1 3 1 3 1 3 1 3 1 3 1 3 1 3 1 3 1 3 1 3 1 3 1 3 1 3 1 3 1 3 1 3 2f D11 2 3 2 3 2 3 2 3 2 3 2 3 2 3 2 3 2 3 2 3 2 3 2 3 2 3 2 3 2 3 2 3 3b D...

Page 46: ...HP0C20002 SURROUND BACK RCSHP0C20018 ZONE2 Blu ray RCSHP0C20003 MASTERVOL PRESET1 0dB RCSHP0C20019 ZONE2 AUX RCSHP0C20004 RCSHP0C20020 ZONE2 GAME RCSHP0C20005 MASTERVOL PRESET2 20dB RCSHP0C20021 RCSHP...

Page 47: ...HP0210043 RCSHP0210059 ZONE2 ON RCSHP0210044 RCSHP0210060 ZONE2 OFF RCSHP0210045 RCSHP0210061 ZONE3 ON RCSHP0210046 RCSHP0210062 ZONE3 OFF RCSHP0210047 RCSHP0210063 FORMAT SHARP DATA CONSTRUCTION 15bi...

Page 48: ...1 1 1 0 1 0 M VR PRESET3 40dB RCKSK0410378 0 1 0 1 1 1 1 0 1 0 Channel Level RCKSK0410383 1 1 1 1 1 1 1 0 1 0 TEST TONE ON OFF RCKSK0410384 0 0 0 0 0 0 0 1 1 0 FL LEVEL UP RCKSK0410385 1 0 0 0 0 0 0...

Page 49: ...TUNING DOWN RCKSK0410972 0 0 1 1 0 0 1 1 1 1 MAIN ZONE PRESET CH UP RCKSK0410973 1 0 1 1 0 0 1 1 1 1 MAIN ZONE PRESET CH DOWN RCKSK0410974 0 1 1 1 0 0 1 1 1 1 MAIN ZONE PRESET CH SHIFT RCKSK0410976 0...

Page 50: ...SEMBLY Flowchart 1 FRONT PANEL ASSY 2 VIDEO PCB 3 DIGITAL PCB 4 MAIN PCB 5 SMPS PCB 6 REGULATOR PCB 7 TRANS EXPLODED VIEW PACKAGING VIEW Before Servicing This Unit Electrical Mechanical Repair Informa...

Page 51: ...o of EXPLODED VIEW P 2 PHONE PCB Ref No of EXPLODED VIEW P 3 TOP COVER TRANS DISASSEMBLY 7 TRANS and EXPLODED VIEW POWER TRANS Ref No of EXPLODED VIEW P 14 VIDEO PCB DISASSEMBLY 2 VIDEO PCB and EXPLOD...

Page 52: ...Photos of AVR X250BT E2 are used in this manual The viewpoint of each photograph Shooting direction X View from the top Shooting direction C Shooting direction D Shooting direction A Shooting directi...

Page 53: ...ng direction A x4 FFC Proceeding TOP COVER VIDEO PCB DIGITAL PCB 1 Remove the screws Remove the connector Remove the FFC 3 DIGITAL PCB Shooting direction A x2 x8 x2 CN713 CN752 FFC CN712CN772 CN771 CN...

Page 54: ...e EXPLODED VIEW for instructions on removing the SMPS PCB Proceeding TOP COVER REGULATOR PCB See EXPLODED VIEW for instructions on removing the REG PCB Proceeding TOP COVER TRANS See EXPLODED VIEW for...

Page 55: ...x1 S7 x1 F3 F2 F5 F6 F4 F1 F7 F8 F9 F10 P1 P2 P3 S6 x1 S6 x3 S6 x1 S3 x2 S3 x1 S3 x6 S3 x1 S3 x2 S6 x4 S6 x7 M10 M11 S6 x2 P15 S4 x2 P4 S14 AVRX250BT EXPLODED VIEW z z EXPLODED VIEW Parts List http dm...

Page 56: ...1 2 3 6 7 4 UK plug Adaptor 10 9 8 10 z 5 2 5 3 5 4 5 5 5 6 5 7 5 8 5 9 Parts List http dmedia dmglobal com Document DocumentDetails 24459 Before Servicing This Unit Electrical Mechanical Repair Info...

Page 57: ...setting button 1 Version Display Mode 2 Video Format and Display Language change mode 3 Product mode 3 1 Remote Lock mode 3 2 Tuner Step Change mode E2 only 3 3 OSD Update Mode 3 4 Protection History...

Page 58: ...t the PCBs Is DC5V output even when the connector CN751 supplying power from the SMPS PCB to the DIGITAL PCB is removed Check the circuits around the Microproces sor on the DIGITAL PCB and replace any...

Page 59: ...PU IC711 is faulty Check the pattern between JK781 and IC781 and then check the Blu ray DVD player or the cable between the unit and the Blu ray DVD player Is the power voltage being output correctly...

Page 60: ...with the one shorter than 5m 2m is recommended and check again Use an High speed HDMI cable with Ethernet or High speed cable that comes with the HDMI logo The HDMI DVI cable is faulty Remove all of...

Page 61: ...21 or IC721 is faulty wThe X731 or IC731 is faulty Replace any faulty parts The RESET pattern or IC721 IC731 is faulty Replace any faulty parts The SDATA SCL signal pattern is faulty Replace the HDMI...

Page 62: ...07 Q7106 Q7105 IC764 IC763 IC762 IC761 IC743 IC755 IC741 IC711 X741 X711 IC 72 1 IC731 D7607 D7606 D7605 D7604 D7603 D7504 D7503 D7502 L7518 L7484 L7511 C7572 C7558 C7512 C7511 C7559 C7569 C7556 IC753...

Page 63: ...gacy PCM2ch or DolbyDigital or dts CHECK 6 Setting SOURCE HDMI OUT other AVR HDMI IN HDMI HD AUDIO PCM MULTI or DolbyTrueHD or dts HD MA CHECK 5 INPUT SURROUND MODE SOURCE Audio output OK HDMI HD MA a...

Page 64: ...or open 4 7 Are any other transistors faulty Are any other resistors faulty Turn on the power and check that the voltage of each part is correct and that there is an idling current Replace the power t...

Page 65: ...rofile Is the Bluetooth function enabled on the Bluetooth device Connect the connectors correctly The circuit around Q7510 of the DIGITAL PCB is faulty Use a device that is A2DP profile compatible Ena...

Page 66: ...13 47 25V NX A R6011 10 1608 D 6012 1N4007 ZD 620 Z39V C6012 0 1uF 1608 D6007 1N4007 ZD618 Z27V C6008 50V 10UF NX A C6014 0 1uF 1608 C6015 4 7uF 1608 C6017 100 50V C6018 5600uF 6 3V NX A C6019 5600uF...

Page 67: ...7311 R7301 R7280 R7267 R7254 R7152 R7656 R7653 R7651 R7640 R7639 R7546 R7478 R7477 R7476 R7413 R7246 R7235 R7234 R7233 R7232 R7165 R7164 R7163 R7139 R7773 R7772 R7763 R7762 R7722 R7659 R7658 R7541 R73...

Page 68: ...e NTSC or PAL Default E2 E1C PAL 3 2 Language Select or change the language ENGLISH or SPANISH or FRENCH or CHINESE Default E2 ENGLISH E1C CHINESE 4 Product mode TUNER PRESET CH TUNE TUNE Select the f...

Page 69: ...n com e Main IAP r DSP version t OSD version y 4k GUI version u Bluetooth version qModel destination information AVR X250 Region E3 E2 E1C JP wMain com Main eMain IAP Main IAP V rDSP version DSP tOSD...

Page 70: ...SC TUNER PRESET CH or DIMMER V Format PAL Press the TUNE button to confirm the displayed mode Do not turn off the power until the display switches to the normal mode screen wSelect Display Language La...

Page 71: ...f STATUS PMIG STATUS NO PROTECT 4 Canceling the selected mode Press the power button to turn off the power 3 1 1 Actions This mode prohibits remote control operation 3 1 2 Starting up While the power...

Page 72: ...Pressing the button each time switches the display shown as follows AM9 FM50 TUNER PRESET CH or DIMMER AM10 FM200 Enter using the TUNE button The display then returns to normal mode b The step freque...

Page 73: ...s abnormal If the power is turned on in the abnormal state protection is activated after around 6 seconds and the power is turned off 4 THERMAL if the last protection is THERMAL A or THERMAL B PRT THE...

Page 74: ...el lock mode 4 2 Starting up Press TUNER PRESET CH and QUICK SELECT 3 simultaneously while on standby Panel LOCK On 4 3 Canceling the selected mode Press TUNER PRESET CH and QUICK SELECT 4 simultaneou...

Page 75: ...UI menu Press the cursor button to select General ECO ECO Mode Off 2 Remove the top cover 3 Connect the DC Voltmeter to the test points FRONT Lch CN510 FRONT Rch CN550 CENTER ch CN530 SURROUND Lch CN5...

Page 76: ...E AFTER REPLACING THE PCB PROCEDURE AFTER REPLACING THE U COM ETC FIRMWARE UPDATE PROCEDURE 1 Items necessary for update 2 How to Update Before Servicing This Unit Electrical Mechanical Repair Informa...

Page 77: ...D7602 D7601 C7397 Q7611 Q7610 Q7614 Q7612 Q7613 Q7521 Q7517 Q7509 Q7504 Q7501 Q7516 Q7202 Q7201 Q7608 Q7514 Q7609 Q7515 Q7513 Q7522 Q7520 Q7518 Q7506 Q7503 Q7502 Q7510 Q7112 Q7512 Q7113 Q7107 Q7106 Q7...

Page 78: ...dard Service Equipment Not offered by D M Purchase from D M Article code Download from SDI System u com Serial Flash Update RS 232C cable 9P Male Straight X 8U 210100S WRITING KIT OLD JIG SPK 581 WRIT...

Page 79: ...EPM CE DSPBOOT Connect the RS 232C cable Straight cable Top side is contacts of exible card cable Using the 7P FFC Straight is 1PIN side This side is contacts of exible card cable is 1PIN side Align...

Page 80: ...ed next to each firmware file Click Write A B C D ModelName_DSP_vXXX bin ModelName ModelName_MCU_vXX_XX bin ModelName_OSD1_vXX_XX bin ModelName_OSD2_vXXXXXXXX bin A B C D C Users Desktop ModelName Mod...

Page 81: ...e an update is started normal operations cannot be performed until it is completed The GUI menu settings and image adjustment settings of this unit may be initialized Note down the settings before upd...

Page 82: ...Copyright 2018 D M Holdings Inc All Rights Reserved www denon com...

Reviews: