background image

The Operating Manual for DENON AV Receiver/Amplifier firmware upgrade                    Page 9 / 18 


3.8

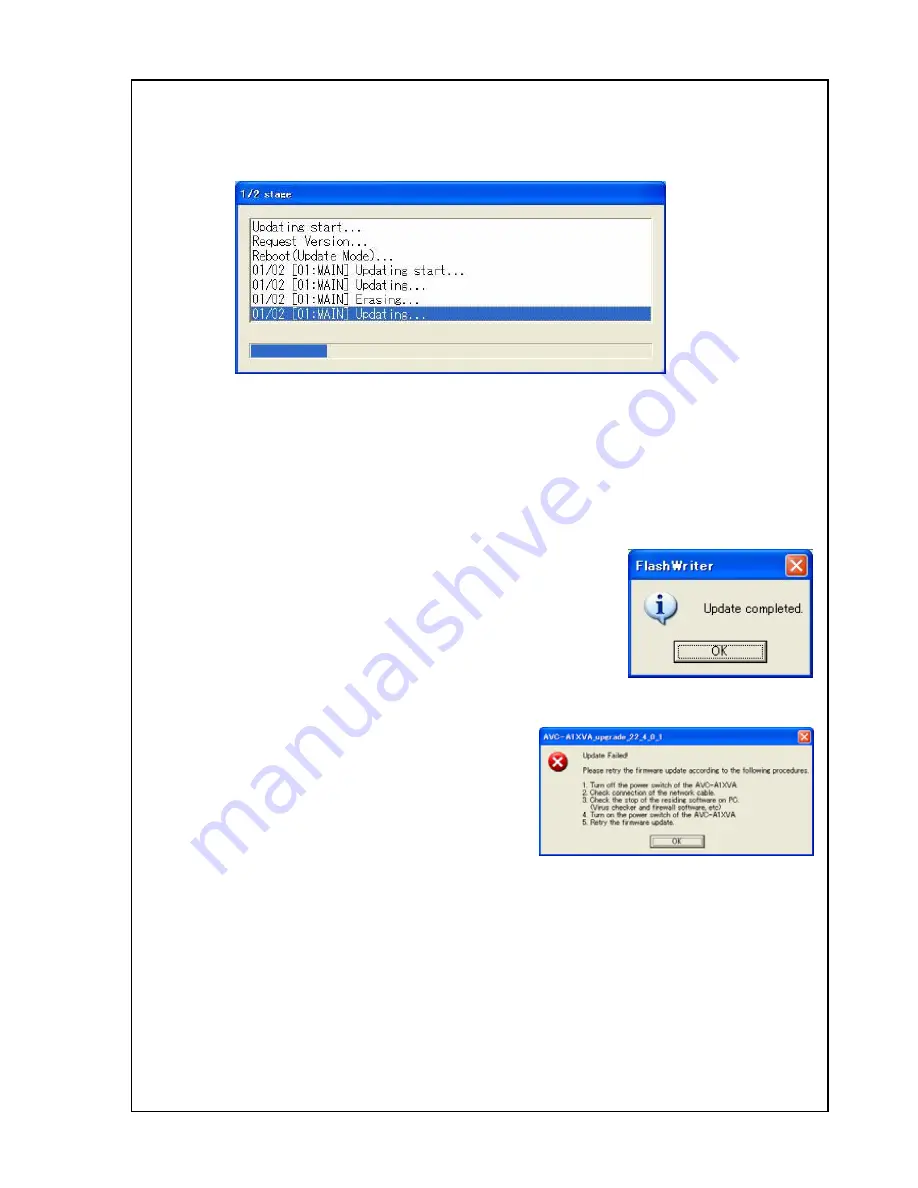
  Start the firmware update. 

Click the “Update” button. You can see the following indication. 


This upgrade takes almost 5 minutes from beginning to the end.   

The upgrade situation is displayed as the bar graph, and can confirm the status. 

Please do not touch the router, working PC, the AV Receiver / Amplifier, the connecting cable, 

and HUB while upgrade. 


3.9

  Complete the firmware update. 

1) When Update utility completed the firmware update, you can 

see the “Update completed.” message. 


2) If you can’t complete the firmware update, please retry the firmware update from 2.1.   


3) Please turn off the power of the AV amplifier / receiver after the firmware upgrade.   

  After the connection used for the upgrade is removed, Turn the power on of the AV amplifier / 

receiver.  


Summary of Contents for AVR-5805CI AV

Page 1: ...Manual for DENON AV Receiver Amplifier firmware upgrade Page 1 18 The Operating Manual for DENON AV Receiver Amplifier firmware upgrade AVR 5805CI Upgrade tool Model Name AVR 5805CI Version 23 0 0 1 D...

Page 2: ...irmware update 9 3 9 Complete the firmware update 9 4 Firmwares update procedure 10 4 1 Setup the IP address of the PC refer to 6 10 4 2 Run the upgrade application 10 4 3 Confirmation of notes 10 4 4...

Page 3: ...irewall software etc d Avoid the communication cable from the electrical noise source E g telephone cable AC line a fluorescent light e Stop the screen saver ability on PC f Stop the power save abilit...

Page 4: ...5MB or more OS Windows XP Home Edition Professional SP2 Display resolution Super VGA 800x600 or more Port ETHERNET port RJ 45 Communication speed ETHERNET 10BASE T 100BASE TX 1 2 Preparations for the...

Page 5: ...onnect the Ethernet straight cable between Ethernet port of Hub or Router w o DHCP server and Ethernet port of AV Receiver Amplifier refer to 4 C Connect the Ethernet straight cable between Ethernet p...

Page 6: ...connection without hub using cross cable refer to 2 1 a 3 1 Setup the IP address of the PC refer to 6 Setup the IP Address IP Address 192 168 0 2 Subnet Mask 255 255 255 0 3 2 Run the upgrade applicat...

Page 7: ...ier 1 Push the SYSTEM SETUP button on the AV Receiver Amplifier or the remote controller 2 Select 7 Option Setup and push the CH SELECT ENTER button on the AV Receiver Amplifier or the remote controll...

Page 8: ...button 2 If connection is good then you can see the Communication check OK message and push the OK button 3 If connection is not good then you can see the Communication check NG message Please confir...

Page 9: ...us Please do not touch the router working PC the AV Receiver Amplifier the connecting cable and HUB while upgrade 3 9 Complete the firmware update 1 When Update utility completed the firmware update y...

Page 10: ...er to 2 1 b 4 1 Setup the IP address of the PC refer to 6 Setup the IP Address IP Address 192 168 0 2 1 Subnet Mask 255 255 255 0 1 If this address conflicts with the other equipments then you should...

Page 11: ...ier 1 Push the SYSTEM SETUP button on the AV Receiver Amplifier or the remote controller 2 Select 7 Option Setup and push the CH SELECT ENTER button on the AV Receiver Amplifier or the remote controll...

Page 12: ...button 2 If connection is good then you can see the Communication check OK message and push the OK button 3 If connection is not good then you can see the Communication check NG message Please confir...

Page 13: ...us Please do not touch the router working PC the AV Receiver Amplifier the connecting cable and HUB while upgrade 4 9 Complete the firmware update 1 When Update utility completed the firmware update y...

Page 14: ...Page 14 18 5 Firmwares update procedure In case of Ethernet HUB or Router with DHCP server ability refer to 2 1 c 5 1 Run the upgrade application Run the AVR 5805CI_UTOOL_23_0_0_1 exe 5 2 Confirmatio...

Page 15: ...You can see the dialog box like the picture of the right hand 1 Push the SYSTEM SETUP button on the AV Receiver Amplifier or the remote controller 2 Select 7 Option Setup and push the CH SELECT ENTER...

Page 16: ...OK button 3 If connection is not good then you can see the Communication check NG message Please confirm the following a Check the connection refer to 2 1 c b Check the IP address refer to 5 5 Push t...

Page 17: ...us Please do not touch the router working PC the AV Receiver Amplifier the connecting cable and HUB while upgrade 5 8 Complete the firmware update 1 When Update utility completed the firmware update y...

Page 18: ...s Properties 7 Check the status of General tab of Internet Protocol TCP IP Properties Please confirm the current setting of the Internet protocol Obtain an IP address automatically Use following IP ad...

Reviews: