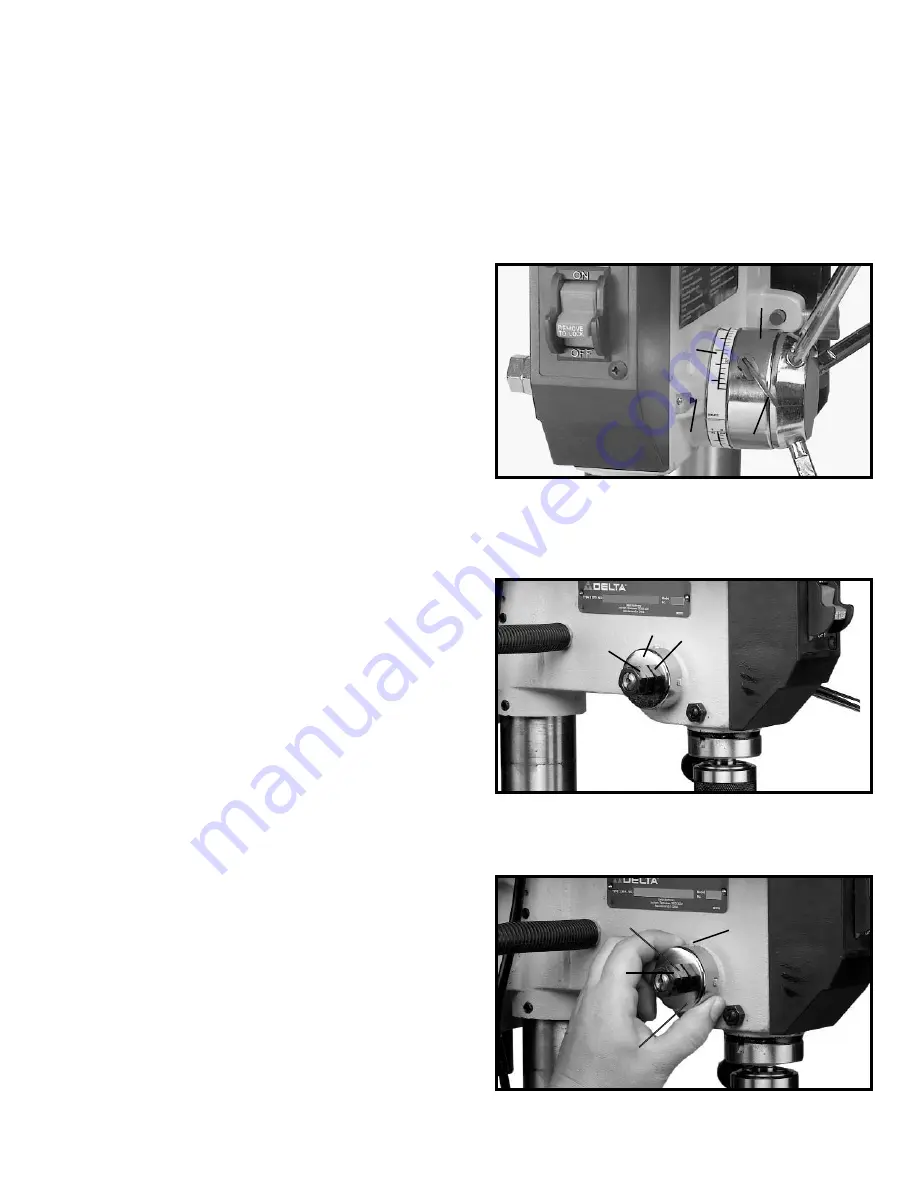
Delta ShopMaster DP200 Instruction Manual Download Page 13

13

Fig. 27

DRILLING HOLES TO DEPTH

Where a number of holes are to be drilled to exactly the
same depth, a depth stop is provided in the pinion shaft
housing and is used as follows:

1.

DISCONNECT MACHINE FROM POWER SOURCE.

2.

Insert bit into chuck.

3.

Lower the spindle until the pointer (C) Fig. 27, lines

up with the mark on the scale (D) you wish the depth of
the holes to be drilled. Then tighten lock screw (A).
Return the spindle to the up position.

4.

Place the material to be drilled on the drill press

table. Raise the drill press table until the material to be
drilled just touches the drill bit.

5.

Drill a test hole to check the adjustment and readjust

if necessary. All holes will then be drilled to the exact
depth as indicated on scale (D) Fig. 27. 

NOTE:

Scale (D)

is calibrated in both inches and millimeters.

C

A

B

D

ADJUSTING SPINDLE
RETURN SPRING

The spindle is automatically returned to its upper most
position when the handle is released. It is recommended
that the handle be allowed to slowly return to the top
position after each hole has been drilled in the material.
This spring has been properly adjusted at the factory
and should not be disturbed unless absolutely
necessary. To adjust the return spring, proceed as
follows:

1.

DISCONNECT MACHINE FROM POWER SOURCE.

2.

Loosen nuts (B) and (E) Fig. 28. Make sure spring

housing (A) stays engaged with head casting.

3.

While 

FIRMLY HOLDING

spring housing (A) Fig. 29

pull out housing and rotate it until boss (D) is engaged
with the next notch on the housing. Turn the housing
counterclockwise to increase or clockwise to decrease
spring tension. Turn nut (E) until it contacts spring
housing (A), then back nut (E) out a 1/4 turn from spring
housing (A). Tighten nut (B) against nut (E), to hold the
housing in place. 

IMPORTANT: Inside nut (E) should

not contact spring housing (A) when tightened.

Fig. 28

Fig. 29

5.

After the belt is positioned on the desired steps of

the motor and spindle pulleys, move motor (D) Fig. 26,
to the rear until the belt is properly tensioned and tighten
tension lock knob (B). The belt should be just tight
enough to prevent slipping. Excessive tension will
reduce the life of the belt, pulleys and bearings. Correct
tension is obtained when the belt (C) can be flexed
about 1" out of line midway between the pulleys using
light finger pressure.

B

E

A

A

D

B

E

Summary of Contents for ShopMaster DP200

Page 1: ...RT NO 906770 07 01 02 Copyright 2002 Delta Machinery ESPA OL P GINA 17 To learn more about DELTA MACHINERY visit our website at www deltamachinery com For Parts Service Warranty or other Assistance pl...

Page 2: ...y to get caught in moving parts Nonslip footwear is recommended Wear protective hair covering to contain long hair 12 SECURE WORK Use clamps or a vise to hold work when practical It s safer than using...

Page 3: ...piece from rotating by clamping it to the table or by securing it against the drill press column 14 TURN THE MACHINE OFF AND WAIT FOR THE DRILL BIT CUTTING TOOL OR SANDER TO STOP TURNING prior to clea...

Page 4: ...pter should be used only until a properly grounded outlet can be installed by a qualified electrician The green colored rigid ear lug and the like extending from the adapter must be connected to a per...

Page 5: ...ing container s Remove the protective coating from all unpainted surfaces This coating may be removed with a soft cloth moistened with kerosene do not use acetone gasoline or lacquer thinner for this...

Page 6: ...aft Handles 3 7 M8x1 25x125mm Carriage Head Screws 2 M8 Flat Washers 2 M8 1 Lock Washers 2 M8x1 25 Hex Nuts 2 for fastening the base to a supporting surface 8 Worm Gear for Table Raising and Lowering...

Page 7: ...using the four screws three of which are shown at C Loosen set screw D and remove ring E and raising rack F Fig 3 Fig 4 Fig 5 G H H G Fig 6 F G 2 Make certain worm gear G Figs 4 and 5 is in place in...

Page 8: ...Fig 9 which was removed in STEP 1 IMPORTANT Bottom of ring E MUST NOT be pushed all the way down onto top of raising rack F MAKE SURE top of raising rack F is under bottom of ring E and that there is...

Page 9: ...8 Place the drill press head N Fig 13 onto the column as far as it will go Align head A Fig 13A to table B and base C Tighten the two head locking screws O Fig 13 with wrench supplied 9 Thread the th...

Page 10: ...g 16 IMPORTANT To avoid damage to the chuck NEVER drive the chuck onto the spindle with a metal hammer FASTENING DRILL PRESS TO SUPPORTING SURFACE If during operation there is any tendency for the mac...

Page 11: ...loosening the table clamp A Fig 20 and turning the table raising and lowering handle B Fig 21 After the table is at the desired height tighten clamp A Fig 20 NOTE Final positioning of the drill press...

Page 12: ...line up with the scale E C D E D C SPINDLE SPEEDS Five spindle speeds of 620 1100 1720 2340 and 3100 RPM are available with your drill press Fig 25 illustrates which step on the motor and spindle pul...

Page 13: ...illed in the material This spring has been properly adjusted at the factory and should not be disturbed unless absolutely necessary To adjust the return spring proceed as follows 1 DISCONNECT MACHINE...

Page 14: ...not possible to support the workpiece against the column the workpiece should always be fastened to the table using clamps or a vise Fig 30 INSTALLING AND REMOVING DRILL BITS 1 DISCONNECT MACHINE FRO...

Page 15: ...and the drill press head so that the table and drill press head can be clamped in the center position at any height Feed slowly when the bit is about to cut through the wood to prevent splintering the...

Page 16: ...s sole warranty and sets forth the customer s exclusive remedy with respect to defective products all other warranties express or implied whether of merchantability fitness for purpose or otherwise a...

Reviews: