background image

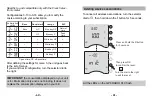
Press the 

2

button.

To modify the various settings, press the + or - buttons,
then press the OK button to confirm and go to the next
setting.

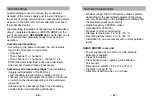
Ch

a

nge 

permi

ss

ion 

for 

us

er

Progr

a

mme ch

a

nge

s


a

llowed

Progr

a

mme ch

a

nge

s

 not 

a

llowed

- 21 -

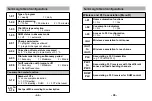
Advanced configurations (menu 2)

- 20 -

Pilot Wire 
type 

s

election

6-order Pilot Wire (def

au

lt)

4-order Pilot Wire

After defining the settings for menu 1, the unit goes back
to the list of menus.
If you want to exit configuration, turn the selector dial to
the right.

DHW 

s

t

a

t

us

 in 

abs

ence mode

DHW off (def

au

lt)

DHW in 

au

tom

a

tic

Summary of Contents for GP8 Radio CPL

Page 1: ... is available on request from Technical information department DELTA DORE Bonnemain 35270 Combourg France E mail info techniques deltadore com Because of changes in standards and equipment the characteristics given in the text and the illustrations in this document are not binding unless confirmed OK OK RF RF GP8 RADIO CPL Amp 15 50 45 35 30 25 20 60 63 10 75 7 5 90 5 CE 40 GP8 Radio CPL Radio DRI...

Page 2: ...rate excessive interference Directive 2004 108 EC The GP8 RADIO PLC only works with a RADIO DRIVER type of wireless programmer Warning Description 5 Positioning the GP8 RADIO PLC 5 Connecting the GP8 RADIO PLC 6 Commissioning the GP8 RADIO PLC 10 Mounting Positioning the RADIO DRIVER 12 Quick association of the GP8 PLC to the Radio Driver and PLC receivers 14 Setting the time on the RADIO DRIVER 1...

Page 3: ...way from any metallic mass Wireless PLC association menu R 25 Accessing the wireless association menu 25 Home automation functions in the installation 26 Consumption meter function 27 Access to PLC configuration 28 Associating a radio transmitter 29 Associating PLC transmitters 33 Associating PLC receivers 34 Allocation of receivers on a three phase system 34 Re associating PLC receivers 37 Associ...

Page 4: ...t switch Current transformers The CT wire length can be extended by up to 1 5 m for wire type H03VV F or H05V K The CT does not have a connection polarity It is possible to pass several conductors from the same phase through a single CT maximum interior Ø10 mm For an installation with a single phase electronic meter the CT option ref 6330004 is used for the consumption indication function of the h...

Page 5: ...an electromechanical meter Connecting the GP8 RADIO PLC 9 10A L1 L2 L3 L1 L2 L3 Meter off peak contact The phase connected to the meter s Off Peak contact must be the same as the GP8 RADIO PLC power supply phase Phase coupler 1 2 3 Domestic Hot Water OP DHW remote info 230 V power supply Day night contact switch Three phase connection ...

Page 6: ...t Load shedding time 1 to 2 minutes To perform the load shedding test the system must be put into power over load 1 2 3 4 3 1 1 2 3 4 Delayed Immediate 1 2 3 4 Cascade Cascade cyclic 1 2 3 4 Test Normal 10 Commissioning the GP8 RADIO PLC Calibre selection If your installation is equipped with a conventional meter select one of the calibres available from 5A to 90A depending on your specific EDF su...

Page 7: ...it Position the thermostat on its base Lock the thermostat 1 2 12 Mounting Positioning the RADIO DRIVER For ease of use the RADIO DRIVER can be installed on the wall at a height of about 1 5 m with screws plugs on a base placed on a piece of furniture or on a shelf Separate the unit from its base by unlocking it Starting up Remove the protective tab from the batteries The first time you activate t...

Page 8: ...n load shedding channels Load shedding channel selection Press and hold for 3 seconds until the following screen appears QuickassociationoftheGP8PLCtotheRadioDriverandPLCreceivers PLC zone 1 PLC zone 2 PLC zone 3 d0 d1 d2 d3 d4 d5 d6 d7 d8 Kitchen Lounge Living room Living room 1 Corridor 1Corridor 2 Bedroom 1 Bedroom 2 Bath room 1 Bath room 2 d0 d1 d2 d3 d4 d5 d6 d7 d8 PLC zone 1 PLC zone 2 PLC z...

Page 9: ... time on the RADIO DRIVER Minutes Hours Days 1 Monday to 7 Sunday to configure zone 3 to configure zone 2 Validate on the receiver Put the receiver in association mode see documentation Validate on the receiver Load shedding channel selection for zone 2 Repeat steps and for each receiver in the zone To exit the configuration menu turn the dial 1 1 2 2 Validate on the receiver Load shedding channel...

Page 10: ...reless association Information about unit version Configuration mode 5 seconds Menu 3 is only accessible if the RADIO DRIVER is associated with a RADIO TYWATT or the consumption meter function of a GP8 RADIO PLC see menu R 19 Basic configurations menu 1 Press the 1 button To modify the various settings press the or buttons then press the OK button to confirm and go to the next setting Programming ...

Page 11: ...amme changes allowed Programme changes not allowed 21 Advanced configurations menu 2 20 Pilot Wire type selection 6 order Pilot Wire default 4 order Pilot Wire After defining the settings for menu 1 the unit goes back to the list of menus If you want to exit configuration turn the selector dial to the right DHW status in absence mode DHW off default DHW in automatic ...

Page 12: ...2 22 Pilot Wire order selection in Economy mode only for 6 order Pilot Wire Economy default Modérato Comfort 2 C Médio Comfort 1 C Correction of temperature measured Correction possible by 5 C either way in increments of 0 1 C Press the or buttons to change and press OK to confirm If there is a difference between the actual temperature taken with a thermometer and the temperature meas ured and dis...

Page 13: ...l Eco Tariff reduction Economy Configuration 2 06 0 Comfort 2 C Configuration 2 06 1 Comfort 1 C Configuration 2 06 2 Comfort Configuration 2 06 3 Economy Configuration 2 03 0 Comfort 2 C Configuration 2 03 1 Comfort 1 C Configuration 2 03 21 Economy Comfort 2 C Comfort 1 C Comfort 1 C Comfort Comfort 1 C Comfort 2 C Comfort Comfort Comfort 2 C Comfort 1 C Comfort 1 C After defining the settings f...

Page 14: ...Up to 7 home automation products alarm control unit remote controls etc can be associated for each of the heating zones 7 products to act on all the heating zones telephone transmitter outdoor probe etc Menu r 01 can be used to declare these home automa tion functions Compatibility with transmitters from the TYXAL TYXIA and TYDOM ranges Delta Dore Press or to make your choice Press OK to confirm a...

Page 15: ... on the RADIO DRIVER The screen displays 1 The GP8 RADIO PLC is associated with the RADIO DRIVER If you do not have any home automation products press the OK button until PLC is displayed and associate the PLC products 28 Access to PLC configuration The GP8 RADIO PLC controls PLC receivers Press or to make your choice Press OK to confirm and go to the next menu Access to PLC configuration No PLC c...

Page 16: ...pen heating in Frost Protection mode Telephone transmitter Remote control of the installation TYXAL control unit Monitoring alarm on heating in Economy mode Monitoring alarm off heating in Comfort mode until the next program change 30 Step 2 Associating the home automation products The following menus are used to associate one or more transmitters either with all zones rAd or with one zone zone rA...

Page 17: ...d the symbol flashes Associate buttons and zone by zone Press one of the tactile keys or Associate buttons and for all zones rAd Press one of the tactile keys or To exit the association mode press anoth er domain button e g To be associated zone by zone Simultaneously press and hold the buttons for 5 seconds The LED comes on goes off and then comes back on Then release the buttons To be associated...

Page 18: ... Receiver B load shedding channel 2 34 Associating PLC receivers e g TC 51089 For each receiver you must specify the programming zone with which it is to be associated as well as its load shedding channel from d1 to d8 d0 no load shedding Programming zone Load shedding channel Load shedding channel selection Programming zone selection Allocation of receivers on a three phase system In three phase ...

Page 19: ...release the button The green LED stops flashing The receiver is associated with the system To exit configuration mode turn the selector dial to the right Wireless PLC association menu R Associating receiver A Programming zone selected PLC 1 Press or to select the load shed ding channel d 1 On the receiver the OK LED flashes slowly Press and release the button The green LED stops flashing Receiver ...

Page 20: ...earest cent For example Euro 0 1085 is rounded to Euro 0 11 0 11 incl tax 38 Configuration of the consumption meter function Menu 3 Only if the GP8 RADIO PLC is connected to an elec tronic meter Menus 3 12 to 3 18 are only available if you have declared the consumption meter function in menu R r 02 Consumption meter function To display consumptions for heating DHW and other uses you must declare t...

Page 21: ...ding to your subscription After defining the settings for menu 3 the unit goes back to the list of menus If you want to exit configuration turn the selector dial to the right IMPORTANT the consumption displayed on your unit is for information only and is not binding It does not replace the consumption displayed on your bill Base HC Blue day OP Base Double tariff tempo EJP Normal time HP Blue day P...

Page 22: ...ESt mode Otherwise move your transmitter Wireless test 5 seconds 42 The factory settings may be restored for each of the menus Turn the dial to then press and hold the i button for 5 seconds Repeat these steps for the other menus To exit the mode turn the selector dial to the right Restore factory settings Press and hold the button for the menu you want to reset for 5 seconds example shown here fo...

Page 23: ...ons 1 01 Type of program 0 weekly 1 daily 1 02 No programming 0 1 hour 1 30 minutes 2 15 minutes 1 03 Pilot Wire type selection 0 6 orders 1 4 orders 1 05 DHW status in absence mode 0 off 1 automatic 2 01 Change permission 0 program changes allowed 1 program changes not allowed 2 02 Correction of temperature measured by 5 C either way in increments of 0 1 C 2 03 Pilot wire order during an Economy ...

Page 24: ...supply and to avoid tripping in the event of strong current draws Load shedding starts as soon as the total current draw attempts to exceed the subscribed value Load shedding is cascade or cascade cyclic cascadocy clique registered trademark of DELTA DORE In the event of overpower GP8 RADIOPLC sheds load on all the channels then gradually brings them back into operation Cascade load shedding Accor...

Page 25: ... is in PLC mode Check that the OK LED of the GP8 RADIO PLC is flashing The receiver has already been associated 48 GP8 RADIO PLC modular unit 230 V 10 50 Hz power supply Consumption 4 VA Class II insulation DHW output 2A 230V Load shedding on up to 8 channels Circuit breaker calibres conventional meter from 5 A to 90 A PLC transmission frequency 132 5 kHz FSK modulation Transmission power conforms...

Page 26: ...reen displays You have reached the maximum number of functions to associate The four LEDs OK RF and are flashing The GP8 RADIO PLC has not been configured The unit displays the time and the temperature The RADIO DRIVER is in standby mode Press a button to wake it up ...

Reviews: