29
3. To enable the function again, press the
button (B2)
again: the light comes on;
4. Press the
/
button (B9) to confirm. The light
goes off.
The energy saving setting is now programmed.
Please note!
• When in energy saving mode, a few seconds may elapse before
the first coffee is delivered as the appliance must heat up
again.
12. SETTING THE TEMPERATURE
To change the temperature of the water used to make the cof-
fee, proceed as follows:
1. With the appliance off (standby) and the main switch (A6)
in the
I
position (fig. 1), press and hold the
button
(B2) until the lights on the control panel come on;
2. Press the
button to select the required temperature:
LOW HIGH
3. Press the
/
button (B9) to confirm the selec-
tion. The lights go out.
13. WATER SOFTENER FILTER
Certain models are fitted with a water softener filter (C4). If this
is not the case with your model, you are recommended to pur-
chase one from De’Longhi Customer Services.
To use the filter correctly, follow the instructions below.
13.1 Installing the filter
1. Turn the appliance on and wait until it is ready for use.
2. Remove the filter (C4) from the packaging. The date indica-
tor disk varies according to the filter provided (fig. 8);
3. Turn the date disk to display the next 2 months of use.
Please note
The filter lasts about two months if the appliance is used nor-
mally. If the coffee machine is left unused with the filter in-
stalled, it will last no longer than 3 weeks.
4. To activate the filter, run tap water through the hole in
the filter as shown in figure 9 until water comes out of the
openings at the side for more than a minute;
5. Extract the tank (A7) from the appliance and fill with
water;
6. Insert the filter in the water tank and immerse it complete-
ly for about ten seconds, sloping it and pressing it lightly to
enable the air bubbles to escape (fig. 10).
7. Insert the filter in the filter housing and press as far as it
will go (fig. 11);
8. Close the tank with the lid (fig. 12), then replace the tank
in the machine;
9. Position a container with a minimum capacity of 500ml
under the cappuccino maker/hot water spout (A18).
10. Deliver hot water by turning the steam/hot water dial
(A21) to the
I
position.
11. Deliver at least 500 ml of water, then turn the steam/hot
water dial to the
0
position.
The filter is now active and you can use the coffee machine.
Please note:
Occasionally one delivery of hot water is not enough to install
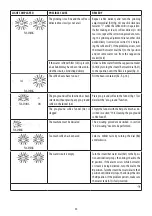
the filter and the
lights come on dur-
ing installation.
If this happens repeat the installation procedure from point 8.
The filter is now active and you can use the coffee machine.
13.2 Removal and replacement of the water
softener filter
After two months (see date indicator) or when the appliance has
not been used for 3 weeks, you should replace the filter:
1. Extract the tank (A7) and exhausted filter (C4);
2. To replace the filter, remove the new filter from the pack-
aging and proceed as described in the previous section.
The filter is now activated.
14. RINSING
Use this function to deliver hot water from the coffee spouts
(A11) to clean and heat the appliance’s internal circuit.
Place a container with a minimum capacity of 100ml under the
coffee and hot water spouts.
Important! Danger of scalding.
Do not leave the appliance unattended while hot water is being
delivered.
1) To start this function, press the
button (B5);
2) After a few seconds, hot water is delivered from the cof-
fee spouts, cleaning and heating the appliance’s internal
circuit.
3) To interrupt the function manually, press the
but-
ton again.
Please note!
• If the appliance is not used for more than 3-4 days, when
you turn it on again, we strongly recommend performing
2/3 rinses before use;


