background image

OPERATING YOUR TOASTER

PREPARING YOUR TOASTER:

1.

Place the toaster on a flat, level surface away from any edge.

2.

Plug the unit into a 120V / 60Hz only outlet.

SUGGESTIONS:

1.     Never use the toaster when it is empty (when there is no food inside).

2.     Do not use very thin or broken slices of bread.

3.     Do not insert other foods that may drip during the cooking process.

4.     Frequently discard the crumbs from the removable crumb tray.

5.     Do not insert foods that are too large for the toasting slots.

6.     Do not insert forks or other utensils inside the toaster in order to remove bread.

7.     Select a lower setting for light browning, for toasting one slice only or for dry

                bread.

8.     When toasting a single slice of bread, you may notice a variation in toast color

                from one side to the other.  This is normal. 

 NOTE:

 If you are only toasting one

item of food, place it in the toasting slot closest to the embossed arrow on the

top of the toaster (this is where the toast sensor is).

9.     Dry/stale bread toasts more quickly than fresh bread.  And thinly sliced bread

                toasts more quickly than thickly sliced bread.  Therefore, the browning control

                should be set at a lower setting than usual.

10.   For best results, ensure that the bread slices are of an even thickness,

                freshness and size.

11.   In order to achieve uniform browning, we recommend you wait a minimum of

                30 seconds between each toasting cycle so that the browning control

                automatically resets itself.

OPERATING YOUR TOASTER:

1.

Move the browning control to the desired setting.  Use a low setting      for light

toasting and for thin or dry bread.  To increase the browning, gradually move

the browning control towards the darkest setting.

2.

Insert the food item you would like to toast (bread, muffin, bagel, frozen

waffle, etc.)  

NOTE: 

Make sure large items (like bagels or muffins) are cut first

to fit the width of the toast slots.

3.     The toaster is equipped with a sensor that detects when food is placed inside

the toaster.  

NOTE:

 When the unit is plugged in, it is ready to toast.  There is no

need to turn it on.  The carriage will automatically lower.  The cancel button will

illuminate indicating that the toasting process has started.

-6-

Summary of Contents for DTT900 Series

Page 1: ...r la lista de centros de servicios cercanos a usted Solamente en los Estados Unidos Visita www delonghi com per una lisa dei centri di servizio a te piu vicini Solo negli Stati Uniti Manuale di istruzioni Tostapane Register this product on line and receive a free trial issue of Cook s Illustrated Visit www prodregister com delonghi Enregistrez ce produit en ligne et recevez un numéro gratuit de Co...

Page 2: ...ot place on or near hot gas or electric burner or in heated oven 10 Always plug cord into the wall outlet before turning on any controls To disconnect turn power OFF then remove plug from wall outlet 11 Do not place toaster oven near combustible materials 12 The area around the toasting slots will become hot during use Do not touch these surfaces during operation 13 Do not allow the toasting slots...

Page 3: ...e the box on a large sturdy flat surface Carefully unpack your appliance and remove all packaging material and literature Remove any labels or stickers from the appliance To remove any dust that may have accumulated during packaging you may wipe the unit with a clean damp cloth Dry thoroughly Do not immerse the appliance in water or other liquid Do not use harsh or abrasive cleaners See Cleaning Y...

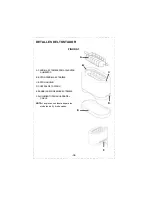
Page 4: ...OUR TOASTER FIGURE 1 A REMOVABLE WARMING RACK B WARMING RACK BUTTON C CANCEL BUTTON D BROWNING CONTROL E REMOVABLE CRUMB TRAY F CORD STORAGE NOTE Parts are the same for both 2 and 4 slice models 4 A B C D E F ...

Page 5: ...reference 4 REMOVABLE CRUMB TRAY Makes cleanup quick and effortless 5 DETACHABLE PARTS The removable warming rack and crumb tray allow for easy and convenient cleaning 6 LIFT AND LOWER CARRIAGE The carriage will automatically lift or lower your food 7 WARMING RACK Removable warming rack heats croissants muffins bagels or keeps already toasted items like toast warm 8 SEAMLESS BRUSHED ALUMINUM BODY ...

Page 6: ...ead toasts more quickly than fresh bread And thinly sliced bread toasts more quickly than thickly sliced bread Therefore the browning control should be set at a lower setting than usual 10 For best results ensure that the bread slices are of an even thickness freshness and size 11 In order to achieve uniform browning we recommend you wait a minimum of 30 seconds between each toasting cycle so that...

Page 7: ...to make sure it doesn t burn and turn it half way through 3 Press the Warming Rack button it will not illuminate The cancel button will illuminate and the carriage will lower automatically NOTE You can discontinue the warming process by pressing the cancel button 4 An audible signal indicates the completion of the warming cycle The toaster will then switch off automatically 5 To remove the warming...

Page 8: ...m the use of this product or arising out of any breach of contract or breach of this warranty are not recoverable under this warranty Some states do not allow the exclusion or limitation of incidental or consequential damage so the above limitation may not apply to you How do you get service If repairs become necessary see contact information below U S Residents Please contact our toll free hotlin...

Page 9: ...n à proximité de matériaux combustibles 12 La zone autour des fentes deviendra chaude pendant l utilisation Ne touchez pas ces surfaces pendant l utilisation 13 Ne permettez pas aux fentes d être recouvertes pendant l utilisation 14 Ne faites pas griller des articles ayant du beurre ou de la confiture et n essayez pas de faire griller votre sandwich cela pourrait provoquer un incendie 15 N utilise...

Page 10: ... peut être insérée que d une seule façon dans une prise murale Si elle ne s insère complètement dans un sens ou dans l autre contactez un électricien qualifié pour faire remplacer la prise obsolète N essayez en aucun cas d en modifier les branches INSTRUCTIONS SPÉCIALES POUR LE CORDON ÉLECTRIQUE CONSERVEZ CES INSTRUCTIONS AVANT LA PREMIÈRE UTILISATION Placez la boîte sur une grande surface plate e...

Page 11: ...OUTON DE LA GRILLE DE RÉCHAUD C BOUTON D ANNULATION D COMMANDE DE BRUNISSEMENT E PLATEAU RAMASSE MIETTES AMOVIBLE F RANGEMENT DU CORDON REMARQUE Les pièces sont les mêmes pour les modèles à 2 tranches et à 4 tranches VOTRE GRILLE PAIN A B C D E F ...

Page 12: ...et de choisir la couleur de votre pain grillé selon votre goût particulier 4 PLATEAU RAMASSE MIETTES AMOVIBLE Permet un nettoyage rapide et sans effort 5 PIÈCES DÉTACHABLES Permettent un nettoyage facile et pratique 6 CHARIOT D ÉLÉVATION ET D ABAISSEMENT Le chariot élève ou abaisse votre aliment 7 GRILLE DE RÉCHAUD La grille de réchaud amovible permet de réchauffer des croissants des muffins des b...

Page 13: ...ches minces grillent plus rapidement que les tranches épaisses Il faut donc régler le niveau de brunissement en conséquence 10 Pour de meilleurs résultats veillez à ce que les tranches de pain soient uniformes en épaisseur fraîcheur et taille 11 Afin d obtenir un brunissement uniforme nous vous recommandons d attendre un minimum de 30 secondes entre chaque cycle d utilisation afin que la commande ...

Page 14: ...e réchaud en utilisant des gants de cuisine si la grille n a toujours pas refroidi UTILISATION DE LA GRILLE DE RÉCHAUD NETTOYAGE DU GRILLE PAIN ATTENTION Vérifiez que votre appareil est bien débranché et refroidi avant d essayer de le nettoyer Pour vous protéger des électrocutions ne plongez pas le cordon la fiche ou l appareil dans l eau ou dans un autre liquide Nettoyage de l extérieur 1 L extér...

Page 15: ...tie Certains états ou provinces n autorisent pas l exclusion ou la limitation des dommages intérêts directs ou indirects Par conséquent la limitation ci dessus peut ne pas s appliquer à vous Comment faire réparer l appareil Si des réparations s avèrent nécessaires consultez les informations ci dessous Résidents des États Unis Veuillez appeler notre ligne d assistance sans frais au 1 800 322 3848 o...

Page 16: ...parato apáguelo OFF y desenchúfelo de la pared 11 No coloque el horno tostador cerca de materiales combustibles 12 La zona alrededor de las ranuras del tostador alcanza mucha temperatura durante el uso No toque estas superficies mientras el aparato está en funcionamiento 13 Tenga cuidado de que las ranuras del tostador no queden cubiertas durante el funcionamiento 14 No tueste alimentos con manteq...

Page 17: ...ambién debe tener tres conductores uno de los cuales debe servir de conexión a tierra Por razones de seguridad este artefacto tiene un enchufe con patas de polaridad diferenciada una es más ancha que la otra que se puede introducir en una sola posición en un tomacorriente de polaridad diferenciada Si hubieran dificultades para introducirlo totalmente en el tomacorriente llamar a un electricista pr...

Page 18: ...S B BOTÓN PARRILLA EXTRAÍBLE C BOTÓN ANULAR D CONTROL DE TOSTADO E BANDEJA RECOGEMIGAS EXTRAÍBLE F ALOJAMIENTO PARA GUARDAR EL CABLE NOTA Las piezas son idénticas para los modelos de 2 y 4 rebanadas 18 DETALLES DEL TOSTADOR FIGURA 1 A B E C D F ...

Page 19: ...onar el grado de tostado que prefiera 4 BANDEJA RECOGEMIGAS EXTRAÍBLE Para una limpieza fácil y sin esfuerzo 5 PIEZAS DESMONTABLES Para una limpieza fácil y práctica 6 CARRO PARA SUBIR O BAJAR ALIMENTOS El carro subirá o bajará automáticamente los alimentos 7 PARRILLA PARA CALENTAR ALIMENTOS Esta parrilla extraíble sirve para calentar croissants muffins ingleses panes bagels o mantener calientes l...

Page 20: ... mismo tipo grosor y tamaño 11 Para que el pan se tueste de manera homogénea antes de introducir una rebanada nueva le recomendamos esperar unos 30 segundos entre uso y uso para que el control de tostado se reajuste automáticamente CÓMO UTILIZAR EL TOSTADOR 1 Ponga el control de tostado en la posición que desee Seleccione un nivel bajo para tostar ligeramente o para tostar rebanadas finas o pan se...

Page 21: ...ruebe que esté desenchufado y se haya enfriado Para evitar el peligro de descargas eléctricas no sumerja el cable el enchufe ni el aparato en agua ni ningún otro líquido Limpieza de la parte Exterior 1 Puede limpiar la parte exterior del tostador con un paño suave y húmedo y luego secarlo bien No utilice detergentes abrasivos para limpiar la superficie exterior del tostador porque podría rayar la ...

Page 22: ... y condiciones que hacen válida la garantía En algunos estados no se permiten exclusiones ni limitaciones de los perjuicios reconocidos por una garantía por lo cual las limitaciones mencionadas podrían ser no válidas en su caso particular Obtención de servicios de garantía Si las reparaciones son necesarias vea la información de contacto que aparece a continuación Residentes de los Estados Unidos ...

Page 23: ...compaña Cuando el producto hubiese sido alterado o reparado por personas no autorizadas por el fabricante nacional importador o comercializador responsable respectivo Para hacer efectiva la garantía o si se necesitan reparaciones o refacciones componentes combustibles y accesorios llame con su garantía sellada por el establecimiento al Centro Nacional de Servicio para proporcionarle una cuenta de ...

Page 24: ...to alle fessure del tostapane si riscalda durante l uso Non toccare queste superfici durante il funzionamento 13 Evitare che le fessure di riscaldamento siano coperte durante il funzionamento 14 Non tostare alimenti spalmati di burro o marmellata e non tostare i sandwich per evitare il rischio d incendio 15 Non mettere in funzione il tostapane se il cassettino raccoglibriciole non è posizionato in...

Page 25: ... spina polarizzata con un polo più grande dell altro Per ridurre il pericolo di scosse elettriche questo tipo di spina si adatta ad una presa polarizzata solamente in un modo per cui non è possibile sbagliare Se la spina non entra nella presa contattare un elettricista qualificato Non tentate in nessun modo di modificare la spina ISTRUZIONI CORTE DEL CAVO PRIMA DELL USO Posizionare la confezione s...

Page 26: ...ER RISCALDARE C PULSANTE PER ANNULLARE D CONTROLLO DELLA TOSTATURA E RACCOGLIBRICIOLE ESTRAIBILE F ALLOGGIAMENTO CAVO NOTA Le parti sono le stesse sia per il modello a 2 fette sia per il modello a 4 fette CARATTERISTICHE DEL TOSTAPANE Illustrazione 1 A B E F D C ...

Page 27: ...regolare il grado di tostatura in base alle proprie preferenze 4 CASSETTINO RACCOGLIBRICIOLE RIMOVIBILE Per una pulizia facile e veloce 5 PARTI RIMOVIBILI Per una pulizia facile e pratica 6 CARRELLO PER SOLLEVAREE ABBASSARE IL CIBO Il carrello solleva o abbassa automaticamente il cibo 7 GRIGLIA PER RISCALDARE La griglia rimovibile consente di scaldare croissant muffin focaccine oppure di mantenere...

Page 28: ...i migliori assicurarsi che le fette di pane abbiamo spessore freschezza e dimensioni simili 11 Per ottenere una tostatura uniforme si consiglia di attendere almeno 30 secondi tra un ciclo di tostatura e l altro perché il controllo della tostatura abbia nuovamente le impostazioni iniziali FUNZIONAMENTO DEL TOSTAPANE 1 Spostare il controllo della tostatura sull impostazione desiderata Per una tostat...

Page 29: ...odomestico abbia la spina staccata e sia ormai freddo prima di iniziare a pulirlo Per evitare il rischio di scosse elettriche non immergere il cavo la spina o l unità in acqua o altri liquidi Pulizia della parte esterna 1 Per pulire l esterno del tostapane strofinare la superficie con un panno morbido inumidito di acqua poi asciugare accuratamente Per pulire l esterno del tostapane non utilizzare ...

Page 30: ...coperti da quest ultima Alcune giurisdizioni non consentono l esclusione o la limitazione di danni incidentali o consequenziali in tal caso le limitazioni o esclusioni di cui sopra non saranno applicabili Come ottenere servizi di assistenza Nel caso occorra fare delle riparazioni rivolgersi al servizio informazioni Residenti negli USA Contattare il servizio di assistenza telefonica gratuito al num...

Page 31: ...Series DTT900 980 Serie DTT900 980 Made in PRC Fabriqué en RPC Fabricado en la RPC Fabbricato nella RPC Power Requirement 120 Volts 60 Hz Caractéristiques électriques 120 Volts 60 Hz Alimentación eléctrica 120 Voltios 60 Hz Per uso con corrente 120 Volt 60 Hz De Longhi 2004 Centro Nacional de Servicio Fiducia Italiana S A de C V Hortencia 129 Col Florida México D F C P 01030 01 800 711 88 05 lada ...

Reviews: