background image

GR

•  Βεβαιωθείτε ότι η μονάδα έχει αποσυνδεθεί από την τροφοδοσία και είναι άδεια.
•  Για να αφαιρέσετε την πόρτα, πρέπει να γείρετε τη μονάδα προς τα πίσω. Θα πρέπει 

να ακουμπήσετε τη μονάδα επάνω σε κάτι σταθερό, π.χ. μια καρέκλα ακριβώς κάτω 

από το επάνω πλαίσιο.

•  Όλα τα μέρη που αφαιρούνται πρέπει να φυλάσσονται για την επανατοποθέτηση της 

πόρτας. 

•  Μην ξαπλώνετε επίπεδη τη μονάδα καθώς με αυτόν τον τρόπο μπορεί να προκληθεί 

βλάβη στο ψυκτικό σύστημα.

•  Συνιστάται να αναλάβουν 2 άτομα το χειρισμό της μονάδας κατά τη συναρμολόγησή 

της.

•  Εάν θέλετε η πόρτα να ανοίγει προς την αντίθετη πλευρά, συνιστάται να 

επικοινωνήσετε με έναν εξειδικευμένο τεχνικό. Θα πρέπει να επιχειρήσετε να αλλάξετε 

τη φορά της πόρτας μόνοι σας, εάν θεωρείτε ότι έχετε την ικανότητα να το κάνετε.

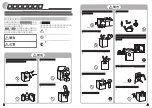
αλλαγη φορας πορτας

απαιτούμενα εργαλεία:

 Κατσαβίδι τύπου Philips / Κατσαβίδι με επίπεδη λάμα / Εξαγωνικό 

κλειδί σύσφιγξης

1.  Αφαιρέστε όλα τα ράφια της πόρτας του 

ψυγείου από την επάνω πόρτα. Αφαιρέστε 

το επάνω κάλυμμα, το κάλυμμα της επάνω 

γωνίας και το συγκρατητήρα στην επάνω 

γωνία της πόρτας.

2.  Αφαιρέστε το κάλυμμα του επάνω 

μεντεσέ, τις βίδες και τον επάνω μεντεσέ. 

Ανασηκώστε την επάνω πόρτα και 

τοποθετήστε την σε μια επενδυμένη 

επιφάνεια ώστε να αποφευχθεί η 

πρόκληση αμυχών.

3.  Αφαιρέστε το στοπ από το κάτω μέρος της 

επάνω πόρτας και μετακινήστε το στην 

αντίθετη πλευρά. Βιδώστε σφιχτά. Αφαιρέστε 

και το συγκρατητήρα της επάνω πόρτας. Για 

την αντίθετη πλευρά, χρησιμοποιήστε άλλο 

συγκρατητήρα και βιδώστε τον σφιχτά.

Το κάλυμμα της επάνω γωνίας 

έχει αριστερή και δεξιά πλευρά. Τα 

γράμματα “L” και “R” στο πίσω μέρος 

βοηθούν για να ξεχωρίζετε σε ποια 

πλευρά ανήκει. Το κάλυμμα της επάνω 

γωνίας που είναι συσκευασμένο ως 

εξάρτημα είναι για τη δεξιά πλευρά.


Το κάλυμμα του επάνω μεντεσέ 

έχει αριστερή και δεξιά πλευρά. Το 

κάλυμμα του επάνω μεντεσέ που είναι 

συσκευασμένο ως εξάρτημα είναι για 

την αριστερή πλευρά.


22

εγκατασταση

DFC60W_X16_IB_2L_160407_grace.indb   22

7/4/16   6:19 pm

Summary of Contents for DFC60W16

Page 1: ...DFC60W16 DFC60X16 installation instructions manual Frost Free 60cm 60cm Frost Free Fridge Freezer GB GR DFC60W_X16_IB_2L_160407_grace indb 1 7 4 16 6 19 pm...

Page 2: ...ching on your unit 15 super freeze mode 15 holiday mode 15 noises inside the unit 16 tips for keeping food in the unit 16 preparations for freezing 16 defrosting frozen food 17 cleaning the interior a...

Page 3: ...6 20 21 21 21 21 21 22 25 25 26 26 27 27 27 27 28 28 28 29 29 30 LED 30 30 30 30 30 30 31 GR DFC60W_X16_IB_2L_160407_grace indb 3 7 4 16 6 19 pm...

Page 4: ...t be replaced by the manufacturer its service agent or a qualified technician in order to avoid a hazard Choose a location for your unit away from heat sources such as radiators or fires as refrigeran...

Page 5: ...they are of the type recommended by the manufacturer Do not damage the refrigerant circuit The refrigerant is a very environmental friendly gas but is also combustible Take care when transporting or...

Page 6: ...6 GR bed breakfast 2 8 DFC60W_X16_IB_2L_160407_grace indb 6 7 4 16 6 19 pm...

Page 7: ...7 DFC60W_X16_IB_2L_160407_grace indb 7 7 4 16 6 19 pm...

Page 8: ...eatures it offers Read all the safety instructions carefully before use and keep this installation instruction manual for future reference The Main Unit Salad Bin Cover Shelf Upper Left Hinge Cover Wi...

Page 9: ...this adjust the two levelling feet at the front of the unit If the unit is not level the doors and magnetic seal alignments will not be covered properly free space requirements When installing the un...

Page 10: ...from the upper door Remove the upper cover upper corner cover and upper door corner block 2 Remove the upper hinge cover screws and upper hinge Lift the upper door and place it on a padded surface to...

Page 11: ...door and move them to the opposite side Screw tightly 6 Lay down the unit Remove both levelling feet levelling feet fix board and bottom hinge 7 Swap the position of the levelling feet fix board with...

Page 12: ...th the middle hinge Reverse the middle hinge 10 Place the bottom hole of the lower door onto the bottom hinge pin Insert the middle hinge pin into the upper hole of the lower door Tighten the pin secu...

Page 13: ...4 hours to make sure it is working properly and to allow it time to fall to the correct temperature Your unit should not be overfilled Before Plugging in YOU MUST Check that you have a socket which is...

Page 14: ...unit Egg Tray Ice Tray Wine Rack Bottle Stopper Control Panel Fridge Glass Shelf Salad Bin Salad Bin Cover Shelf Fridge Door Shelf Freezer Drawer LED Light Freezer Glass Shelf DFC60W_X16_IB_2L_160407_...

Page 15: ...leave overnight The correct temperature for the fridge compartment should be at the recommended 0 8 C The correct temperature for the freezer compartment should be 18 C or lower super freeze mode Pres...

Page 16: ...defrost and enables you to control the quantity you need better Leave cooked food to cool completely Chill food before freezing if possible Consider how you will want to cook the food before freezing...

Page 17: ...freeze anything that has been defrosted unless you cook it again to kill off harmful bacteria Never re freeze defrosted shellfish Re seal packs properly after removing items This prevents drying or fr...

Page 18: ...pty all food and clean the appliance leaving the door ajar to prevent unpleasant smells condensation Condensation may appear on the outside of the unit This may be due to a change in room temperature...

Page 19: ...Storage Temperature Freezer 18 C Fridge 0 8 C average 4 C Energy Consumption 0 856 kWh 24 hours Energy consumption 312 kWh per year based on standard test results for 24 hours Actual energy consumpti...

Page 20: ...20 GR x 3 x 2 x 2 Instruction Manual x 2 x 4 x 4 x 2 DFC60W_X16_IB_2L_160407_grace indb 20 7 4 16 6 19 pm...

Page 21: ...GR 10 C 43 C Max 160 Y mm X mm 25 mm 50 mm 25 mm 160 21 DFC60W_X16_IB_2L_160407_grace indb 21 7 4 16 6 19 pm...

Page 22: ...GR 2 Philips 1 2 3 L R 22 DFC60W_X16_IB_2L_160407_grace indb 22 7 4 16 6 19 pm...

Page 23: ...GR 4 5 6 7 23 DFC60W_X16_IB_2L_160407_grace indb 23 7 4 16 6 19 pm...

Page 24: ...GR 8 9 10 11 24 DFC60W_X16_IB_2L_160407_grace indb 24 7 4 16 6 19 pm...

Page 25: ...GR 24 12 13 25 DFC60W_X16_IB_2L_160407_grace indb 25 7 4 16 6 19 pm...

Page 26: ...26 GR LED DFC60W_X16_IB_2L_160407_grace indb 26 7 4 16 6 19 pm...

Page 27: ...27 GR 1 2 2 8 C 16 24 C 3 3 3 4 24 5 0 8 C 18 C 3 3 26 3 15 C DFC60W_X16_IB_2L_160407_grace indb 27 7 4 16 6 19 pm...

Page 28: ...28 GR 3 DFC60W_X16_IB_2L_160407_grace indb 28 7 4 16 6 19 pm...

Page 29: ...29 GR 1 2 3 4 5 DFC60W_X16_IB_2L_160407_grace indb 29 7 4 16 6 19 pm...

Page 30: ...30 GR LED LED DFC60W_X16_IB_2L_160407_grace indb 30 7 4 16 6 19 pm...

Page 31: ...R DFC60W16 DFC60X16 7 x x 1850 x 595 x 725 mm 233 L 93 L SN N ST T 10 C 43 C 18 C 0 8 C 4 C 0 856 kWh 24 312 kWh 24 42 dB A 16 12 kg 24 220 240 V 0 8 A DFC60W_X16_IB_2L_160407_grace indb 31 7 4 16 6 1...

Page 32: ...ection and recycling of your waste equipment at the time of disposal will help conserve natural resources and ensure that it is recycled in a manner that protects human health and the environment For...

Reviews: