background image

GB

19

Pre p a r i n g   f o r   u s e

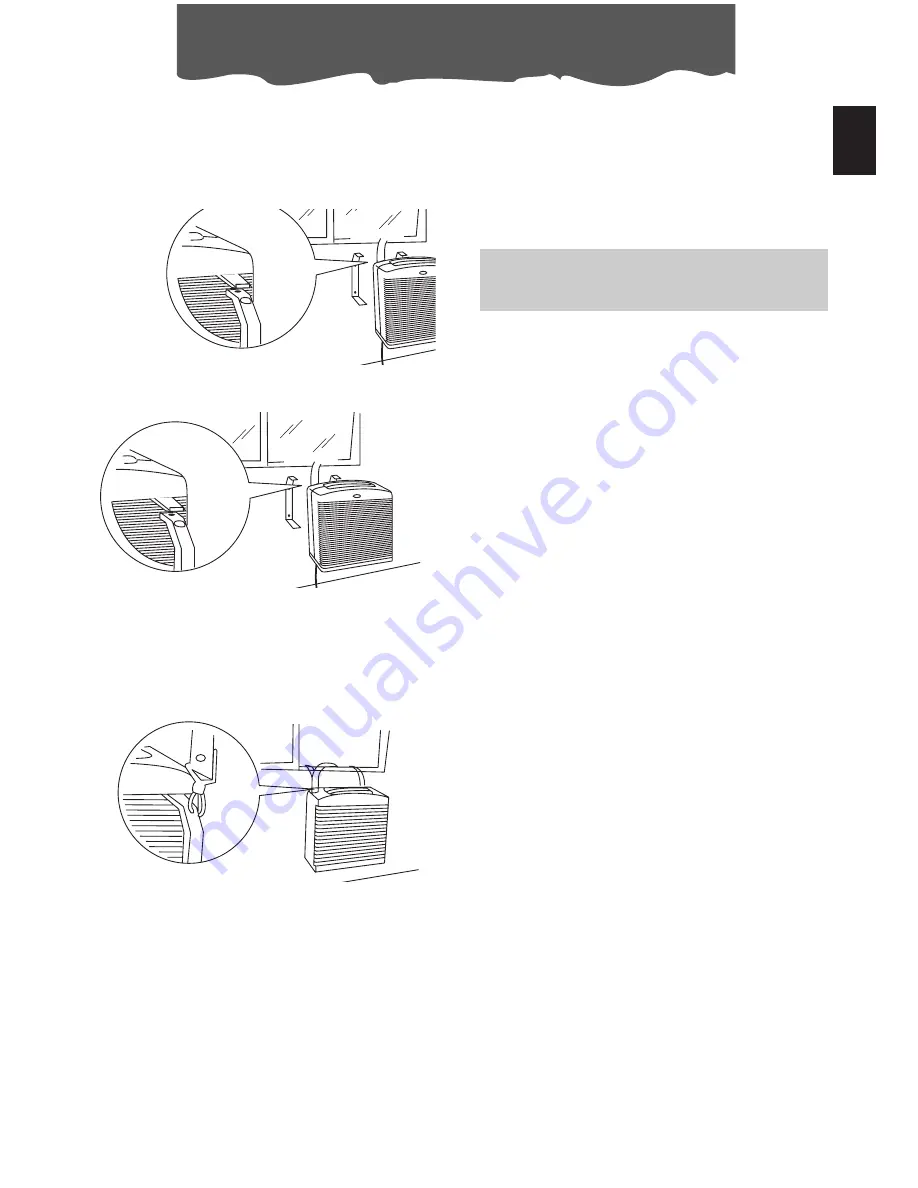
2)  The external unit can be hung on a wall

using the mounts supplied. In this case,
proceed as follows:

a) Fix the mounts to the wall, making sure

they are positioned as shown in the figure. 

b) Hook the external unit to the mounts and

fix with the screws provided.

3) Alternatively, to install temporarily, the

external unit can be hung as follows:

a) Attach the mounts to the external unit and

fix them using the screws provided. 

b) Attach the belts to the mounts.
c) Attach the other end of the belts securely.

The external unit can be installed on the
same level as the internal unit or higher, provi-
ded the difference in height does not exceed
1.5 m.

The air intake and outlet grilles of the external
unit must always be kept free. Condensate
forming during air conditioning (summer
mode) is eliminated through evaporation
from the external unit.

Important:

The external unit must be protected from
rain and bad weather.

In particular cases of exceptionally high humi-
dity, the condensate must be eliminated
using the condensate drain hose (after remo-
ving the rubber cap).

Summary of Contents for CF 1130

Page 1: ...f the appliance Clean the anti microbial filters at least once a week Avoid using heating appliances near the air conditioner Always transport the appliance upright or resting on one side Use the appl...

Page 2: ...he sheath by using the frame provided fig B B 6 c m 3 0 C Turn the appliance off and unplug from the mains Wait about 30 minutes before following the instructions below 1 Remove the screws and take of...

Page 3: ...TERNAL UNIT Install the internal unit in the room to be air conditioned It should usually be beneath a window or in any case near an outside wall The internal unit must be level The air intake and out...

Page 4: ...ded b Attach the belts to the mounts c Attach the other end of the belts securely The external unit can be installed on the same level as the internal unit or higher provi ded the difference in height...

Page 5: ...rogrammed operation increase temperature time button F Programmed operation decrease temperature time button G Display Displays the temperature values set and the programmed operating time H Timer in...

Page 6: ...en you need to cool and dehu midify the room To set operation of the appliance correctly press the E or F buttons until the desired temperature is displayed Then select the fan speed by pressing the F...

Page 7: ...A then select the requi red operating mode and other settings temperature fan speed etc Press the ON OFF button A again to place the appliance in standby mode Press the timer button D The timer light...

Page 8: ...ver on the rear of the remote control Replace the old batteries with two new LR03 AAA 1 5V batteries inserting them correctly see the instructions inside the battery compartment Replace the cover If t...

Page 9: ...blinds to make the appliance much more economical to run Never rest objects of any kind on the air conditioner Never obstruct the air intake or outlet gril les Make sure there are no heat sources in...

Page 10: ...tion The filter is housed in the intake grille To clean the filters extract as shown in figure Use a vacuum cleaner to remove the dust collected on the filter If it is very dirty immerse in warm water...

Page 11: ...ed the air conditioner is not powerful enough for the conditions or size of the room close the window eliminate the heat source clean or replace the filter clean or replace the filter Particular odour...

Page 12: ...tage see rating plate Max absorbed power during air conditioning Refrigerant Cooling capacity Internal unit dimensions width 480 mm height 840 mm depth 300 mm weight 44 kg External unit dimensions wid...

Reviews: